Drawing a face gets messy fast if you start with the eyes. The loomis method drawing fixes that by breaking the shape into simple guidelines you build before you touch a single facial feature.
Loomis method head works from any angle front, profile, tilted up or down because the guidelines move with the head instead of staying fixed to the page.
In this blog, learn the Loomis method step by step, see how to construct the Loomis method head, place facial features correctly, and avoid common mistakes.
What is the Loomis Method?
A popular technique for drawing the human head developed by Illustrator Andrew Loomis. The method simplifies the head into basic shapes and construction lines.
This makes proportions easier to understand. It also helps you draw faces from different angles with confidence.
Instead of guessing feature placement, you build the head step by step, a foundation that pairs naturally with this guide on how to draw person proportions for the rest of the body.
Used by many artists, The Loomis method head provides a strong foundation for realistic and well-balanced drawings.
Why Do Artists Use the Loomis Method?
The Loomis method gives artists a practical way to understand and draw the human head. Its structured approach helps develop stronger skills in portrait and character drawing.
- Builds a reliable head construction.
- Improves facial proportion and alignment.
- Makes perspective easier to understand.
- Helps you draw different head angles with more control.
- Works for both realistic and stylized portraits.
Loomis Method Step by Step
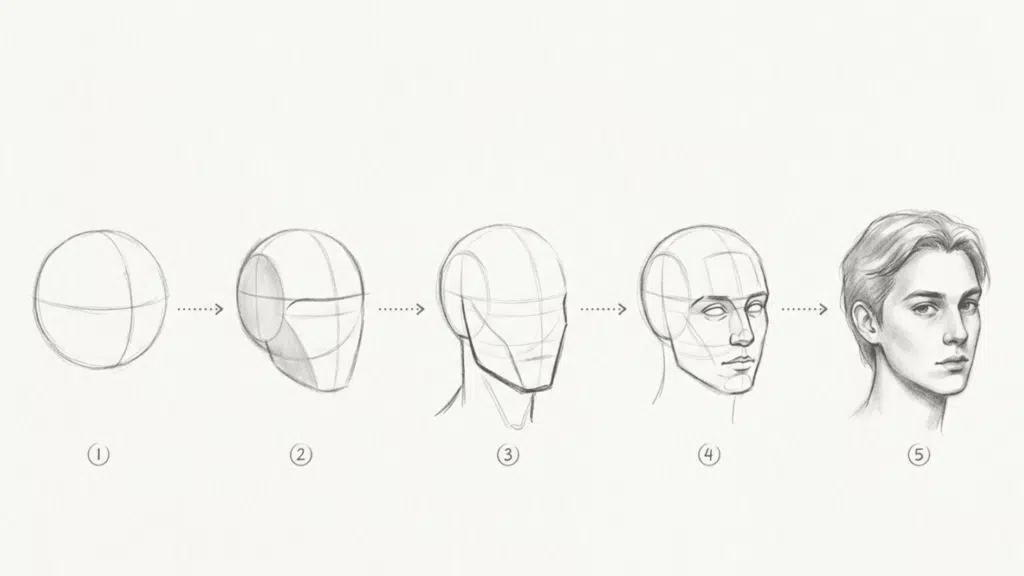
The Loomis method breaks the head into simple forms. This makes drawing faces easier and more accurate. Follow these steps to build a strong head structure before adding details.
Step 1: Draw the Basic Sphere
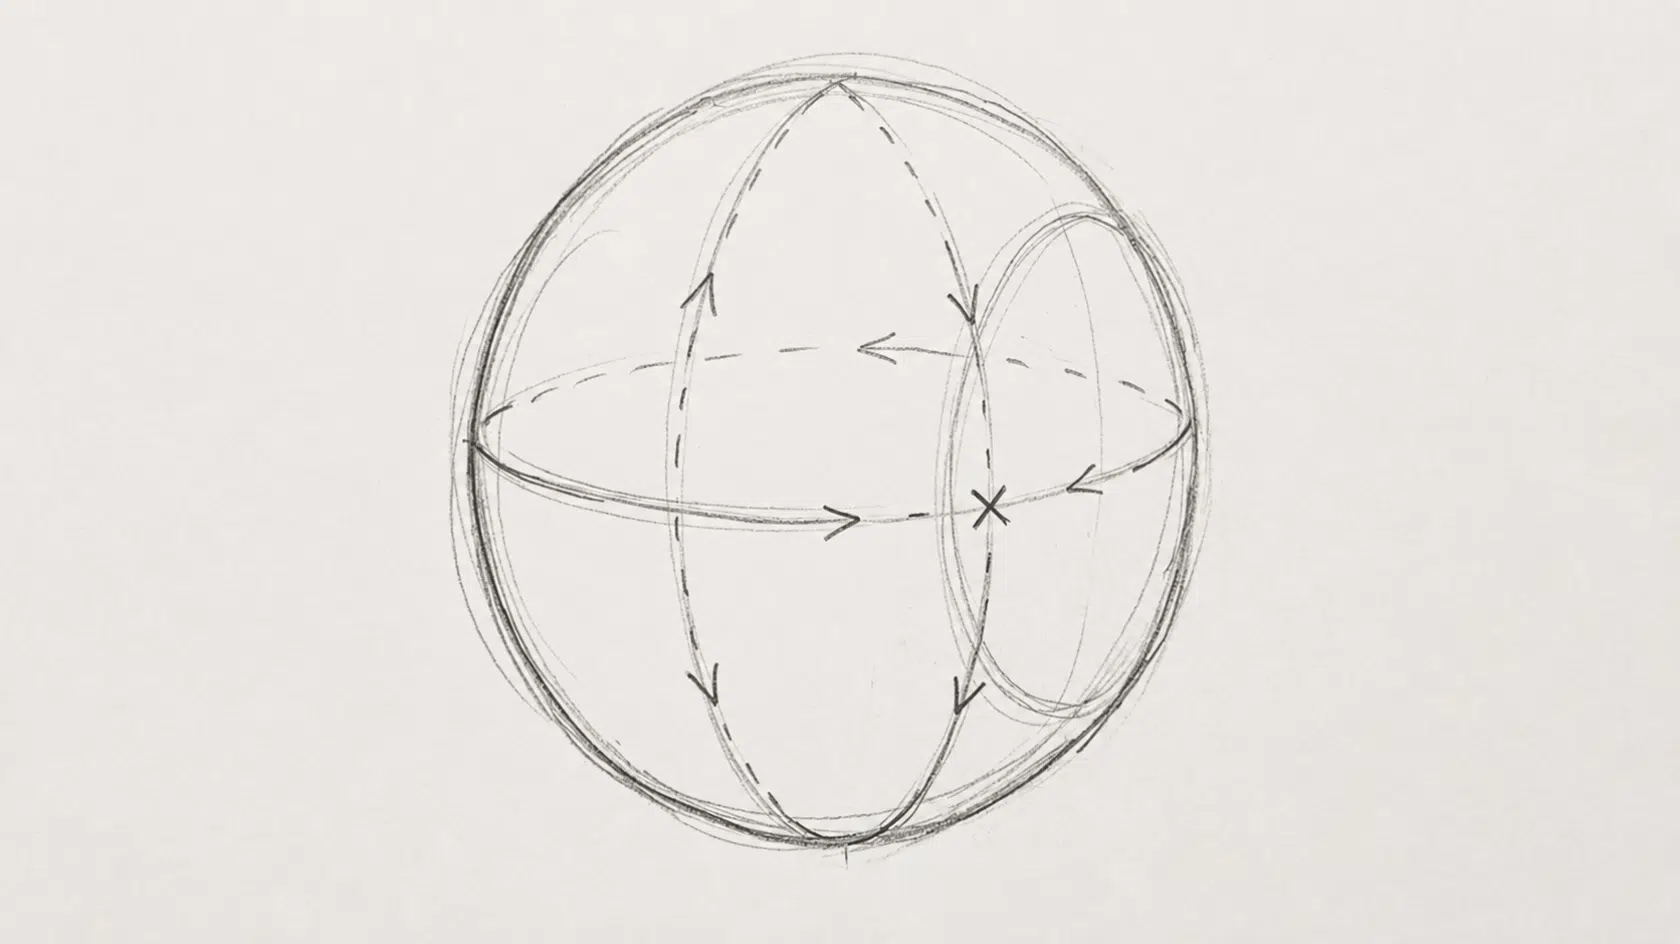
The first step in the Loomis method is drawing a simple sphere. This shape represents the main volume of the skull and creates the foundation for the entire head.
Keep your lines light and flexible so you can make changes easily. The sphere does not need to be perfect at first. Focus on creating a balanced form that shows the direction and angle of the head.
A strong base will make it easier to add guidelines, facial features, and accurate proportions in the following steps.
Step 2: Add the Side Planes
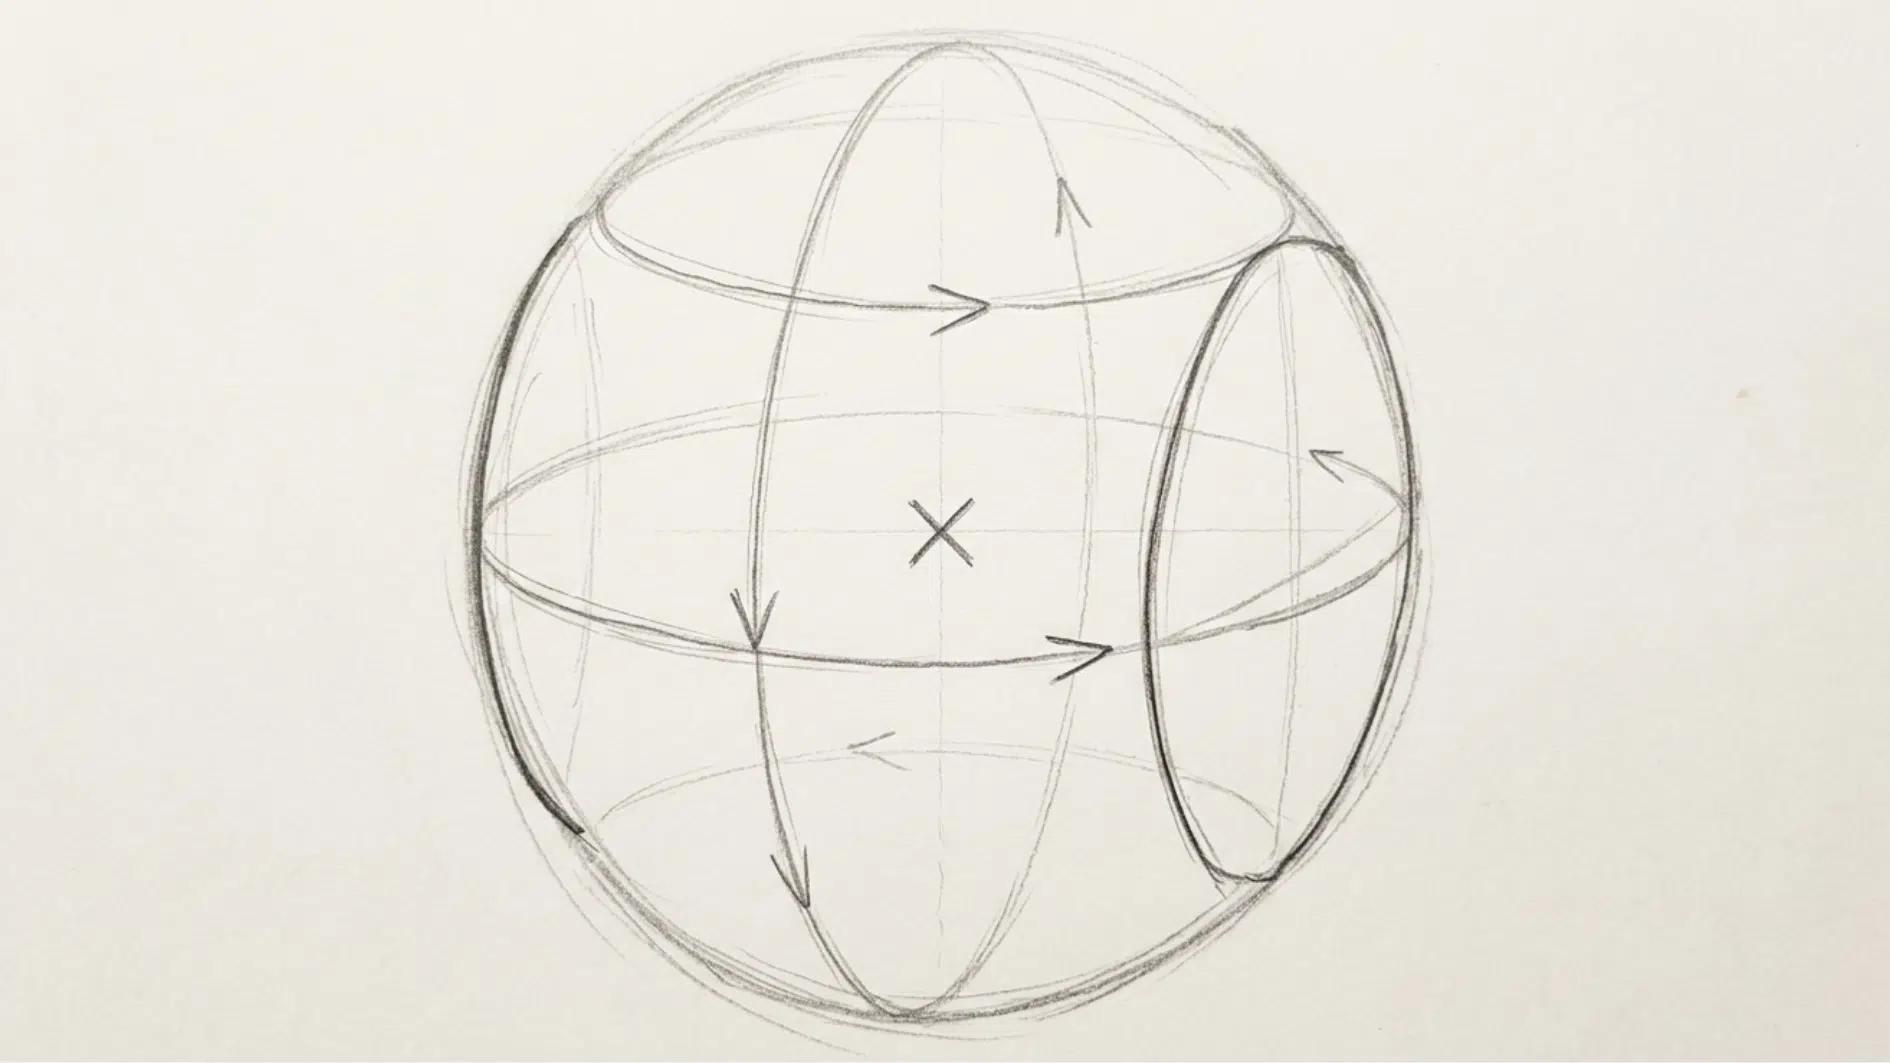
After creating the basic sphere, the next step is to define the side planes of the head. Remove small curved sections from both sides of the sphere to create a flatter structure.
These areas represent the sides of the skull and help give the head a three-dimensional appearance. This step is important because it adds depth and makes the head easier to position from different angles.
Keep the lines light and focus on creating a clear structure before moving on to facial guidelines. Keep the side planes consistent with the viewing angle.
They should look narrower when the head turns away from you, and more visible when the head faces a stronger side angle.
Step 3: Draw the Center Line
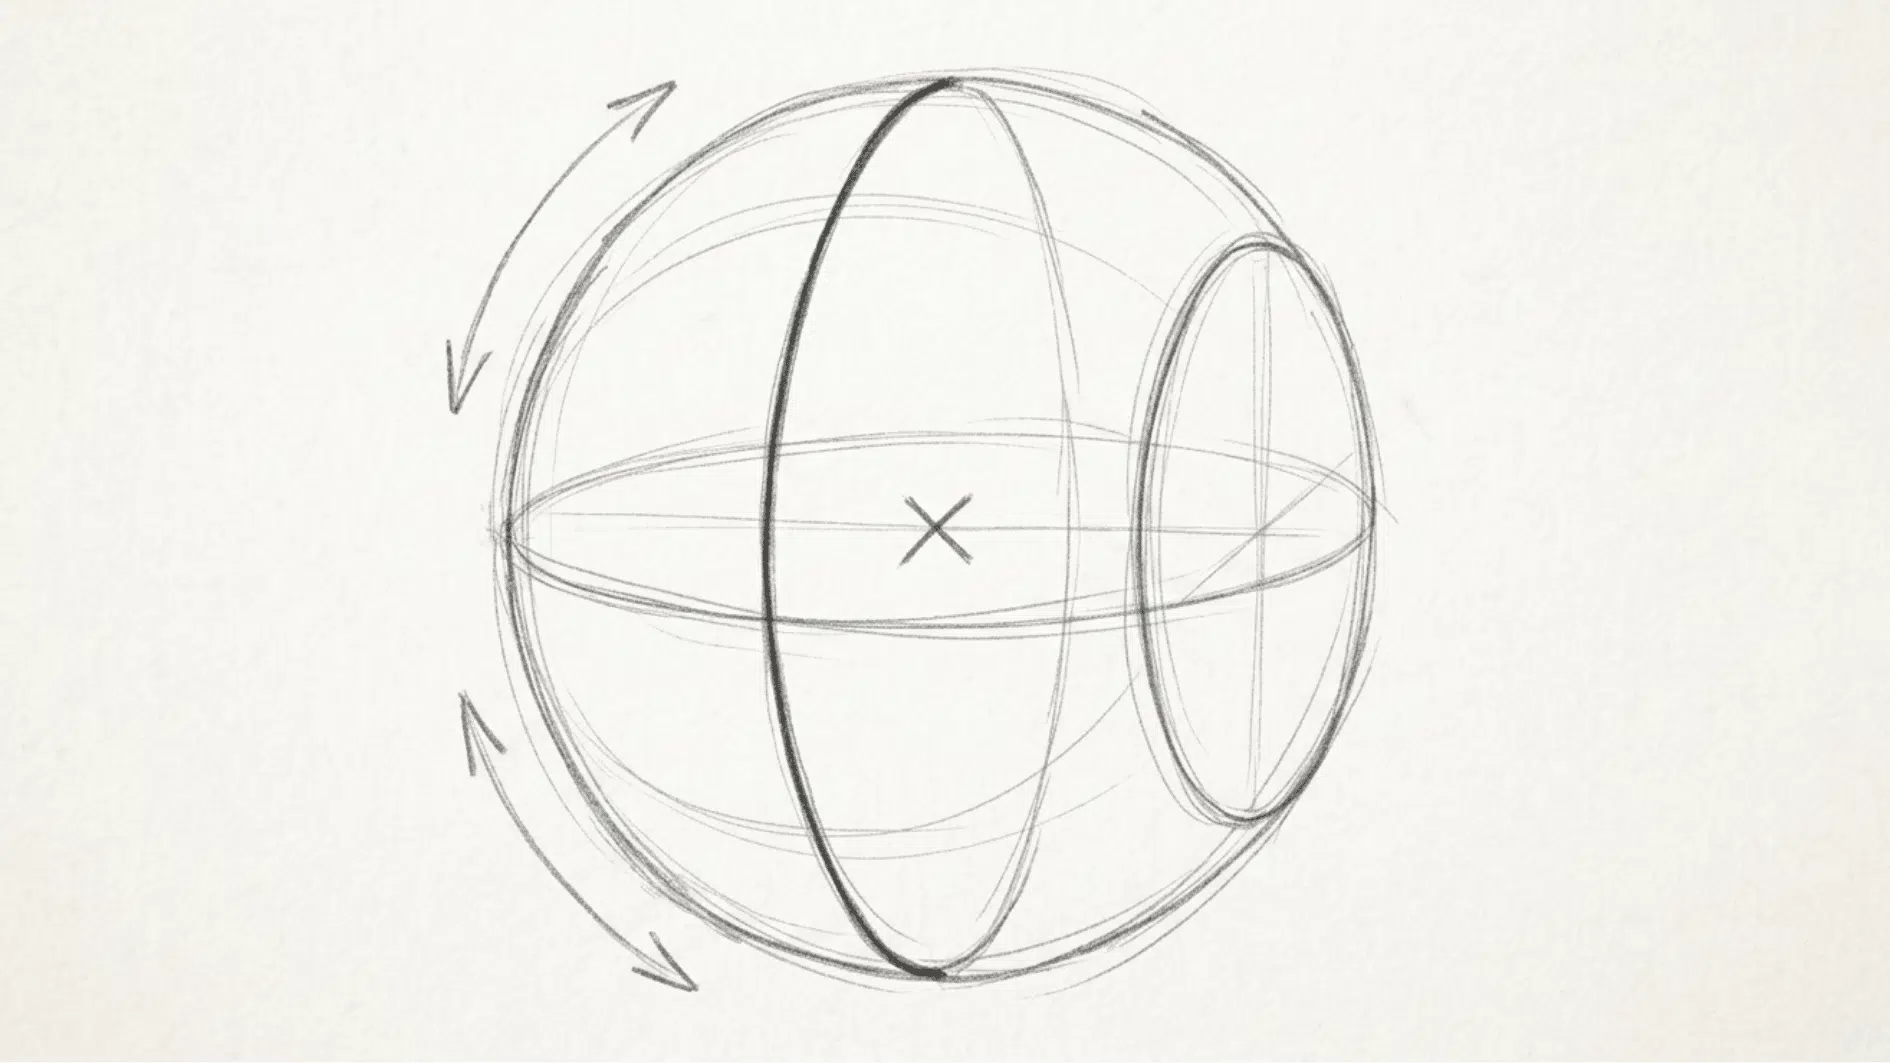
The center line helps show the direction the head is facing. Draw a curved vertical line across the sphere, following the shape of the head.
This guideline divides the face into two sections and helps keep facial features balanced. A straight line works for a front view, while a curved line works for turned or tilted poses.
This step makes it easier to place the eyes, nose, and mouth correctly later in the drawing process.
Step 4: Add the Brow Line
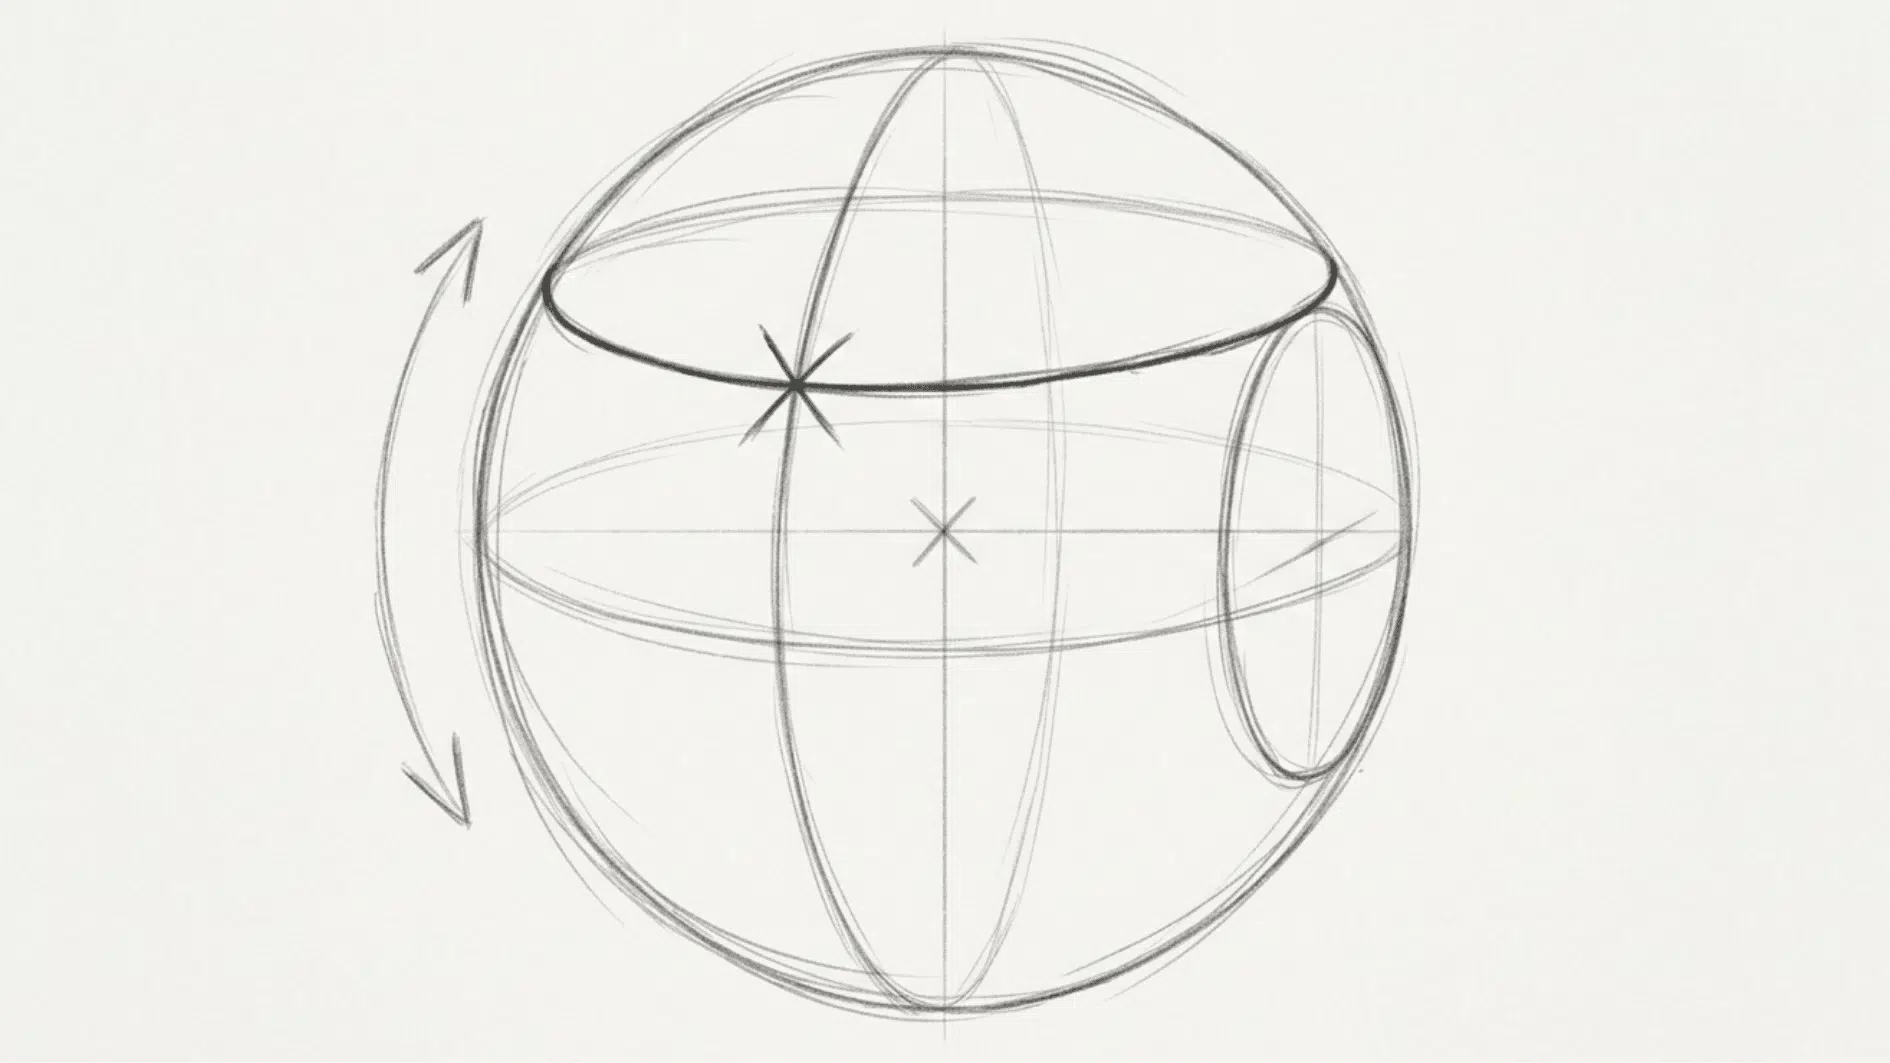
The brow line is an important guide for placing the main facial features. Draw a horizontal line around the sphere where the eyebrows and eye area will sit.
This line follows the curve of the head and shifts with the viewing angle, the same way the center line does. A correctly placed brow line improves alignment of the eyes, nose, and other features.
Take your time with this step, as it creates the structure needed for a more accurate and balanced head drawing.
Step 5: Build the Jaw and Chin
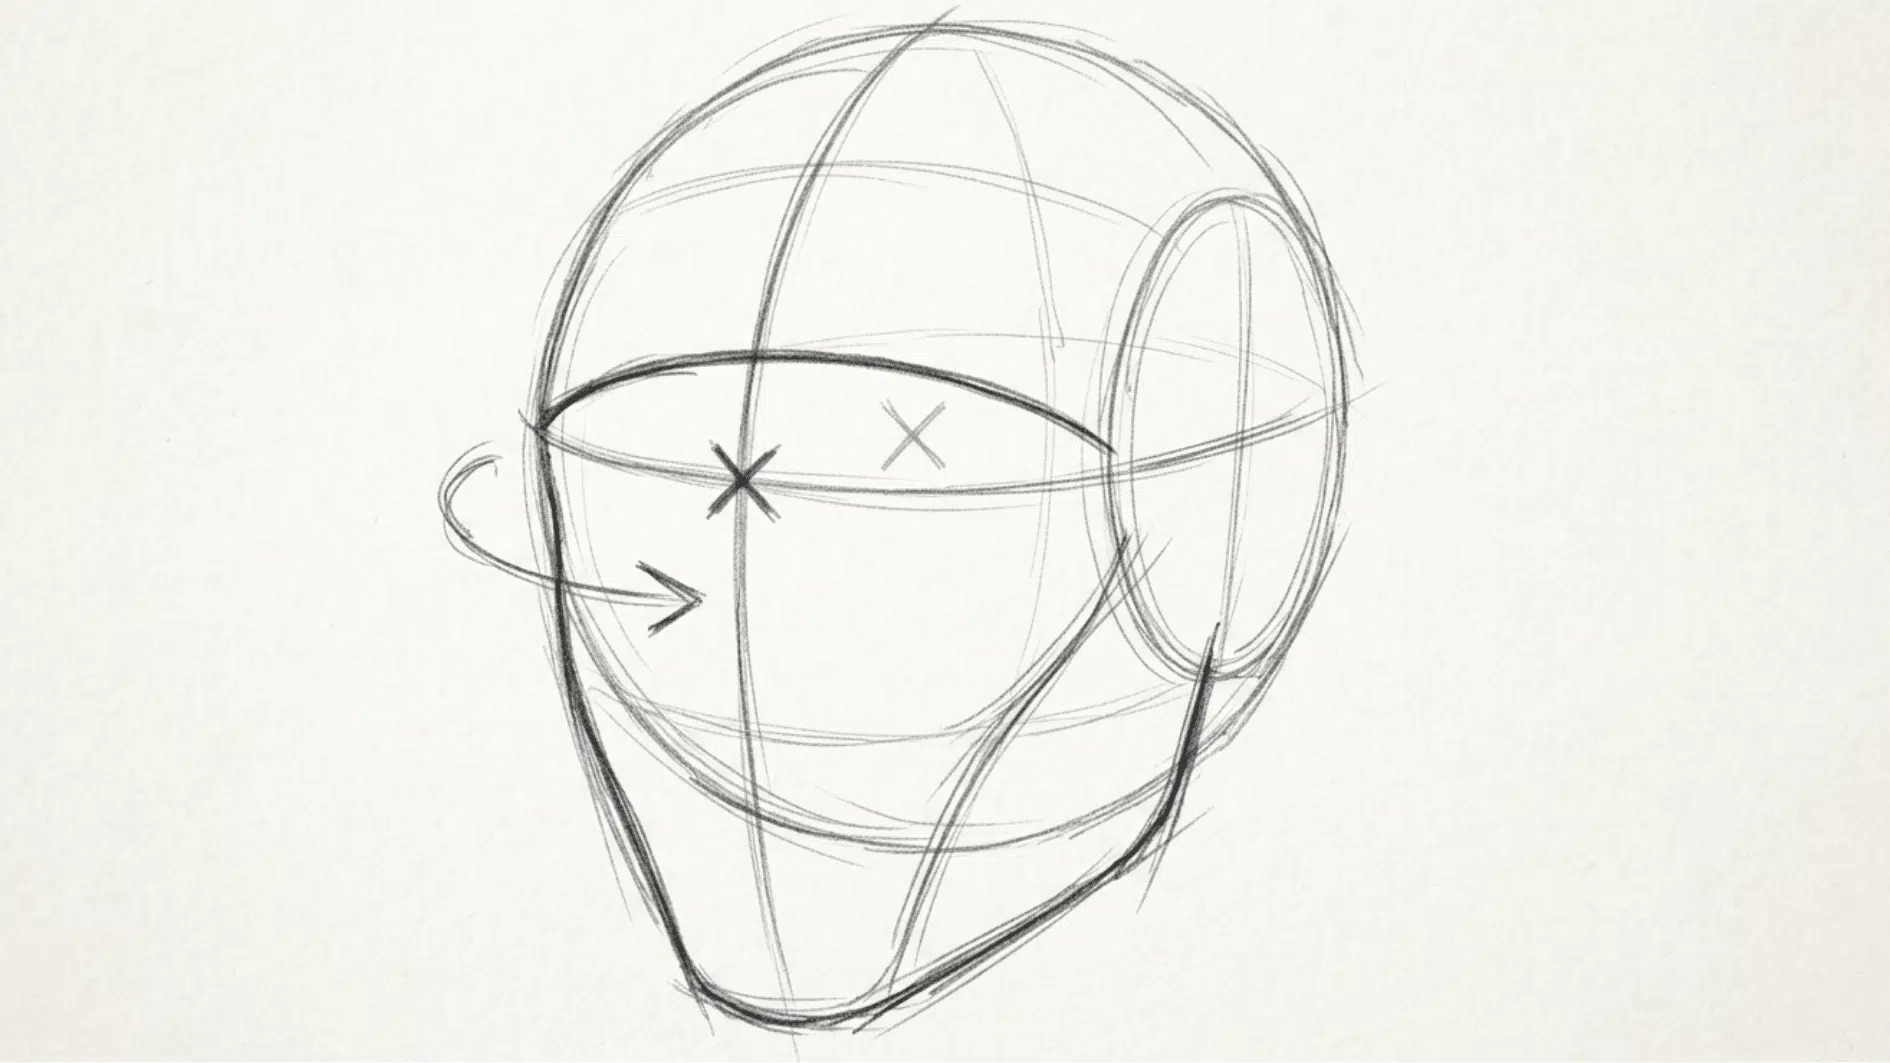
After creating the basic head structure, the next step is to add the jaw and chin. Extend lines downward from the sides of the sphere to create the cheek and jaw areas.
Then connect these lines to form the chin. The shape of the jaw can change depending on the person, age, and style of the character. Keep the structure simple at this stage.
Focus on creating a natural connection between the skull and face. A well-built jaw helps give the head a realistic shape and stronger perspective.
Step 6: Place the Facial Features
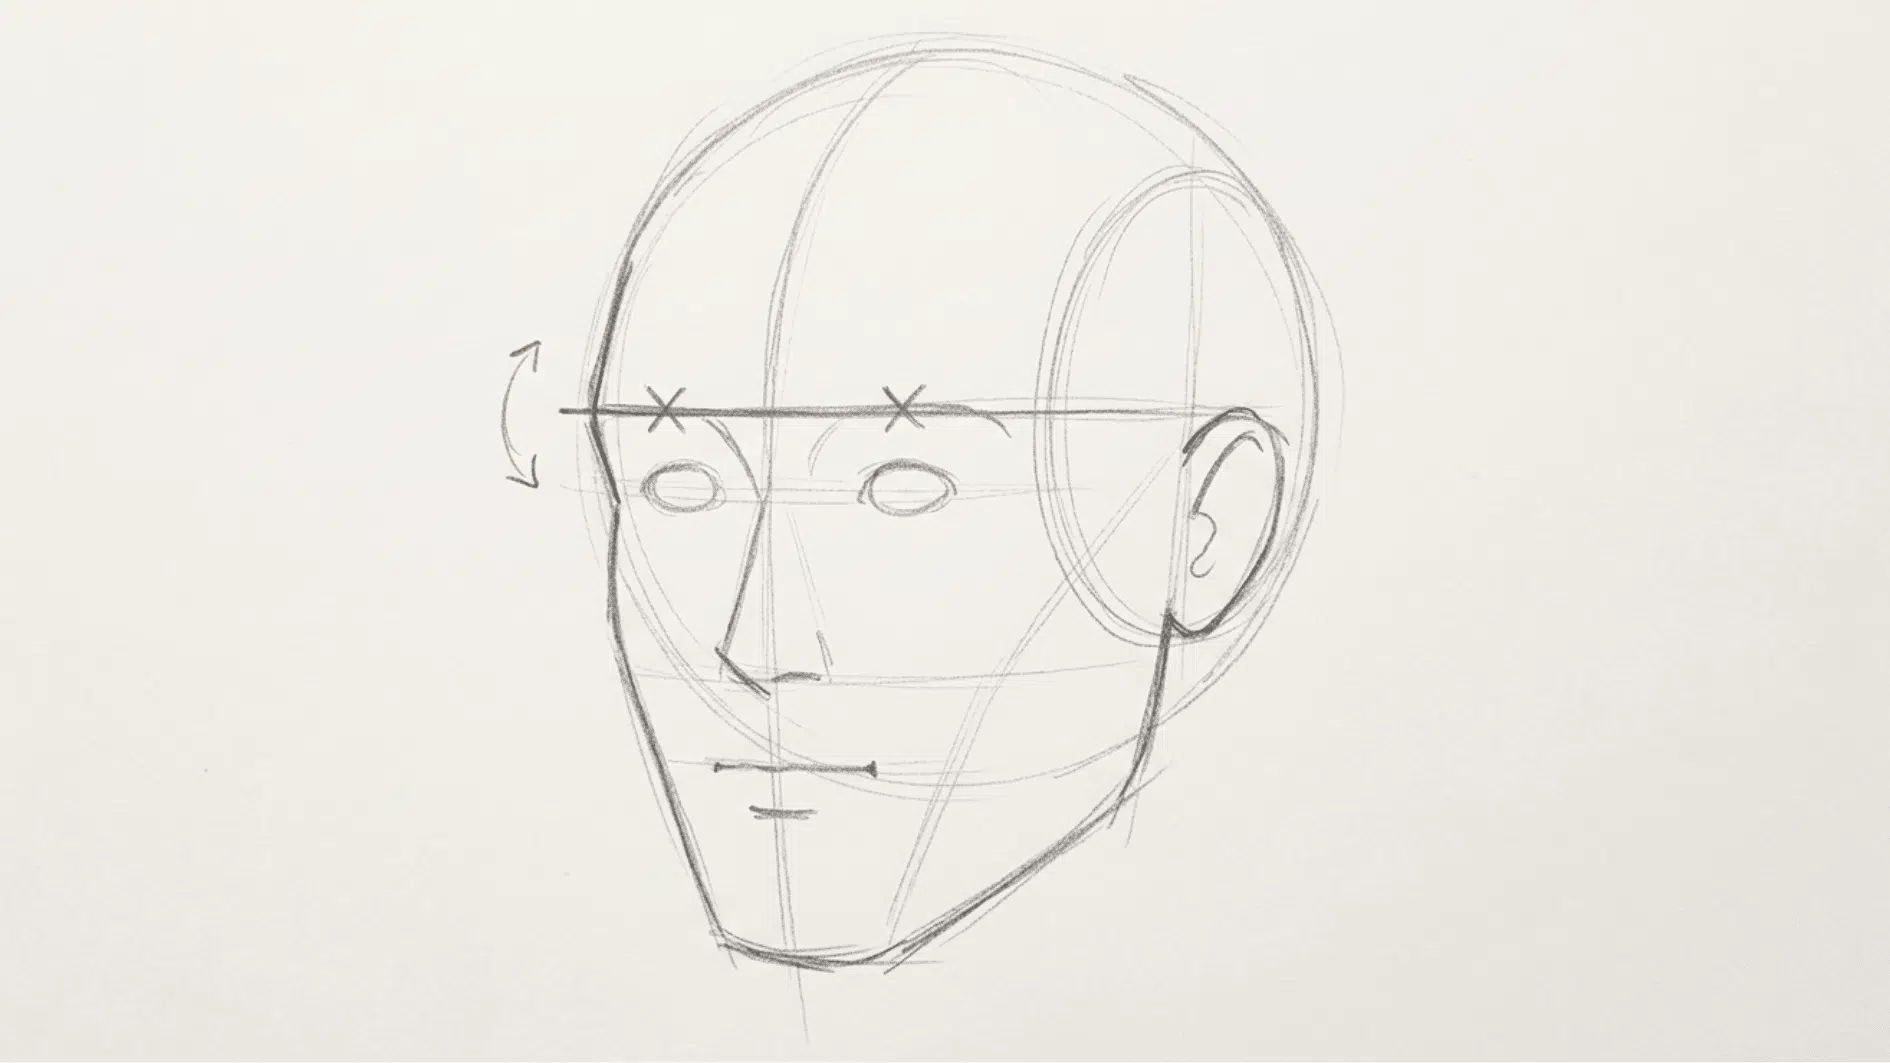
Once the head structure is complete, you can begin adding the facial features.
Use the guidelines to position the eyes, nose, mouth, and ears correctly, the same core skill covered in this anatomy drawing practice guide for keeping proportions consistent across a whole figure.
The eyes should sit along the brow line, while the nose follows the center line of the face. The mouth is placed between the nose and chin area.
Focus on spacing and alignment rather than adding details too quickly. Proper placement creates a balanced face and makes the portrait look more natural.
This step helps transform the basic Loomis head into a recognizable face.
Step 7: Refine the Drawing
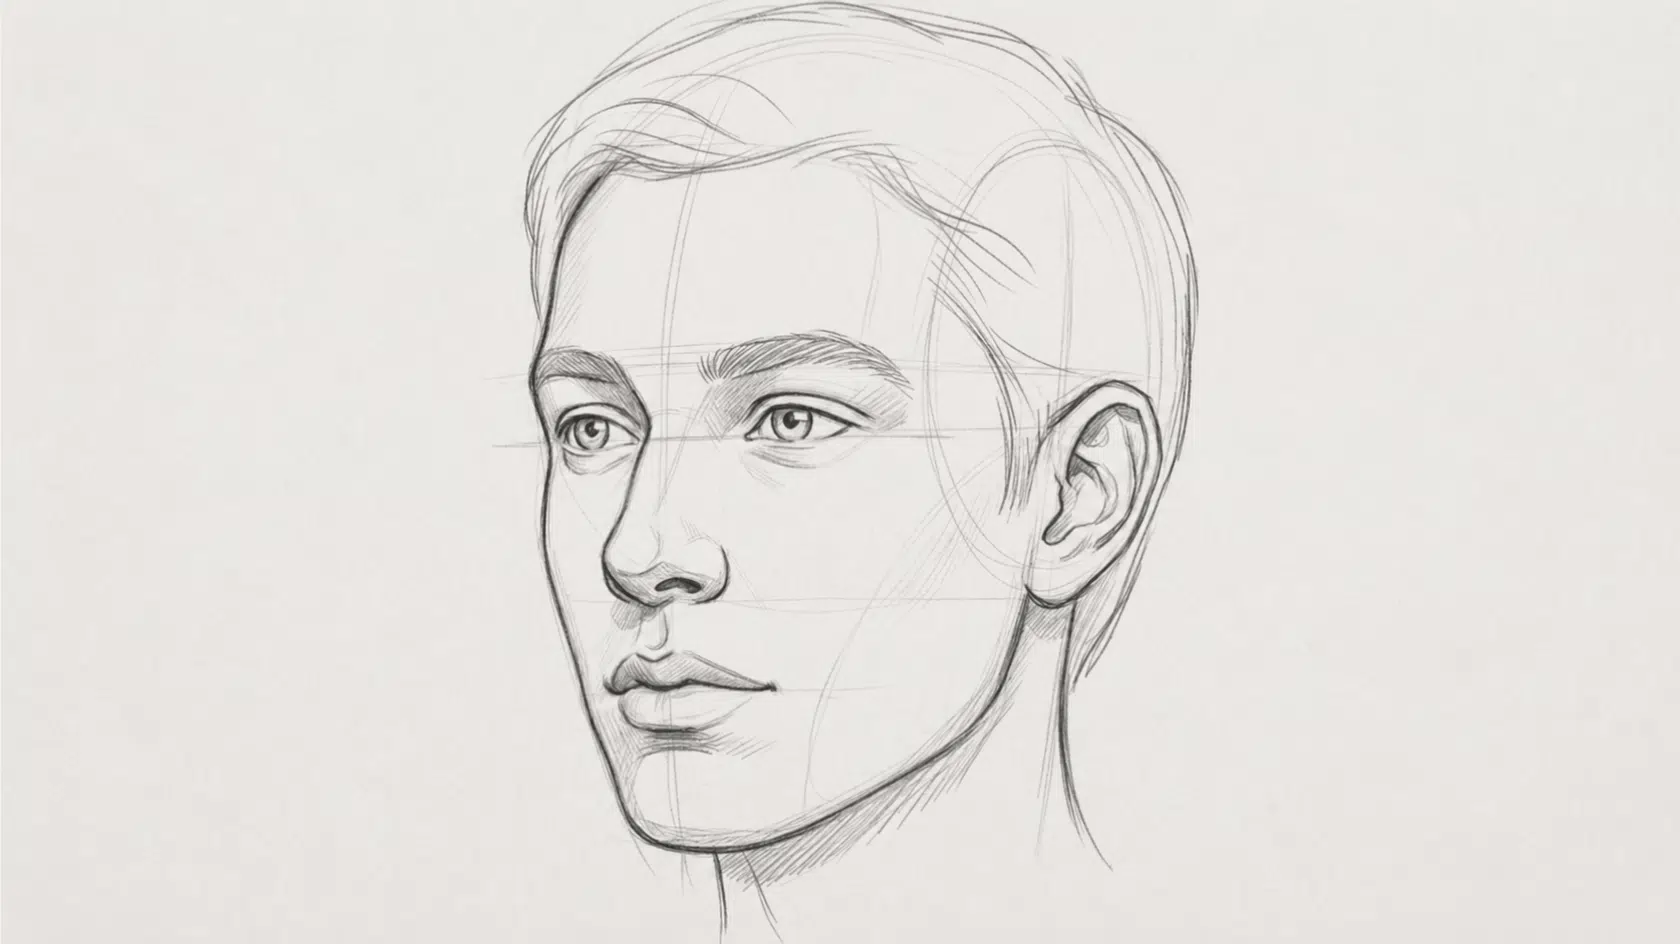
The final step is to refine the head and add important details. Start by reviewing the overall structure and adjusting any uneven proportions.
Clean up unnecessary construction lines while keeping the main guidelines that help with accuracy. Add details to the eyes, nose, lips, ears, and hair while maintaining the head’s original form.
Focus on light and shadow to create more depth and realism. This stage brings your Loomis method drawing together and helps turn a simple construction sketch into a complete portrait.
Quick check: before you erase your guidelines, confirm the center line still follows the curve of the sphere, and the eyes sit on the brow line. Fixing that now is easier than fixing it after the details are in.
Loomis Method Head Proportions
Learning head proportions is an important part of creating realistic portraits. The Loomis method provides a simple structure to place facial features correctly.
| Feature | General Placement |
|---|---|
| Eyes | Around the middle of the head |
| Brow | Across the upper facial area |
| Nose | Extends downward from the brow |
| Mouth | Between the nose and chin |
| Ears | Generally from the brow line to the bottom of the nose |
| Chin | Completes the lower facial structure |
Adjusting Proportions for Different Ages
Facial proportions naturally change as people grow, and the Loomis method can be adjusted to represent different age groups while maintaining the basic head structure.
- Children: Place the eye line below the head’s horizontal midpoint. A young child’s skull is rounder, and the eyes sit lower than an adult’s, so pushing the brow line down slightly reads as more natural.
- Teenagers: Start moving the eye line back up toward the adult position, but keep the jaw and cheek planes softer than a full adult structure.
- Adults: Use the standard proportions described above, with a more defined jaw and cheek plane than younger age groups.
- Elderly faces: Add a slight indentation at the temples and cheeks during the side-plane step, since bone structure becomes more visible with age.
Drawing the Loomis Head from Different Angles
One of the biggest advantages of the Loomis method is learning to draw the head from multiple views.
The same basic construction can be adjusted to create different perspectives; the exact set of views is broken down in this piece on drawing faces from angles.
| View Angle | What It Shows | Why It Matters |
|---|---|---|
| Front View | Face seen straight from the front. | Helps create symmetry and proper feature placement. |
| Side View | Head shown in profile. | Helps understand depth and facial structure. |
| Three-Quarter View | Shows both front and side of the face. | Creates more natural and dynamic portraits. |
| Looking Up | Head tilted upward with lower planes visible. | Helps place the chin, jaw, and nose correctly. |
| Looking Down | Head tilted downward with upper planes visible. | Helps adjust features according to perspective. |
Common Loomis Method Mistakes and How to Fix Them
Many beginners make small mistakes. These errors can affect proportions, perspective, and the overall structure of the head.
- Adding Details Too Early: Focusing on eyes, hair, or facial features before building the head structure can lead to inaccurate proportions. Detailed eyes or lips can’t fix a drawing if the head shape underneath is off.
- Ignoring Head Proportions: Incorrect placement of facial features can make the face look unbalanced and unnatural.
- Skipping Construction Lines: Avoiding guidelines makes it harder to understand facial alignment, angles, and the three-dimensional form of the head.
- Drawing Every Head the Same: Using identical measurements for every face can limit creativity and prevent realistic variations.
- Practicing Only One Angle: Drawing only front-facing views can make it difficult to understand perspective and head rotation.
- Using Dark Lines Too Soon: Heavy initial strokes make corrections harder to see and easier to skip, so mistakes end up carried into the final drawing instead of getting caught early.
The Bottom Line
The Loomis method is a powerful technique for learning how to draw realistic heads and faces. With Loomis method drawing, you can break the head into simple shapes to better understand structure, proportions, and perspective.
Whether you are a beginner or an experienced artist, practicing the Loomis method head can strengthen your portrait drawing skills.
Build the sphere, planes, and guidelines before you touch a single feature. Following the Loomis method step by step gives you a clear foundation, making it easier to place the eyes, nose, and mouth accurately.
Set old sketches next to new ones every few weeks. Compare your earlier drawings with newer ones to track progress, spot repeated mistakes, and see how your Loomis method drawing skills improve over time.
Frequently Asked Questions
What Are Some Other Commonly Used Drawing Methods?
Other common methods include the Reilly method (rhythm-based lines for structure) and the Bridgman method (using geometric blocks for anatomy).
Can the Loomis Method Be Used to Draw the Whole Body?
The Loomis method is designed for heads, though similar sphere-and-block construction ideas apply to full-body figure drawing with other systems.
Which Is Better, the Grid Method or The Loomis Method?
Neither is “better” outright: the grid method suits copying references accurately, while the Loomis method builds structural understanding from scratch.