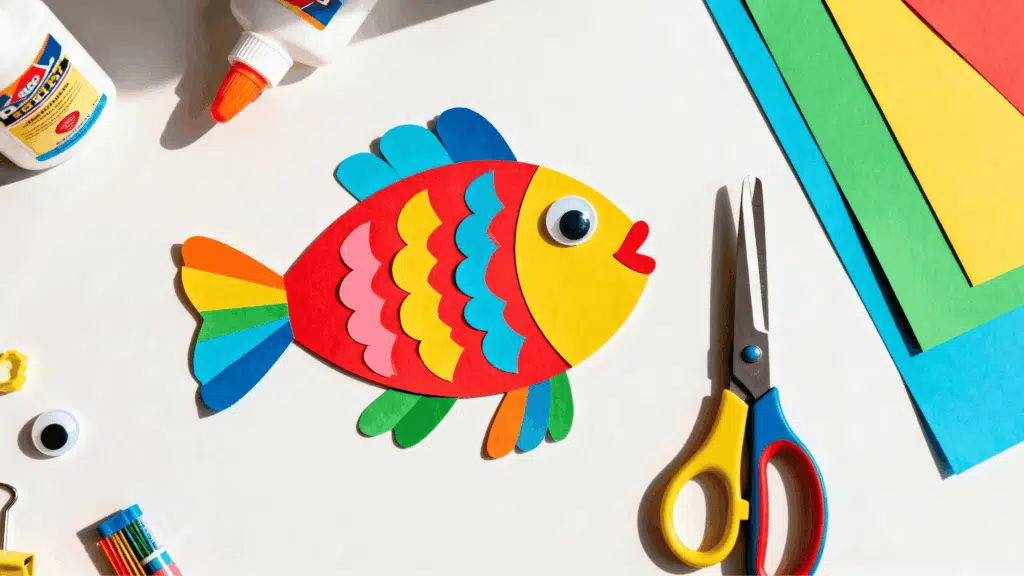
There’s something about fish that kids never seem to get tired of making; maybe it’s the colors, maybe it’s the scales.
A fish craft comes together fast and still feels like a real accomplishment once it’s done. Some ideas take a few minutes, others a bit longer, but none need anything you can’t find around the house.
Younger kids can keep it simple with color and shape, while older ones can push further with texture and detail. This blog covers ideas that fit whatever time and skill level you’re working with.
How Can Fish Crafts Help Kids Learn?
Fish crafts build fine motor skills through cutting, gluing, and folding, plus they teach color patterns, counting, and basic shapes along the way.
A simple scale pattern made from cut paper circles works on counting and spacing at the same time. Kids also pick up sequencing skills when a craft has several steps, like folding an origami fish body before adding fins and eyes.
Group projects add a social piece too. When siblings or classmates work on a shared ocean scene, they practice sharing supplies and talking through how the pieces fit together.
For younger kids, matching fin colors or sorting buttons by size doubles as an early lesson in categories, without feeling like a lesson at all.
Easy Fish Craft Ideas for Kids
From five-minute projects to ones that take more patience, there’s something here for every age. Each idea uses different materials and a few simple steps, so kids end up with a fish they’ll want to display or keep.
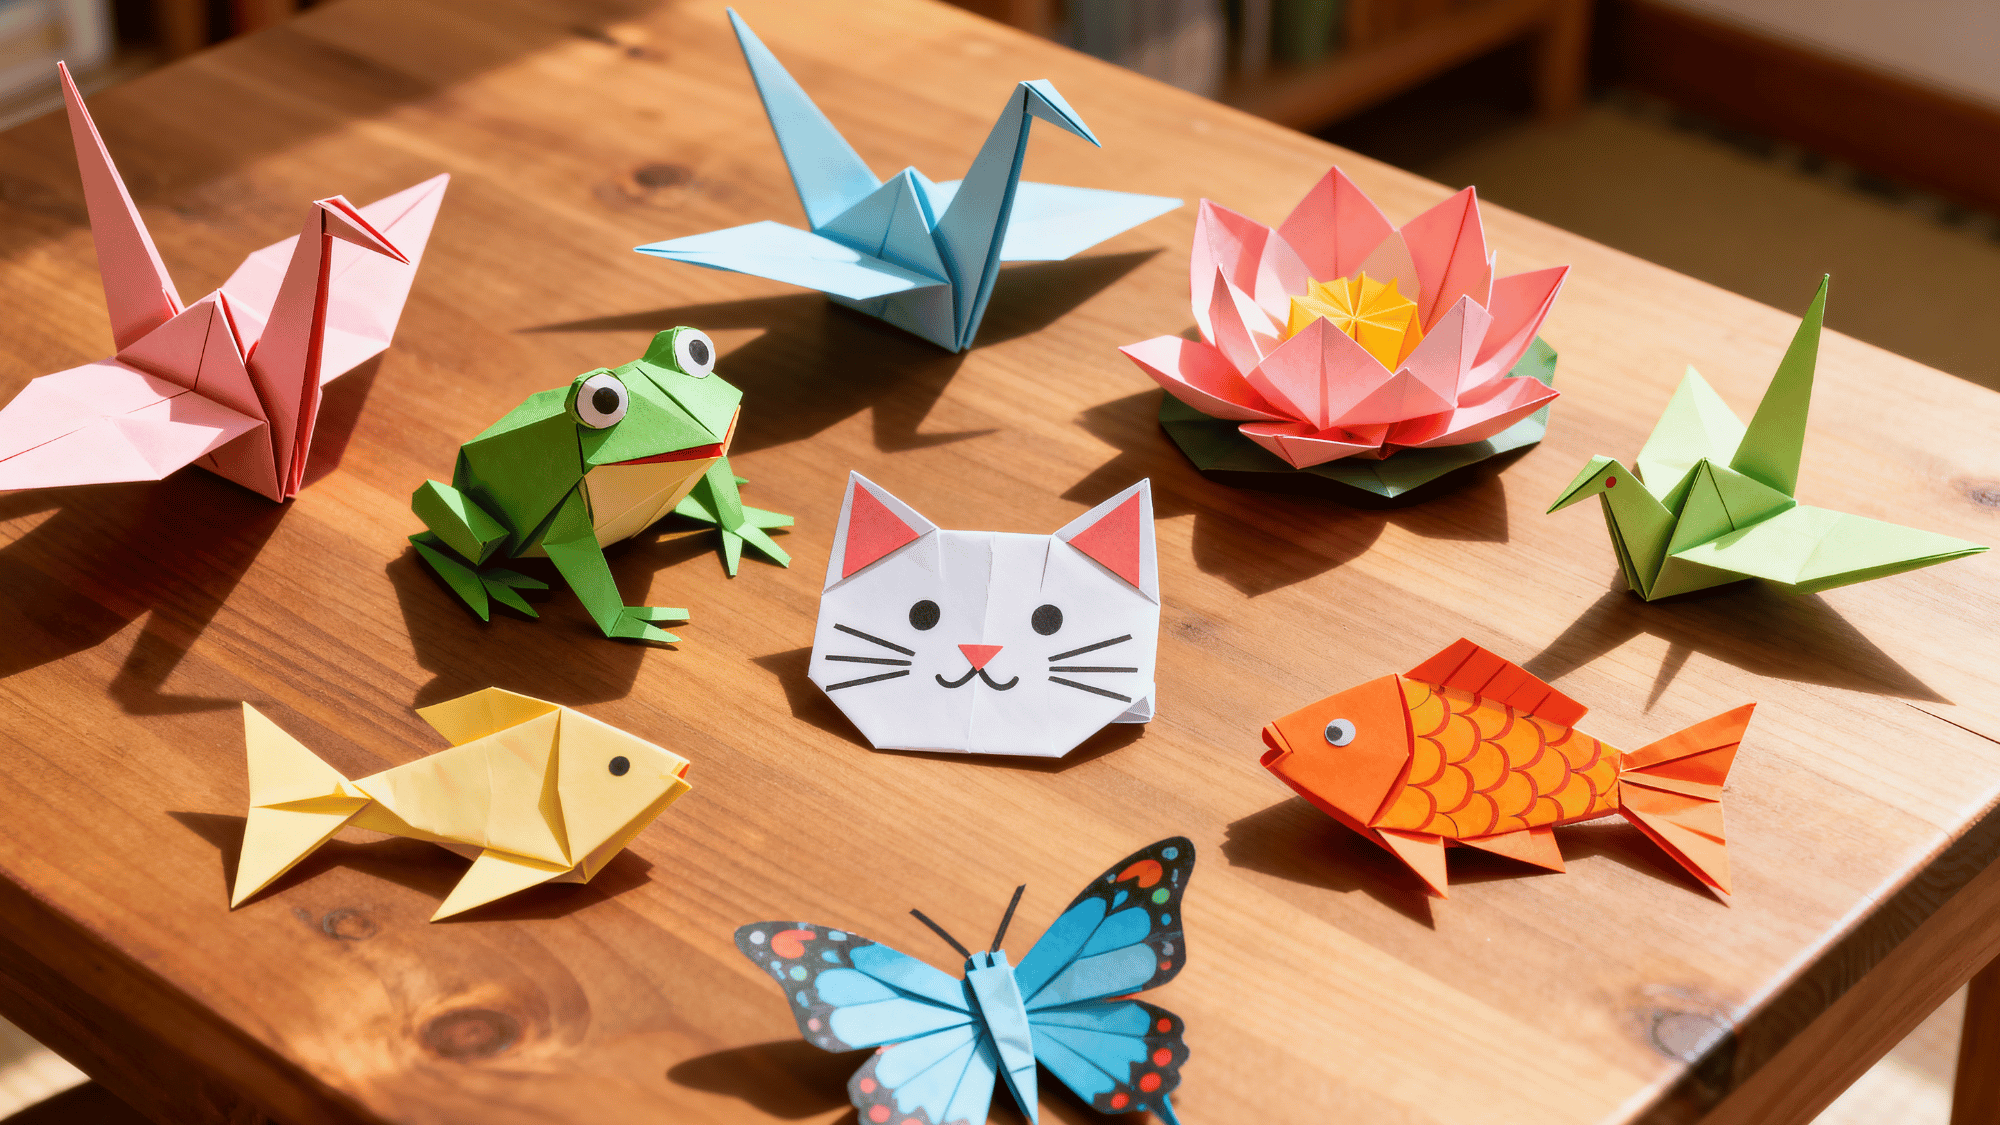
1. Origami Fish
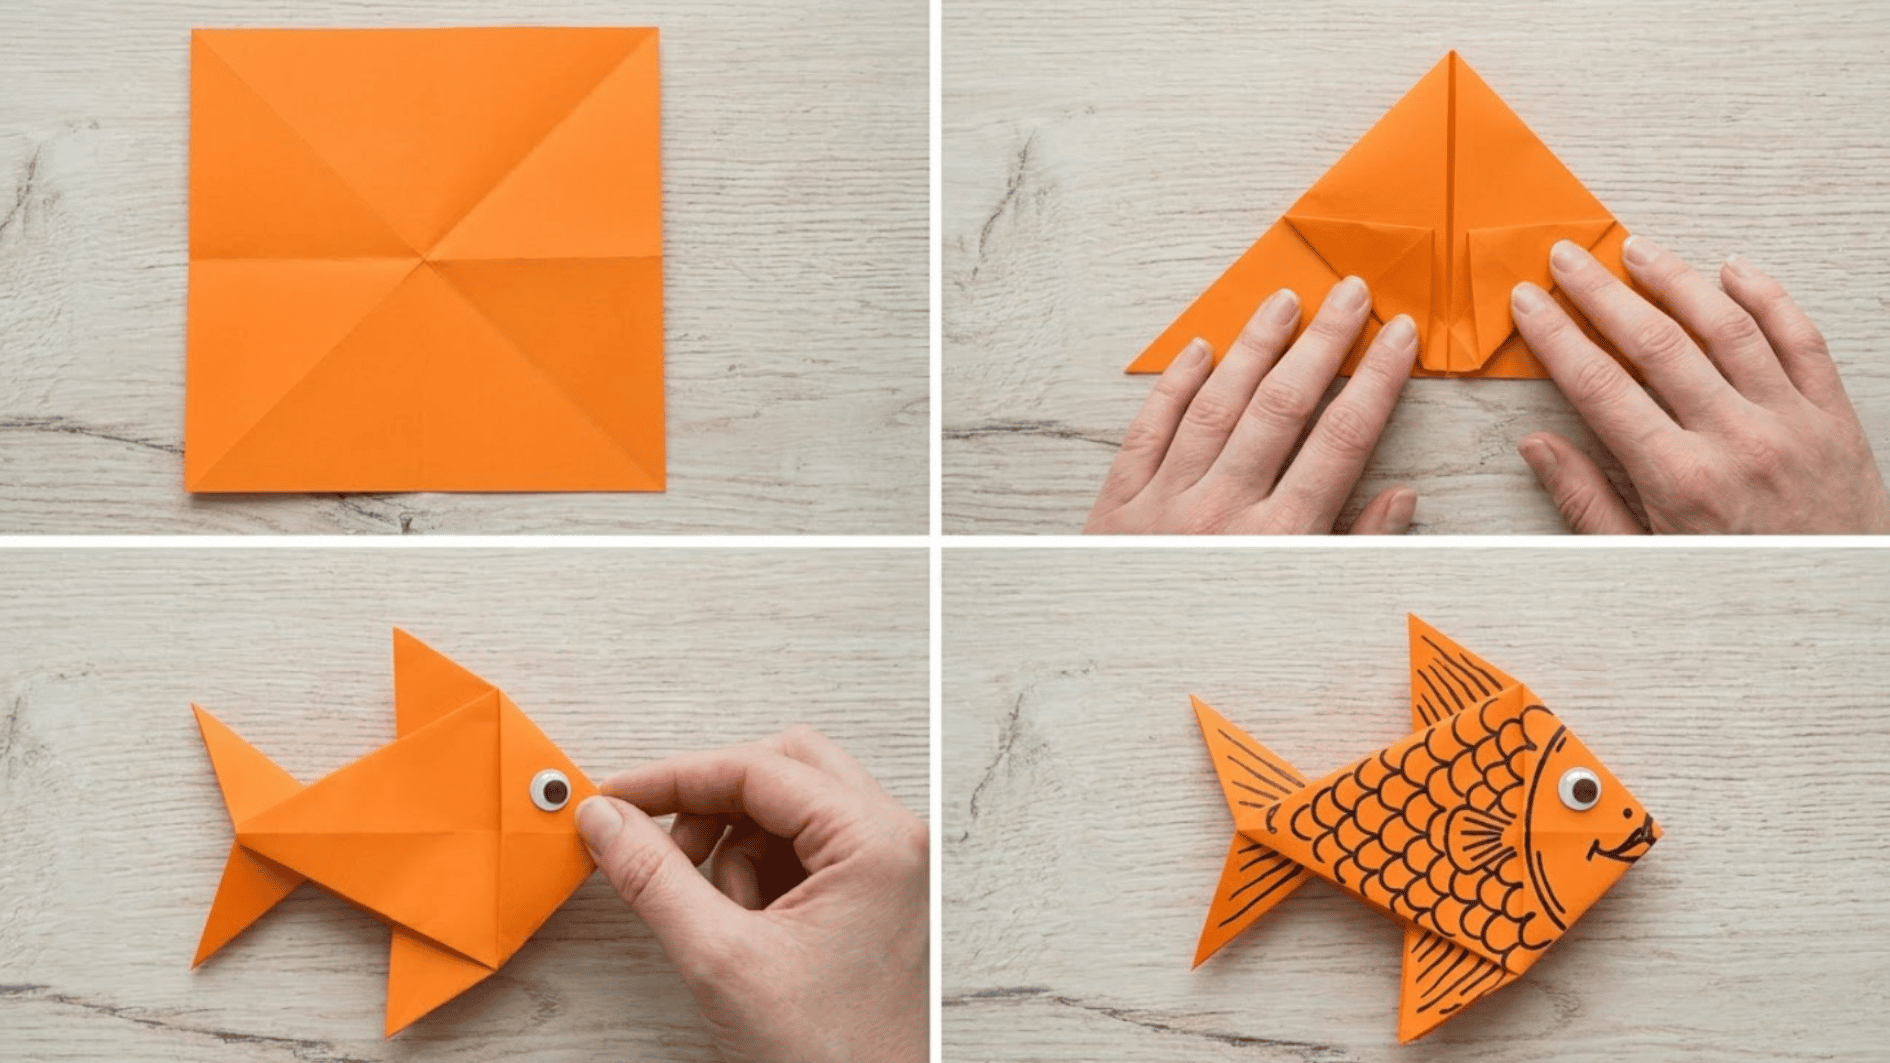
Origami fish range from simple folds to detailed models, and decorations make them work well for beginners and advanced folders alike.
If your child gets hooked on folding, there are beginner-friendly origami projects for every skill level worth trying next.
What You’ll Need: Square sheets of coloured paper, Markers or pens, Stickers or googly eyes
Steps:
- Start with a square piece of paper. Fold diagonally and horizontally to create creases for the body and tail.
- Shape the paper into a fish by following the basic origami folds.
- Add drawn or sticker eyes.
- Decorate the body with markers or glitter to create scales and a personalized look.
2. Paper Plate Fish
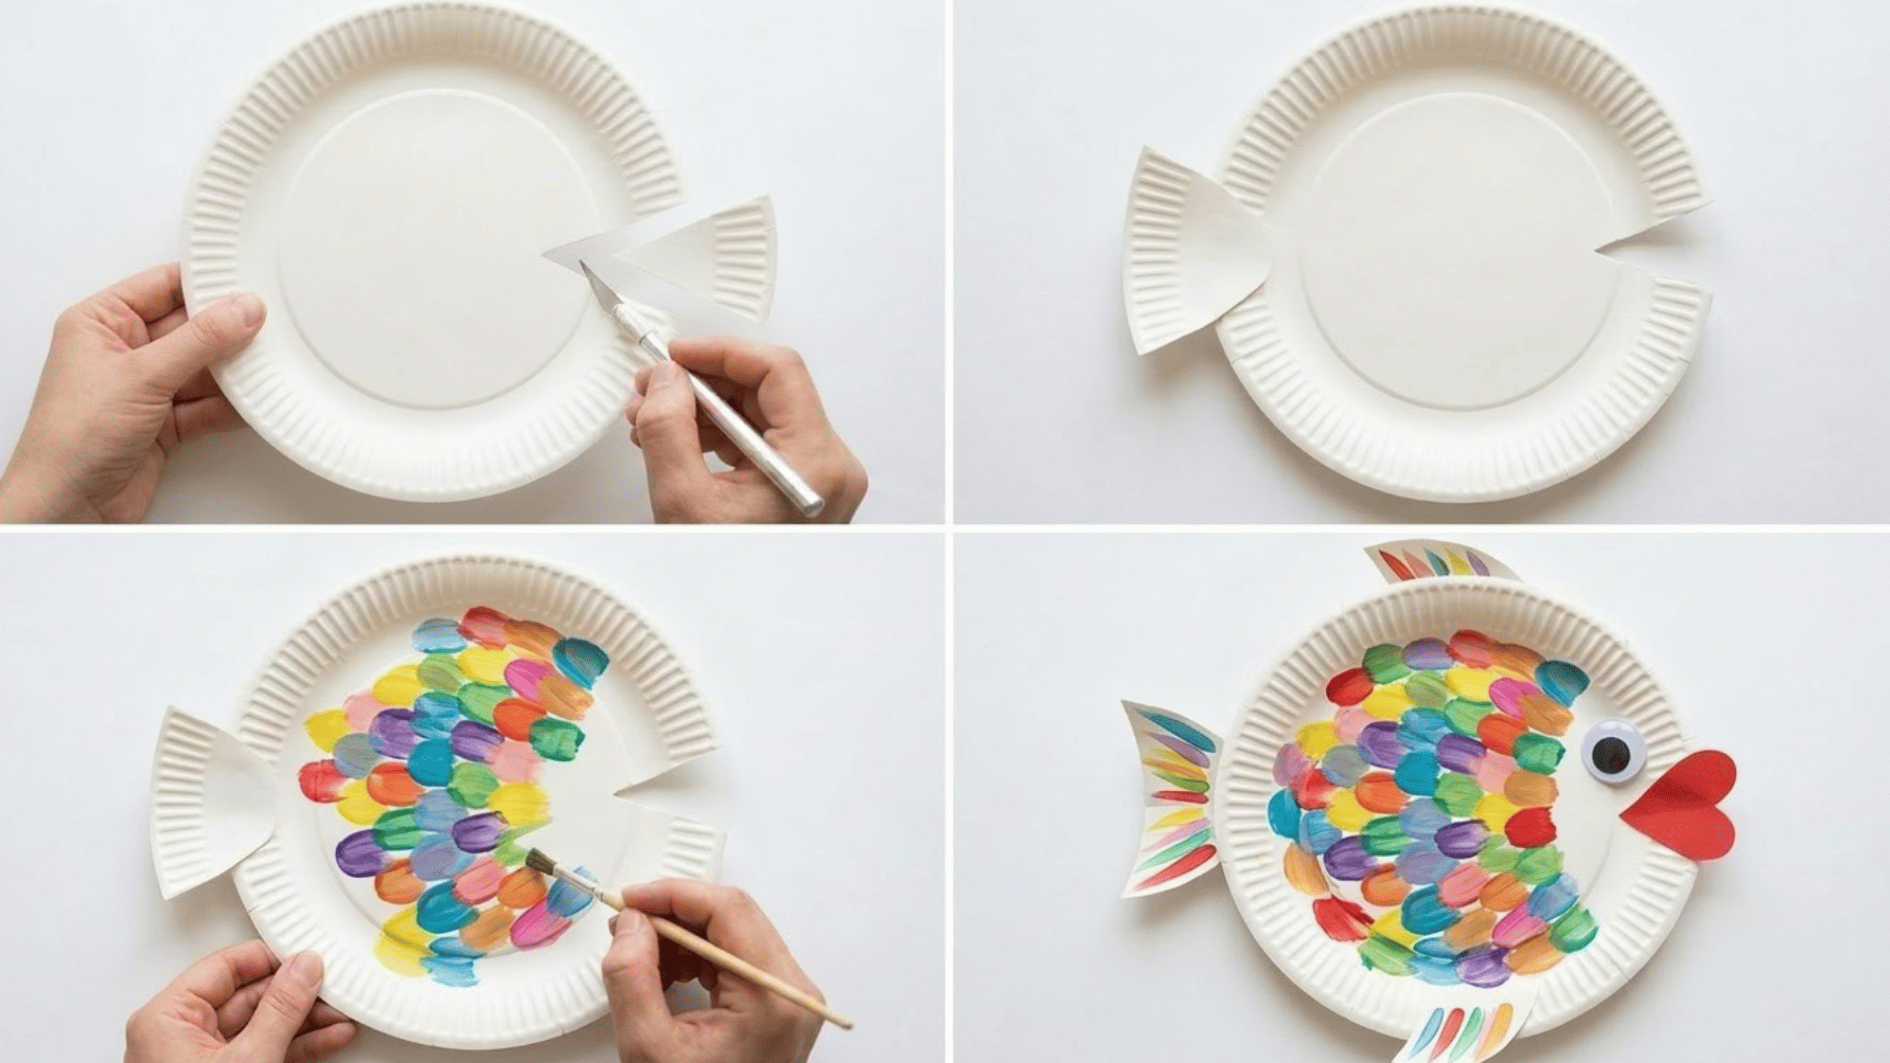
Turn an ordinary paper plate into a vibrant, three-dimensional fish by adding paint, colorful paper scales, and fins. Other decorative elements create a fun craft that’s perfect for kids and classroom activities.
Once this one’s a hit, there are more paper plate craft ideas that turn the same simple plate into an entirely different creature.
What you’ll need: Paper plate, paint or markers, construction paper for the fins, plus glue and scissors.
Steps:
- Cut a triangular wedge from one side of the plate to form the mouth.
- Reattach it to the opposite side to serve as the tail.
- Paint scales on the body using brushes, sponges, or markers.
- Cut fins from construction paper and glue them to the sides.
3. Fish from Scrap Paper
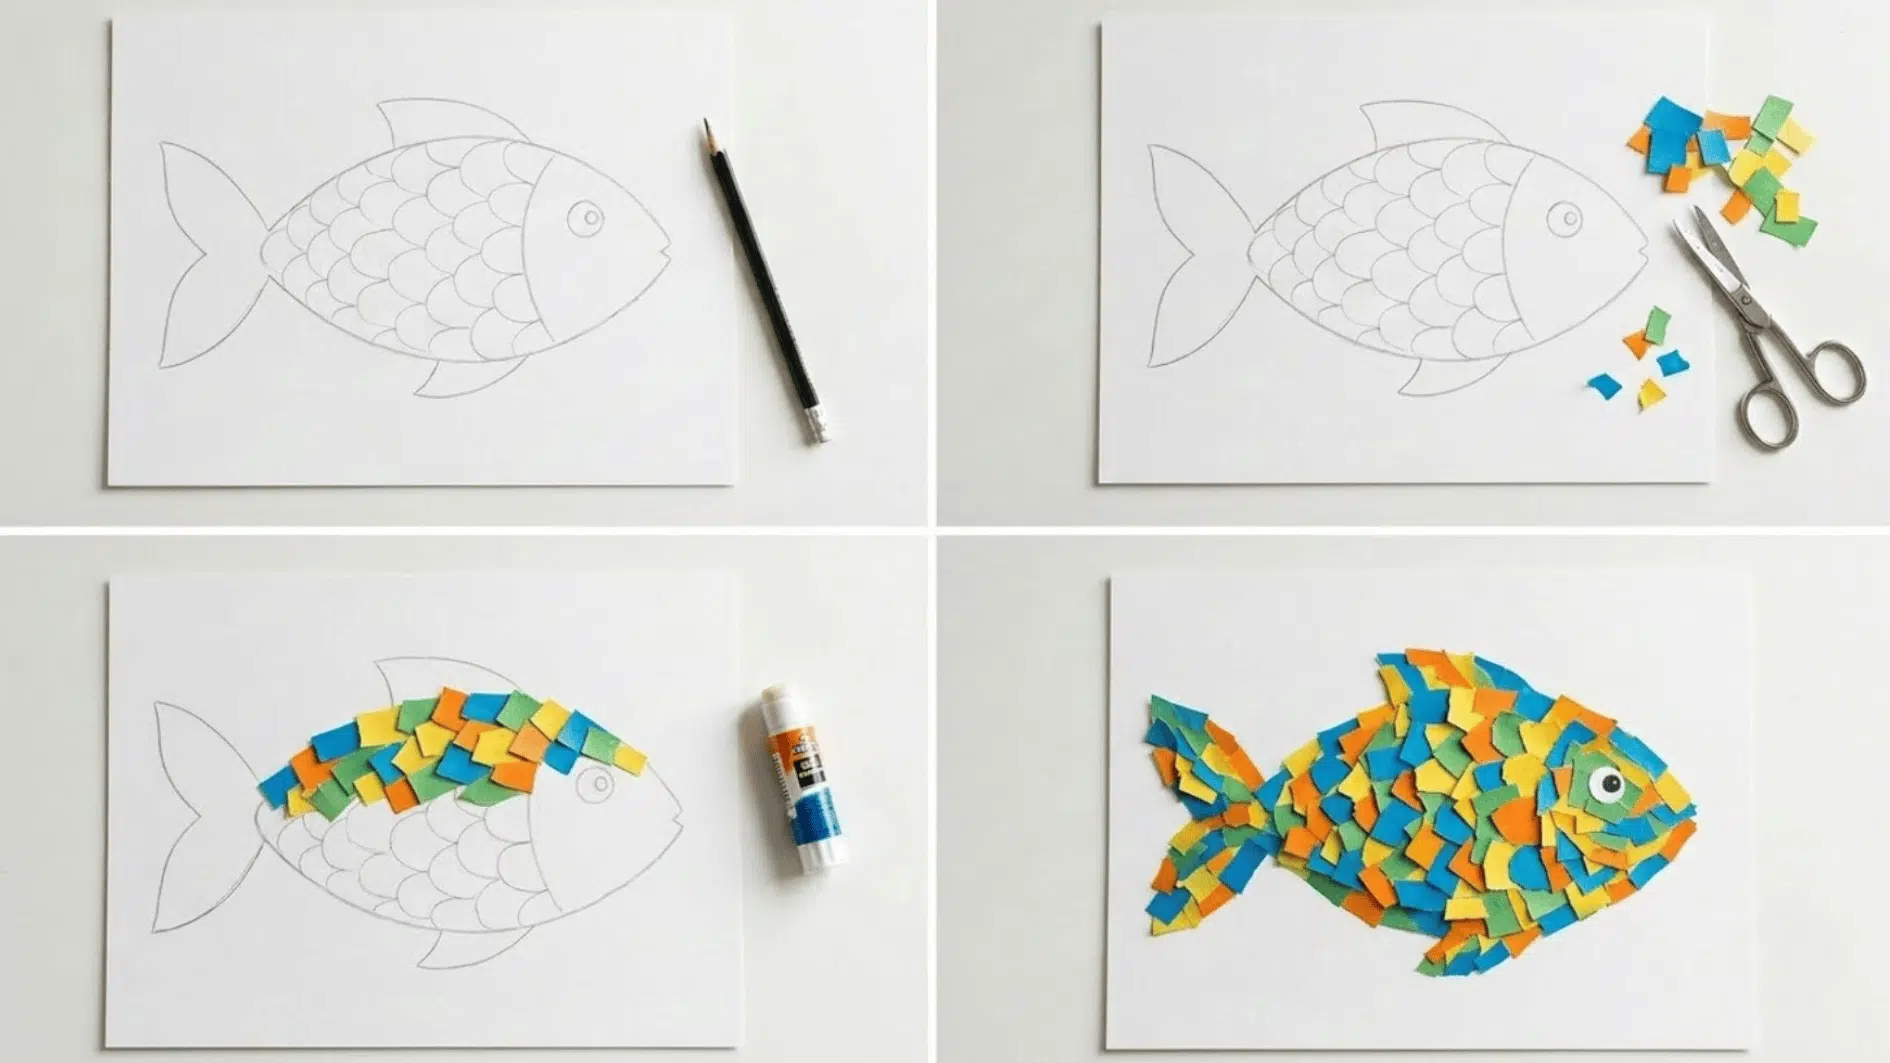
Create a mosaic-style fish using leftover paper scraps, turning small bits of paper into a colorful, textured design.
This craft is ideal for recycling materials while encouraging creativity and fine motor skills. It’s a good entry point if you want to browse other easy paper crafts for kids that use the same basic supplies.
What you’ll need: Paper scraps in different colors, glue, a pencil, base paper for the outline, and scissors.
Steps:
- Draw a simple fish outline on a base sheet.
- Cut scrap paper into small, irregular shapes.
- Glue them onto the outline in overlapping rows to mimic scales.
- Add two to three layers for a textured, mosaic effect.
4. Bottle cap fish
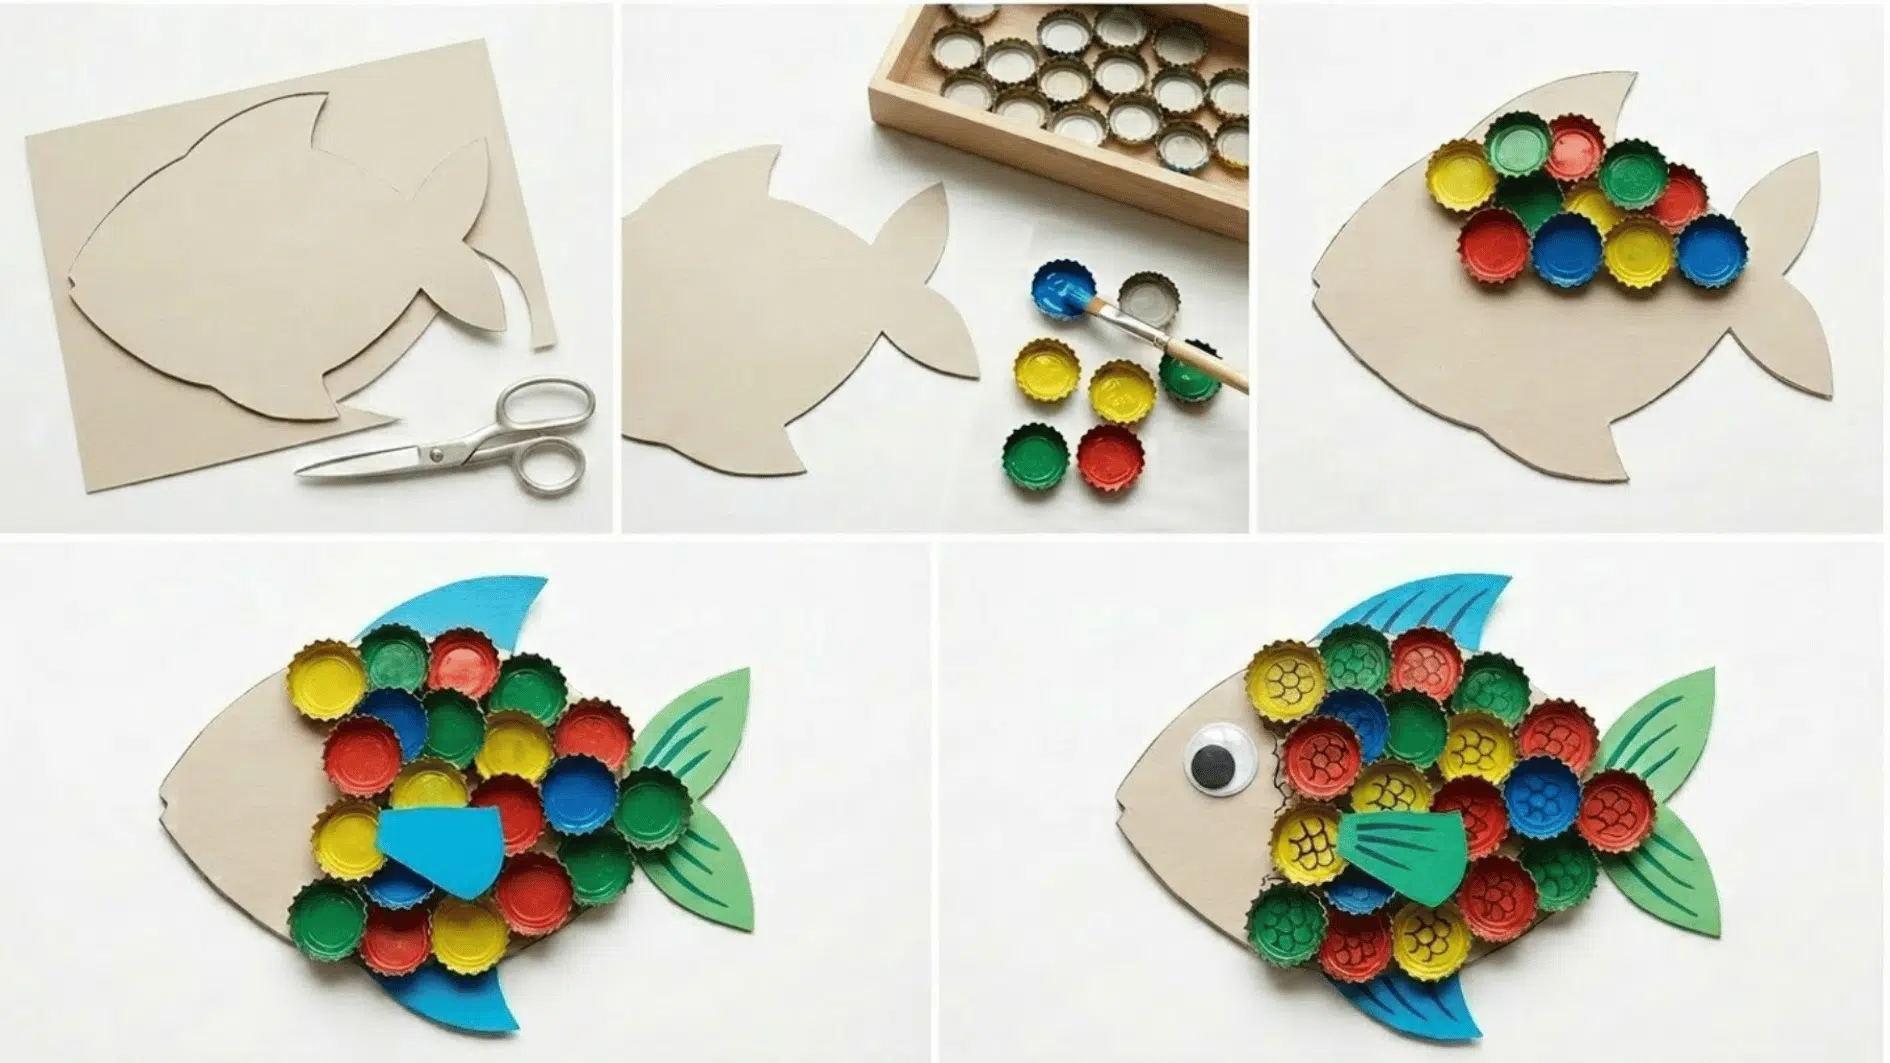
These colorful fish crafts are a fun, hands-on activity that encourages creativity and fine motor skills. Perfect for kids or decorative projects, each fish can be customized with different colors, patterns, and textures.
What you’ll need: Cardstock or cardboard base, painted bottle caps or similar circular craft pieces, colored paper for fins and tails, glue, acrylic or tempera paint, markers for details, and scissors.
Steps:
- Cut fish shapes from cardstock or cardboard.
- Paint the bottle caps in your chosen colors and let them dry.
- Glue the painted caps onto the fish’s body to form scales.
- Cut and attach fins and tails from colored paper.
- Add details to the eyes, fins, and scales using paint or markers
5. Egg Carton Fish
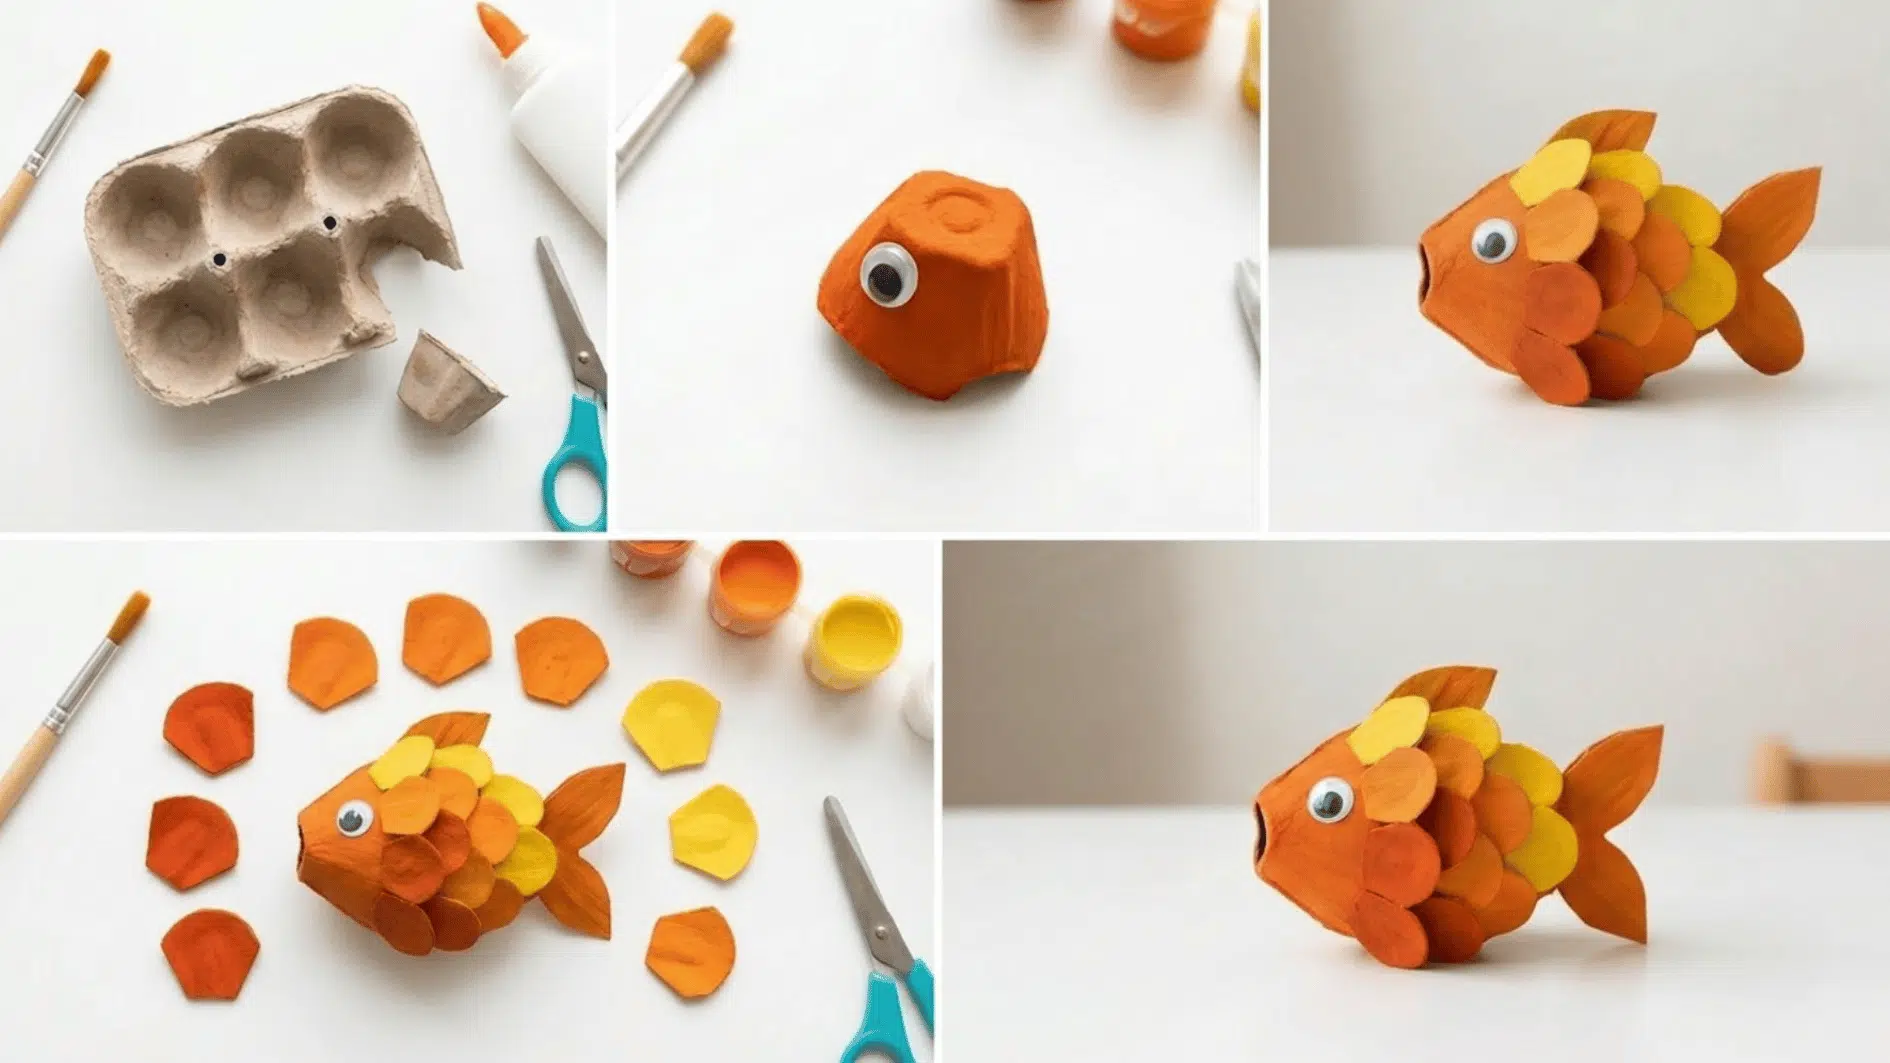
Egg cartons can be cut, painted, and decorated to create textured, three-dimensional fish, adding depth and tactile interest to the craft.
This project is perfect for upcycling materials while making colorful, playful fish for kids or classroom displays.
What you’ll need: Egg cartons, paint, coloured paper for fins and tails, glue, and scissors.
Steps:
- Take an egg carton and cut off one of the corner cups; this becomes the fish head and body.
- Paint it orange, let it dry, then stick on a large googly eye.
- Cut the remaining egg cups into curved petal shapes for scales. Paint them in three shades: dark orange, mid orange, and yellow.
- Glue the scales onto the body in overlapping rows, with the dark scales at the bottom and the yellow toward the top.
- Add a tail piece cut from the edge of the carton, and glue it to the back.
6. Toilet Paper Roll Fish
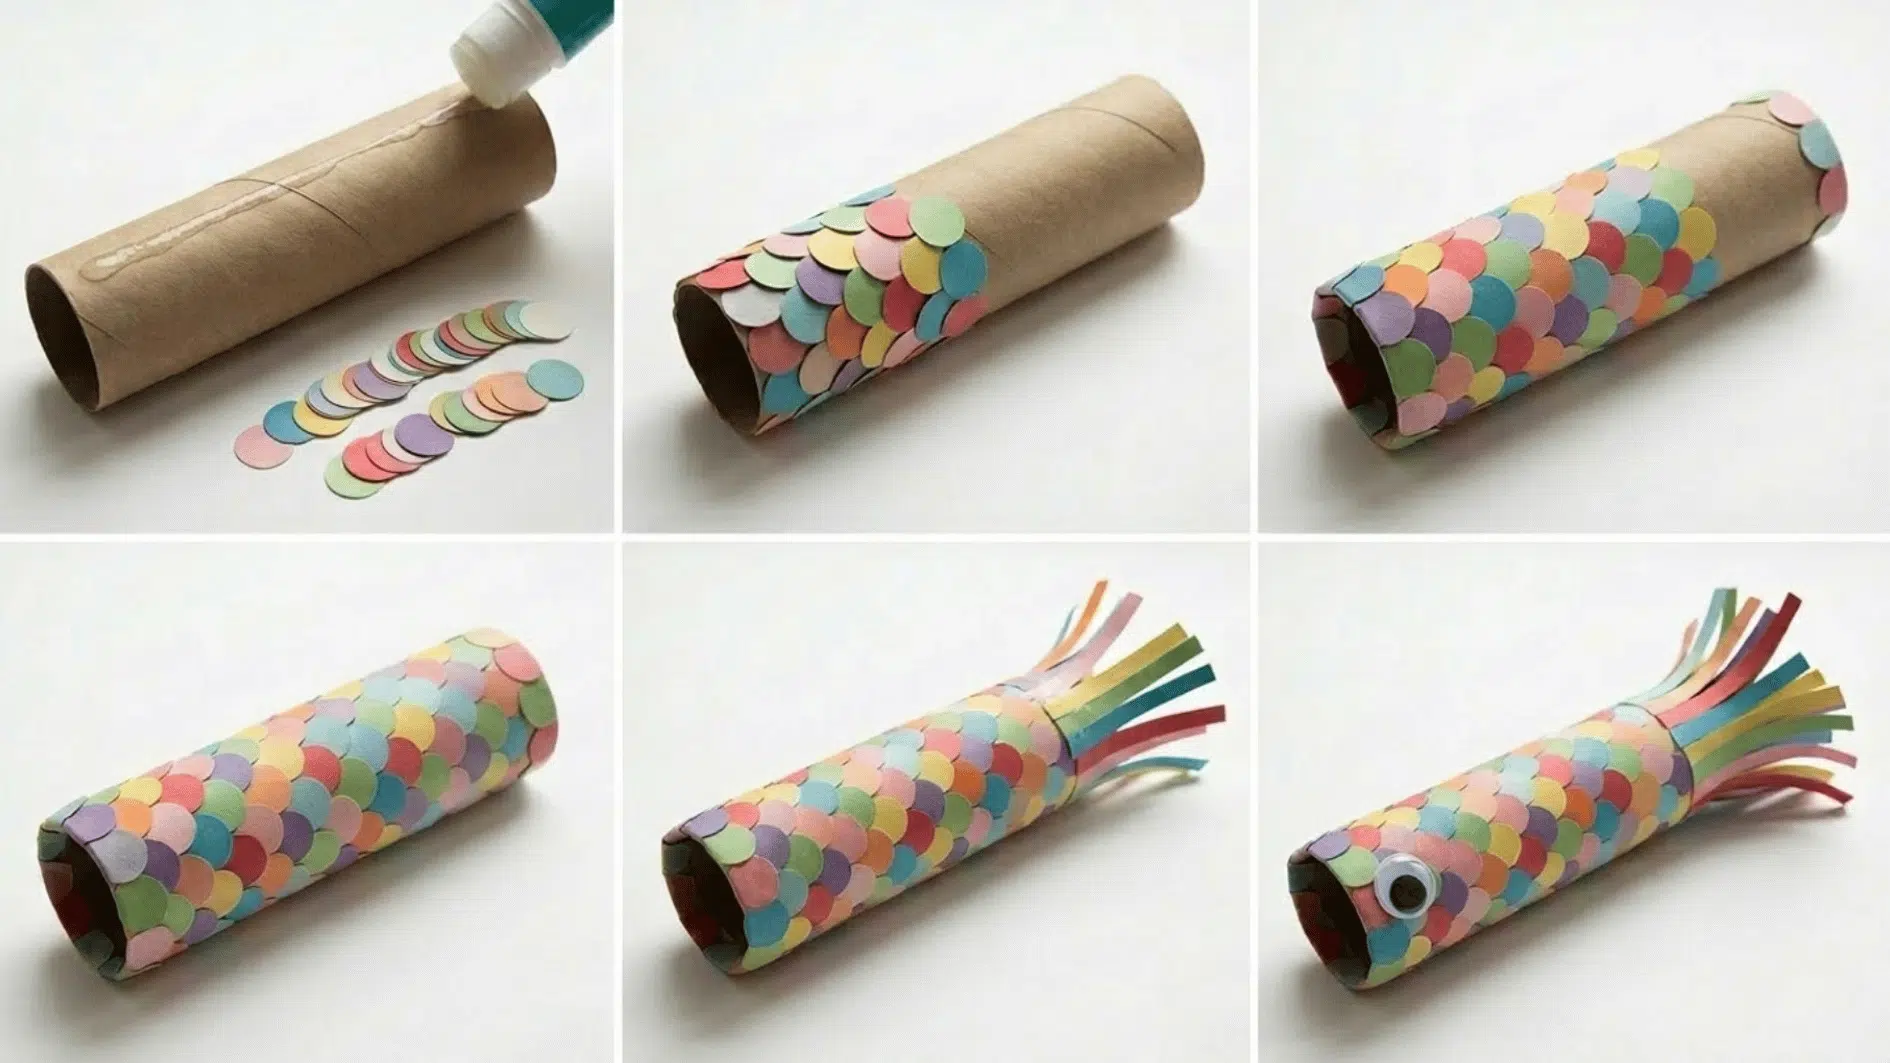
Create a fun, easy three-dimensional fish from empty toilet paper rolls, adding paint, paper fins, and details to bring it to life.
This upcycling craft is perfect for kids, classrooms, or playful home decorations.
What you’ll need: A cardboard tube or toilet paper roll, patterned paper circles, colorful paper strips for the tail fin, glue, and a googly eye.
Steps:
- Apply glue along the edge of a cardboard tube, then place decorative paper circles on it.
- Press each circle firmly onto the tube, overlapping them to create a fish scale pattern.
- Continue layering circles and fold the edges neatly around the rim of the tube.
- Keep covering the entire tube until it is fully wrapped in the scale pattern.
- Apply glue to one end and press colorful paper strips to form the tail fin.
- Stick a googly eye onto the front of the tube to complete the koinobori fish.
7. Fabric Fish
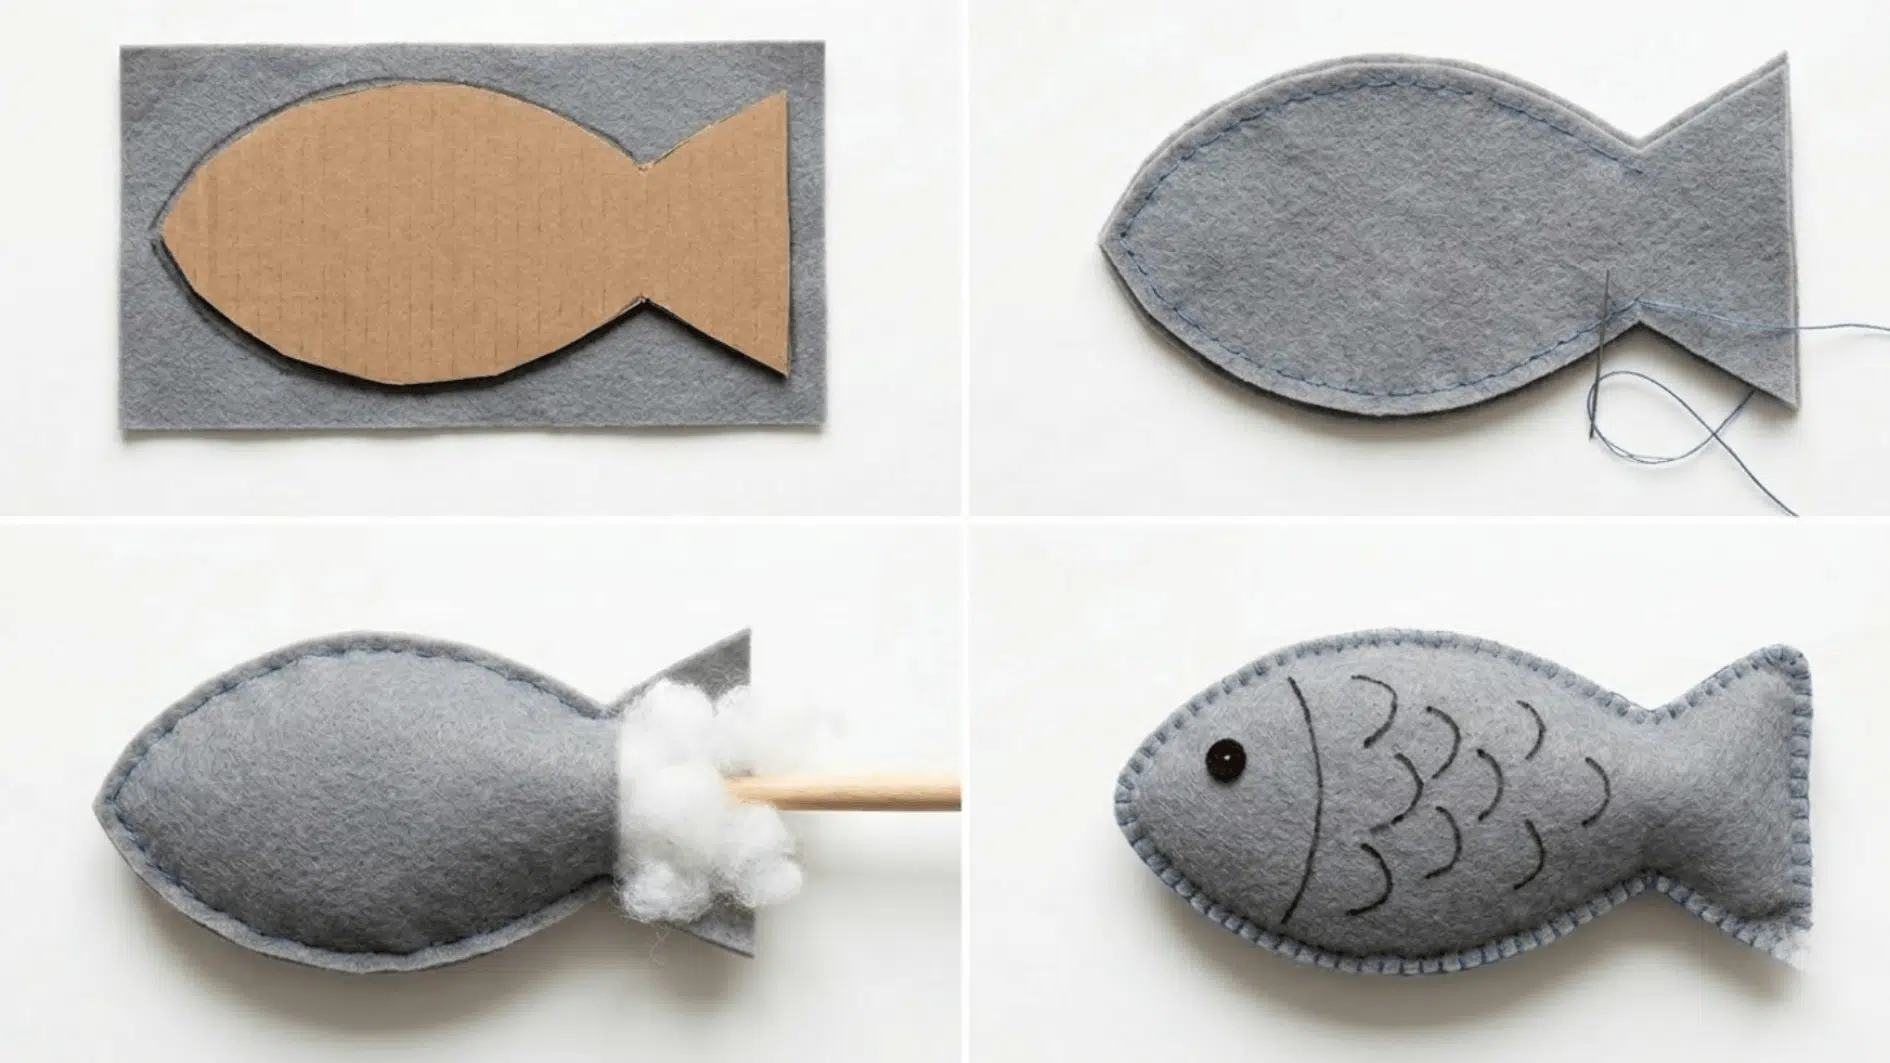
Soft or flat fish made from felt or fabric scraps, perfect as toys or ornaments, and ideal for using up leftover materials. They can be sewn or glued and are great for kids’ play, décor, or as personalized, handmade gifts
What you’ll need: Felt or scrap fabric, needle and thread, fiberfill for stuffed fish, scissors, and markers or fabric paint.
Steps:
- Trace and cut out a fish shape from cardboard as a template.
- Sew or glue fabric pieces onto the fish shape, leaving the tail end open.
- Fill the fish with stuffing or batting to give it a soft, 3D form, then close the tail end.
- Add small fabric scraps or use markers to create details like eyes, scales, or patterns for a decorative finish.
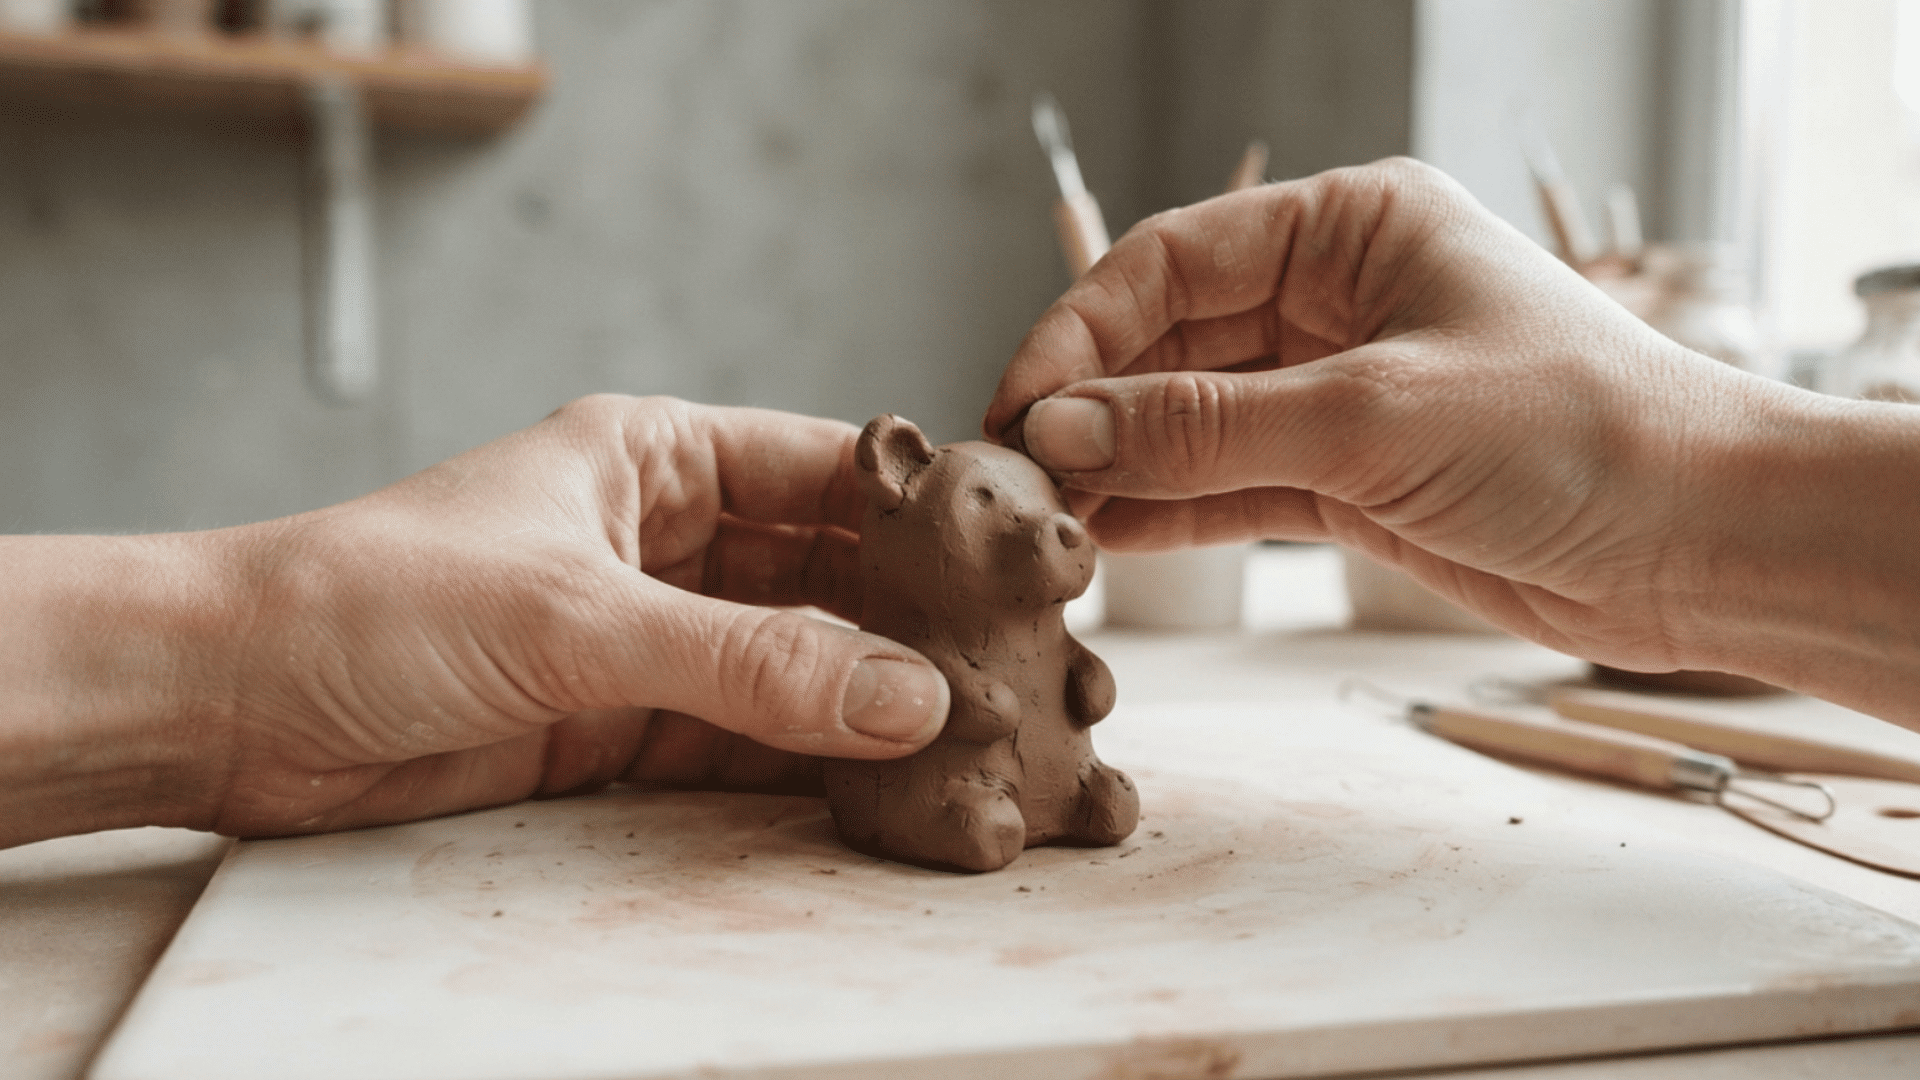
8. Clay or Play-Dough Fish
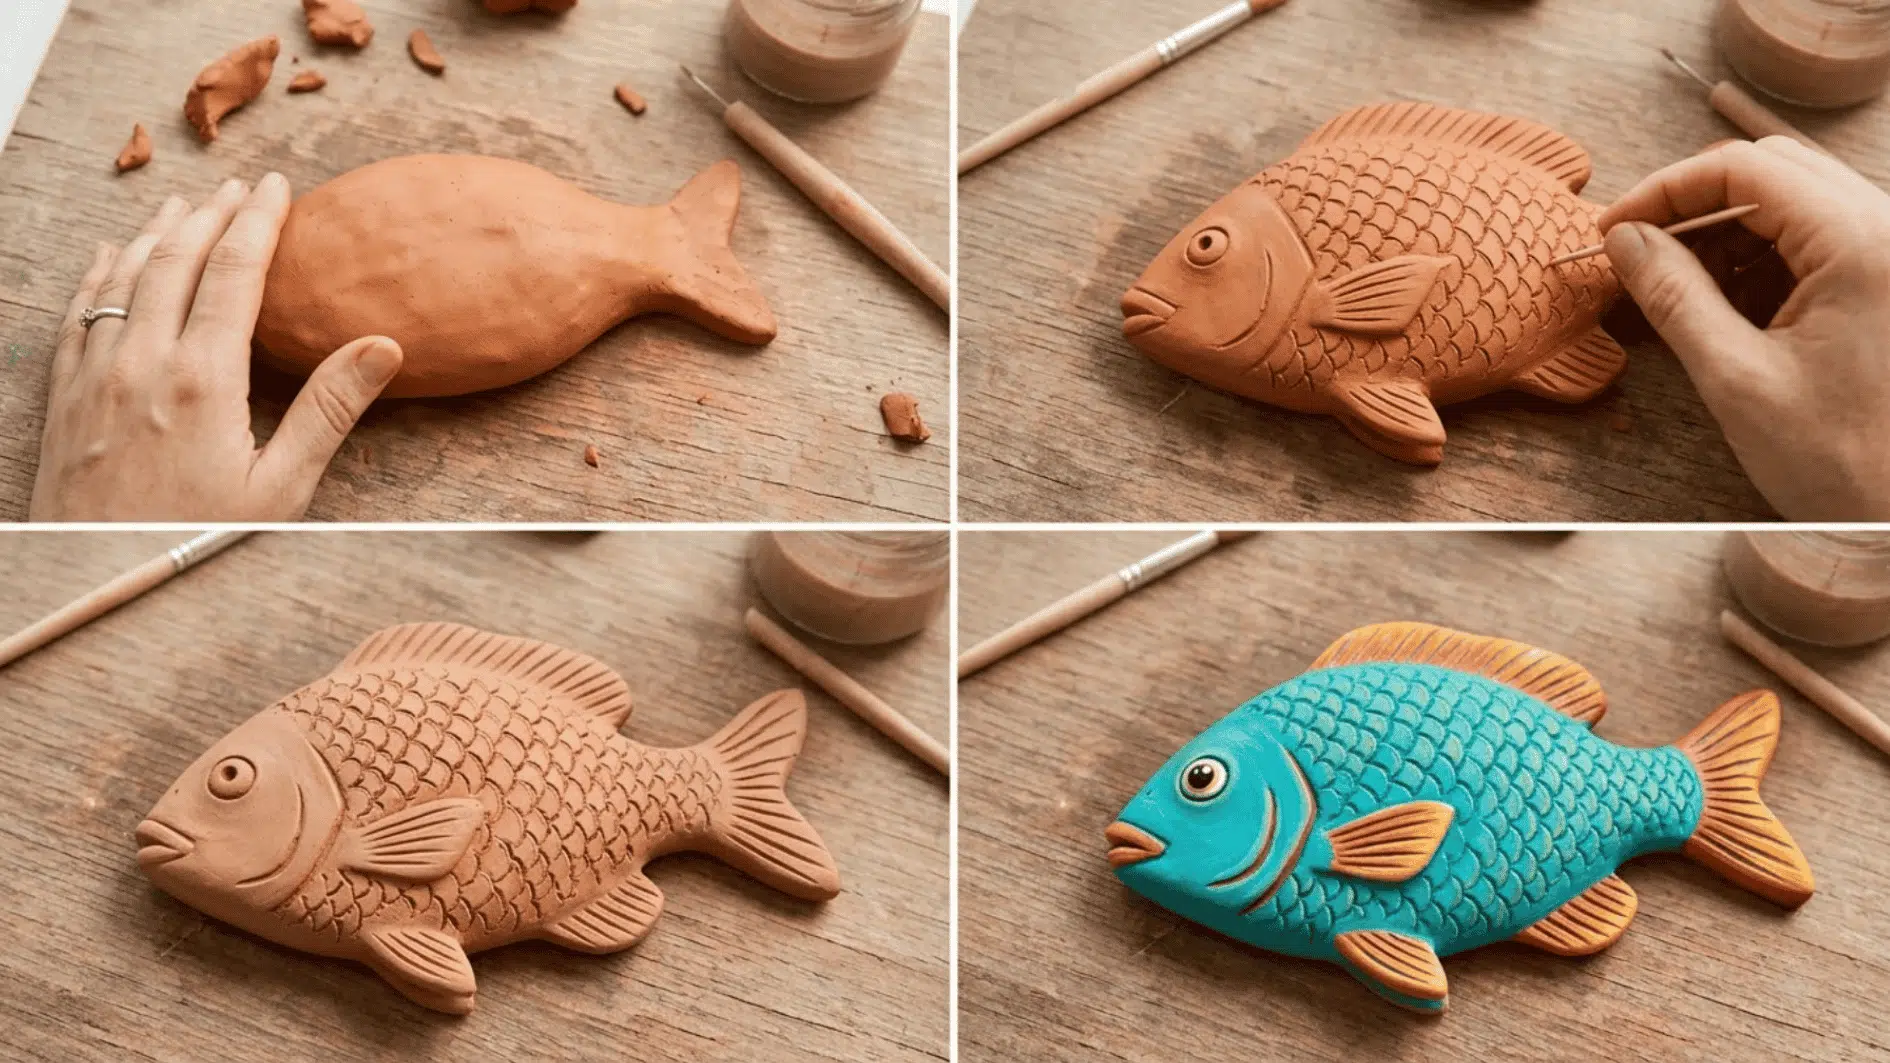
Sculpted fish using clay or playdough, painted for realistic or whimsical effects, making them ideal for display, sensory play, or educational projects. Textured, detailed, even glazed or sealed, they can last as decorative pieces.
If clay clicks for your child, it’s a small step to making pottery at home, where the same shaping and drying skills apply to bowls, mugs, and other functional pieces.
What you’ll need: Air-dry clay or polymer clay, a toothpick for scale lines, acrylic or tempera paint, and brushes.
Steps:
- Shape the fish’s body from clay.
- Score scale lines using a toothpick before drying.
- Bake polymer clay per package instructions or let air-dry natural clay.
- Paint fins, scales, and markings.
9. String-Wrapped Fish Art
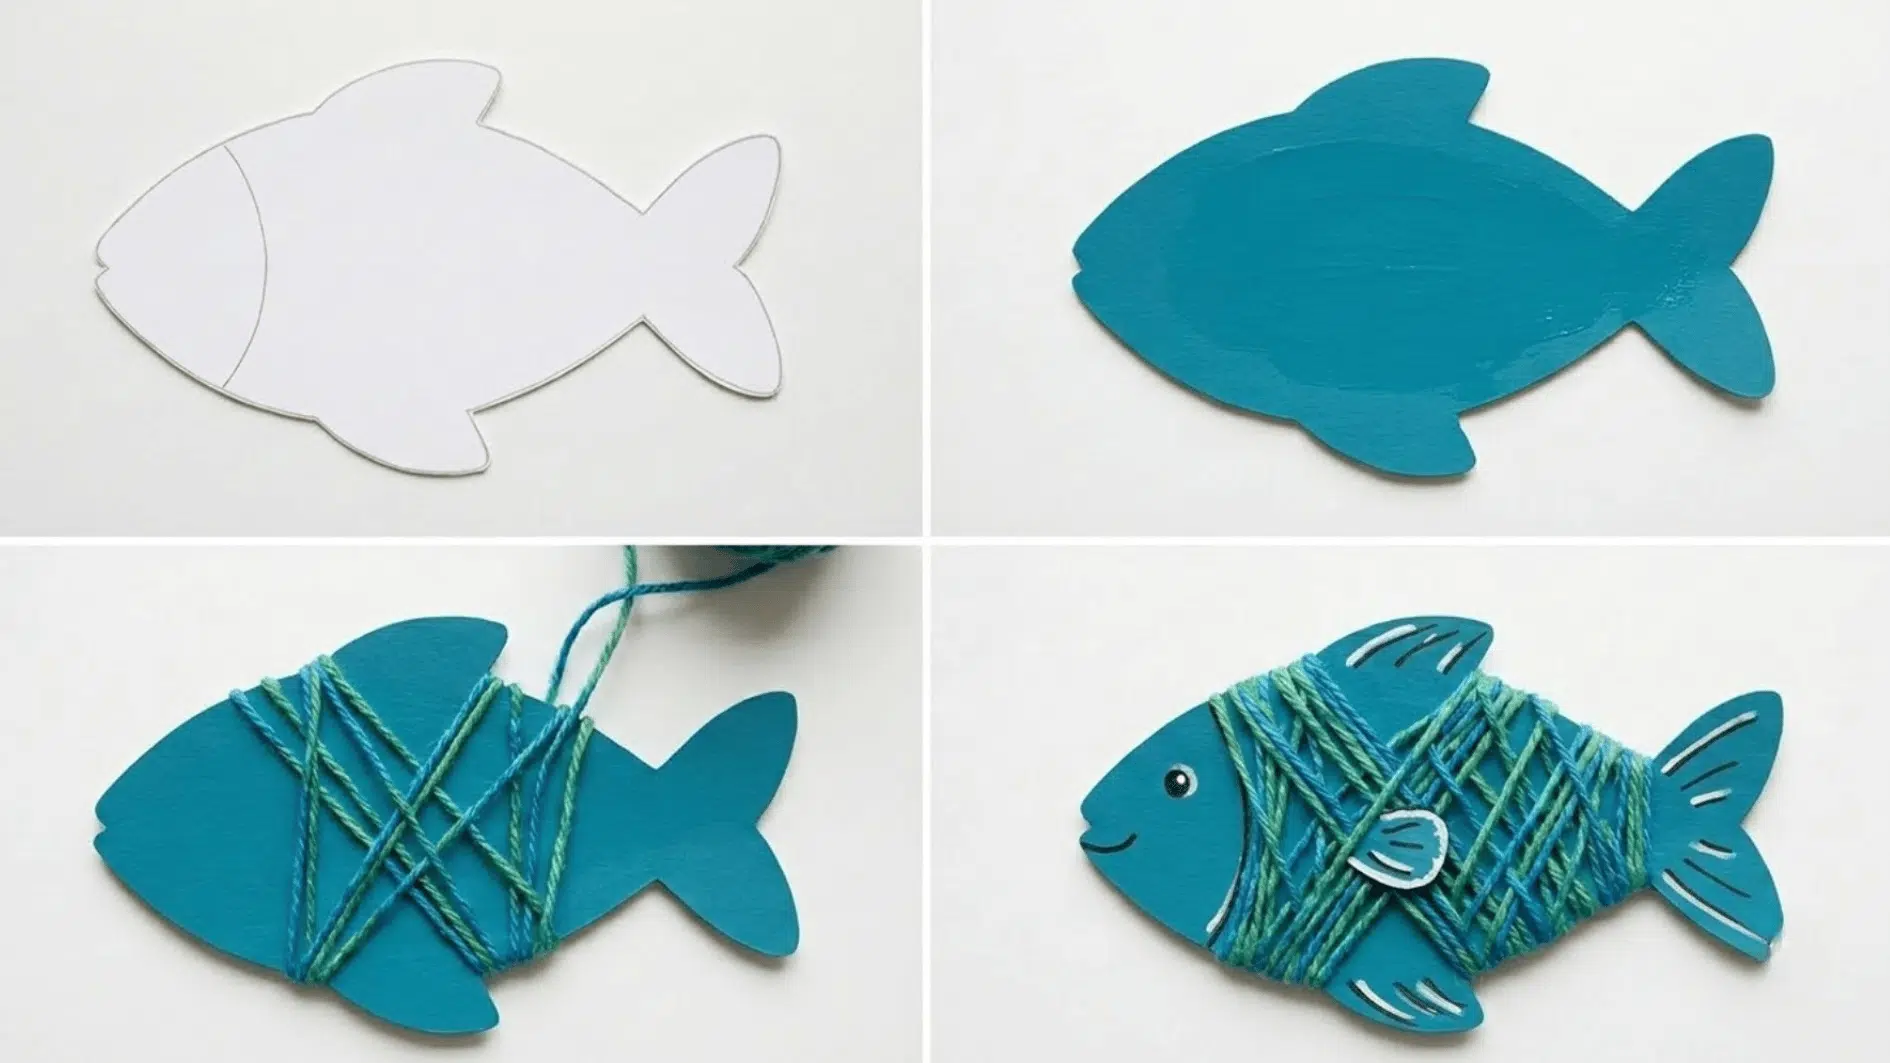
Sculpted fish using cardstock and string, wrapped in crisscross patterns and painted for colorful, textured effects, making them ideal for display, kids’ crafts, or educational art projects.
These can be layered with different yarn colors and patterns for a playful and unique look.
What you’ll need: Cardstock or cardboard base, colored string, yarn or twine, acrylic paint, paintbrushes, glue, scissors, and markers for details.
Steps:
- Draw the fish outline on cardstock.
- Paint the base color of the fish and let it dry.
- Wrap string or yarn around the fish’s body in crisscross patterns to create texture.
- Glue the string securely at overlapping points.
- Add details to fins, tail, and scales using paint or markers.
10. Coffee Filter Fish
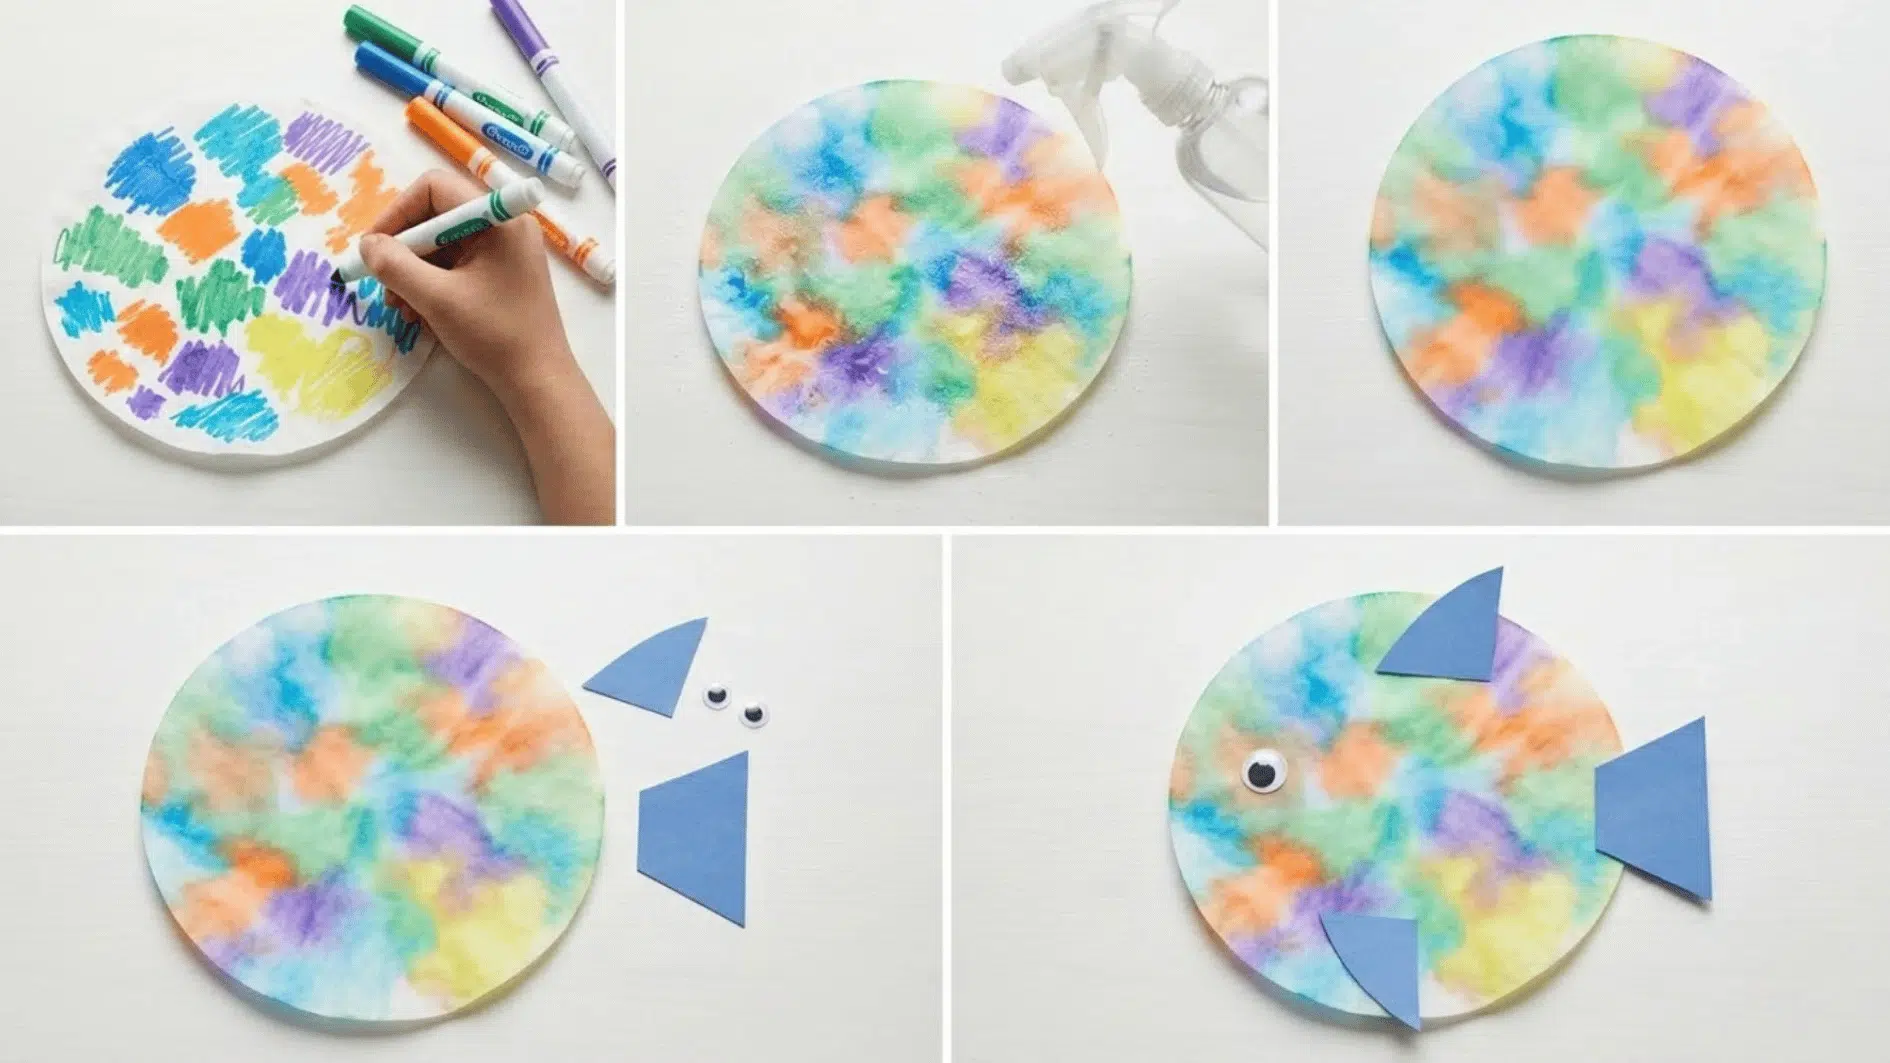
Coffee filter fish are light, colorful crafts made by blending marker colors with water. The soft, washed effect makes the fish look bright and watery, which works well for ocean-themed classroom or home craft sessions.
It’s one of several coffee filter art projects that use this same water-and-marker blending trick.
What you’ll need: Coffee filters, washable markers, a spray bottle with water, construction paper, glue, scissors, and googly eyes.
Steps:
- Color the coffee filter with washable markers in different patterns.
- Lightly spray the filter with water and let the colors spread.
- Allow it to dry fully.
- Cut fins and a tail from construction paper.
- Glue the fins, tail, and googly eye onto the coffee filter fish.
11. Cupcake Liner Fish
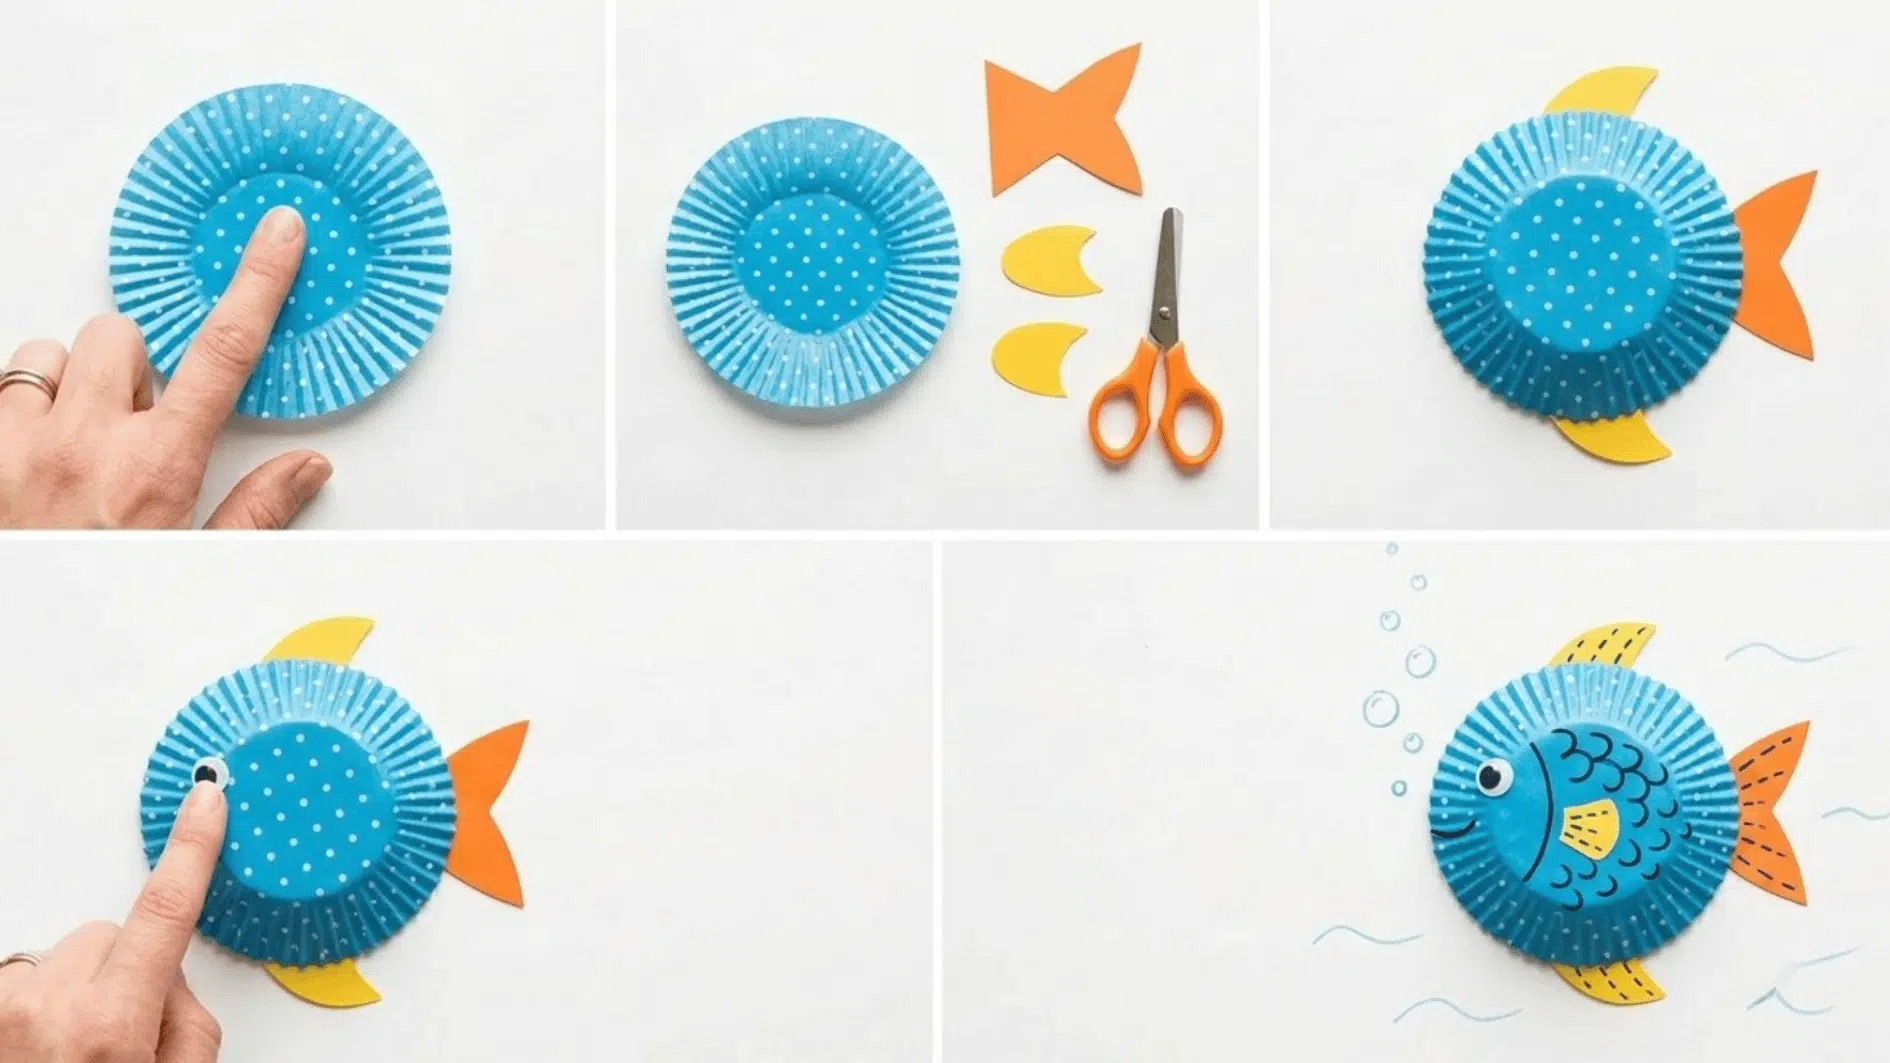
Cupcake liners can be flattened, folded, and layered to make cute fish with round bodies and bright fins. This is a simple craft for young kids because the liners already give the fish a fun shape and texture.
What you’ll need: Cupcake liners, construction paper, glue, scissors, markers, and googly eyes.
Steps:
- Flatten one cupcake liner to make the fish body.
- Cut a tail and fins from construction paper.
- Glue the tail and fins behind the liner.
- Add a googly eye near the front.
- Use markers to draw scales, bubbles, or waves around the fish.
12. Foil Fish
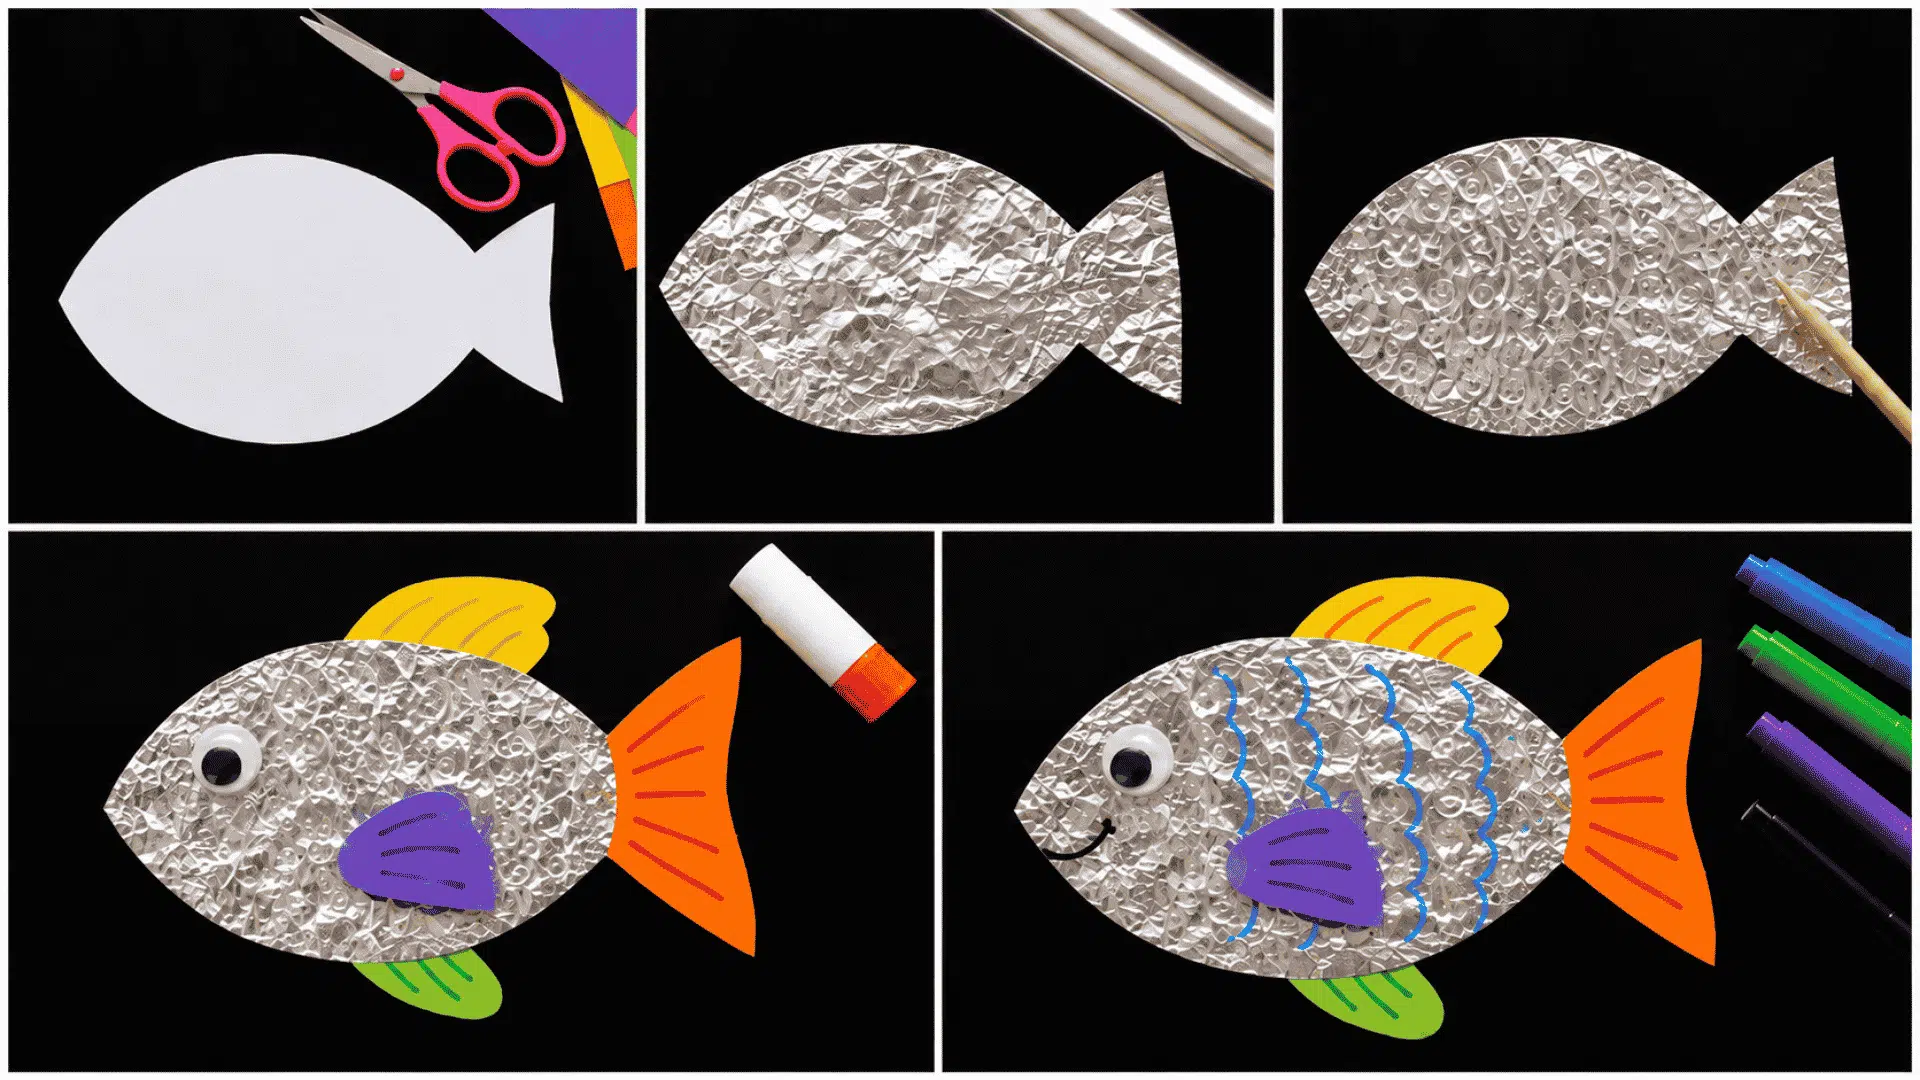
Foil fish use aluminum foil to make a shiny, crinkled fish body. Kids can press patterns into the foil, add paper fins, and color parts with markers.
It gives the fish a bright, textured look without needing many supplies.
What you’ll need: Aluminum foil, cardstock, glue, scissors, markers, a googly eye, and construction paper
Steps:
- Cut a fish shape from cardstock.
- Cover the fish body with aluminum foil.
- Press small lines or dots into the foil for texture.
- Cut fins and a tail from construction paper.
- Glue on the fins, tail, and googly eye.
- Add color or details with markers.
13. Sponge Stamp Fish
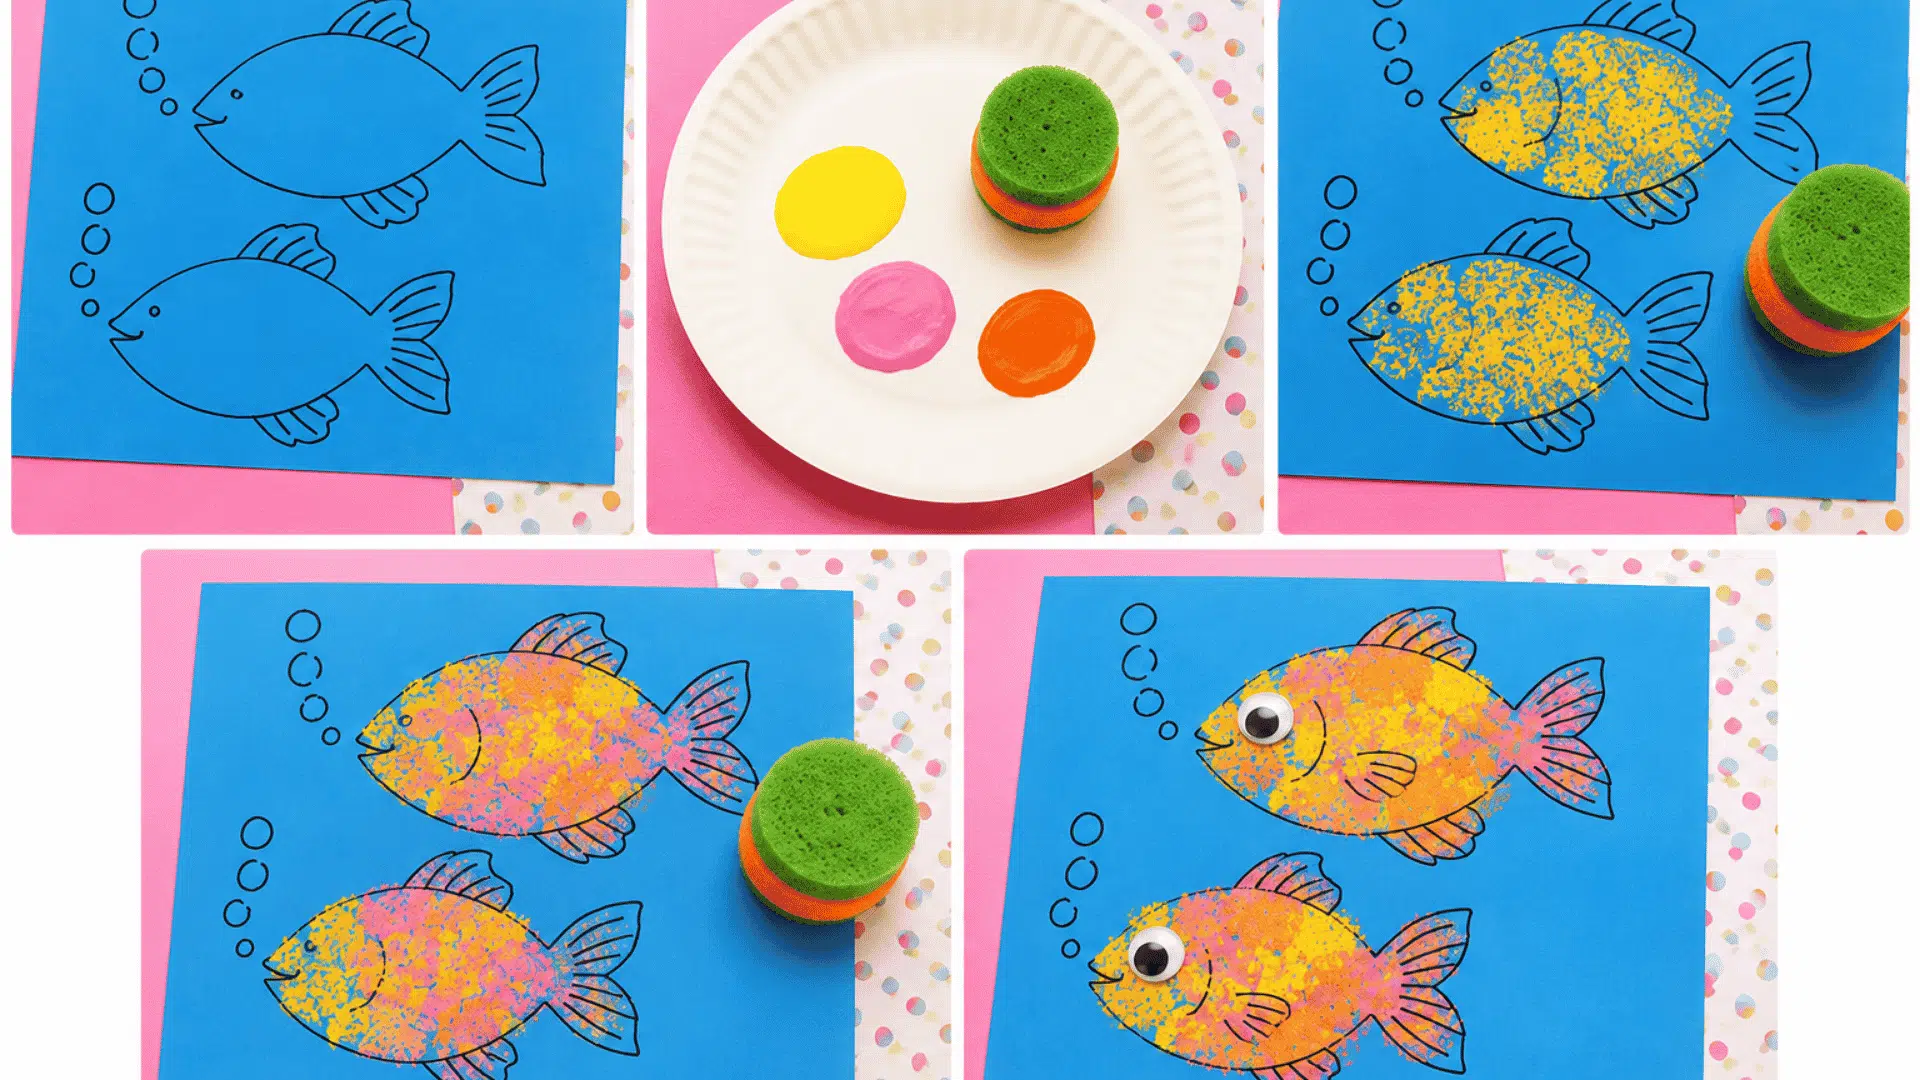
Sponge stamp fish are made by cutting sponges into fish shapes and pressing them into paint. This craft works well for group art because kids can stamp many fish onto paper and make a full underwater scene.
What you’ll need: Blue paper, washable paint, sponge, paper plate, googly eyes, black marker, and glue.
Steps:
- Draw two fish outlines on blue paper with a black marker.
- Pour paint onto a paper plate and dip the sponge into it.
- Dab the sponge inside each fish outline to fill the bodies with color.
- Let the paint dry, then glue googly eyes onto the fish.
- Draw bubbles, fins, tails, and extra details with a black marker.
14. CD Fish
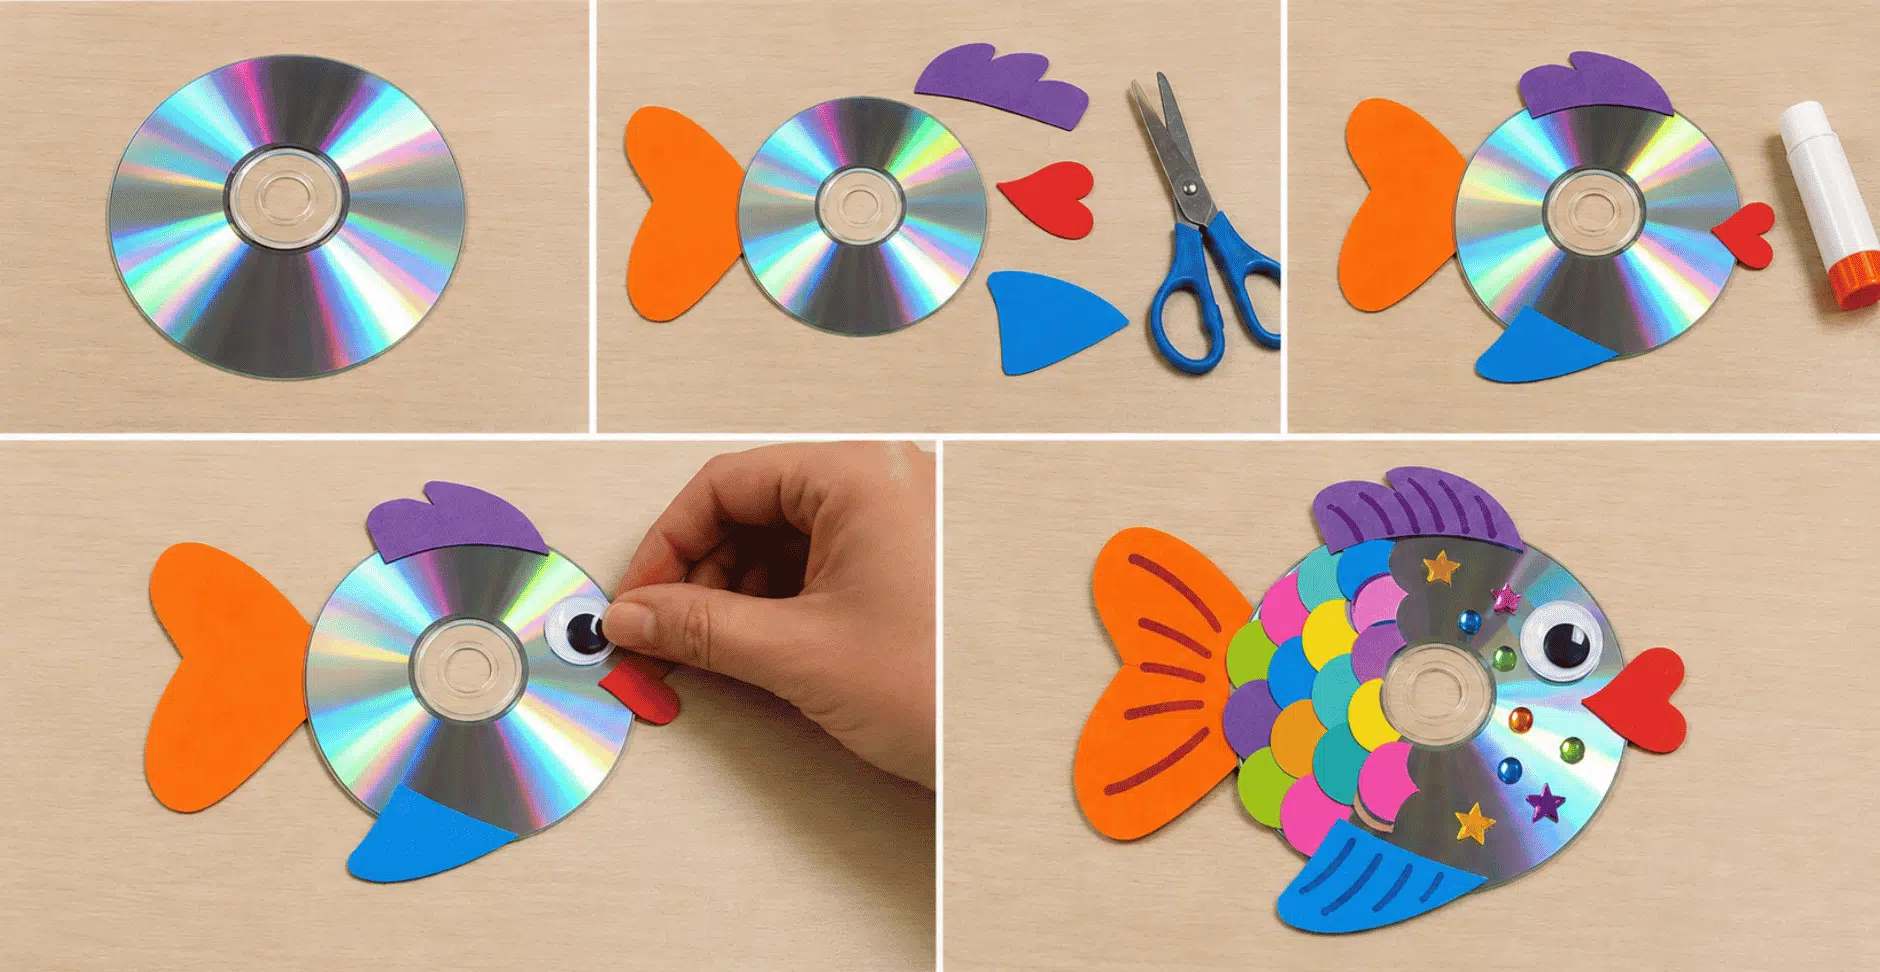
Old CDs can be reused as shiny fish bodies.
Their reflective surface gives the fish a bright scale effect, making this a good craft for reusing materials that might otherwise be thrown away.
What you’ll need: an old CD, construction paper, glue, scissors, a googly eye, markers or stickers.
Steps:
- Place the CD shiny side up.
- Cut fins, tail, and lips from construction paper.
- Glue the paper pieces to the back of the CD.
- Add a googly eye near the front.
- Decorate the body with stickers, markers, or paper scales.
15. Handprint Fish
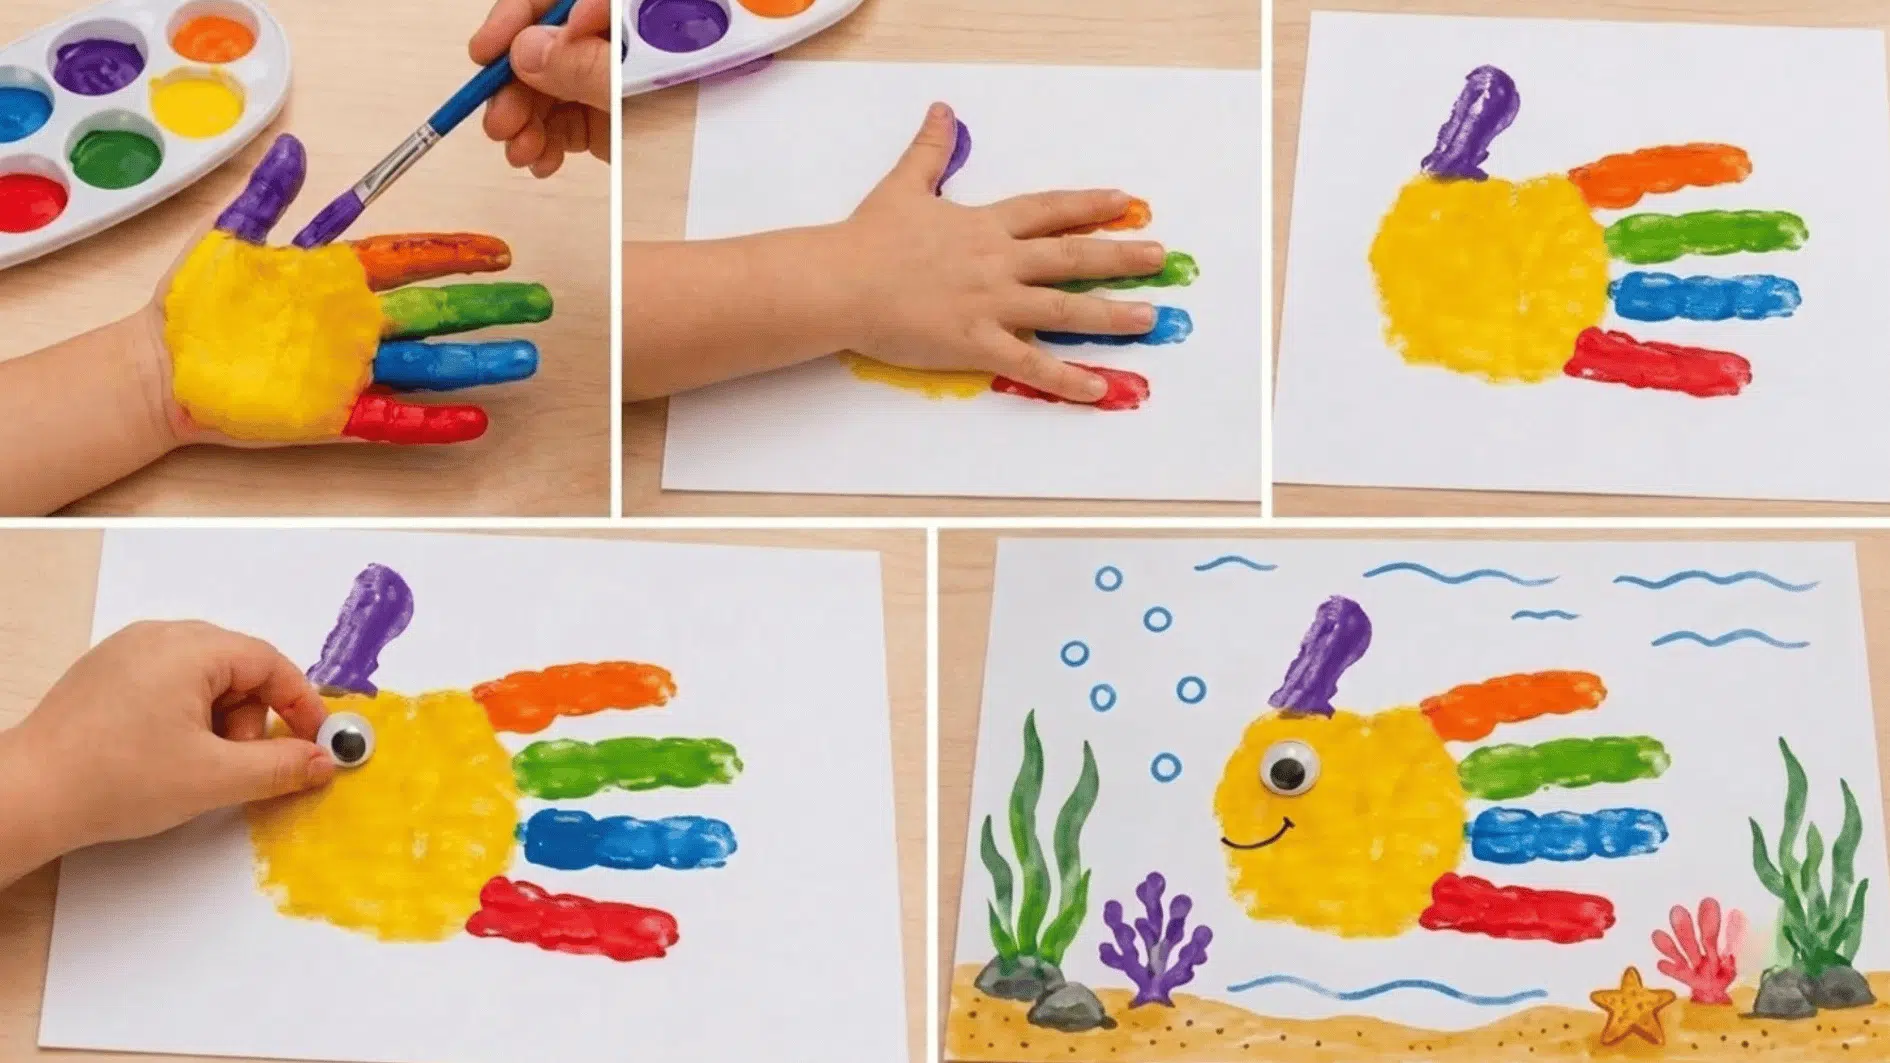
Handprint fish turn a child’s hand shape into a fish body, making the craft personal and easy to save as a keepsake. This idea works well for preschool, kindergarten, or family craft time.
What you’ll need: Paint, paper, paintbrush, googly eye, and markers.
Steps:
- Paint the child’s palm and fingers with bright colors.
- Press the hand sideways onto the paper.
- Let the handprint dry.
- Add a googly eye near the thumb area.
- Draw bubbles, water lines, and sea plants around the fish.
16. Button Scale Fish
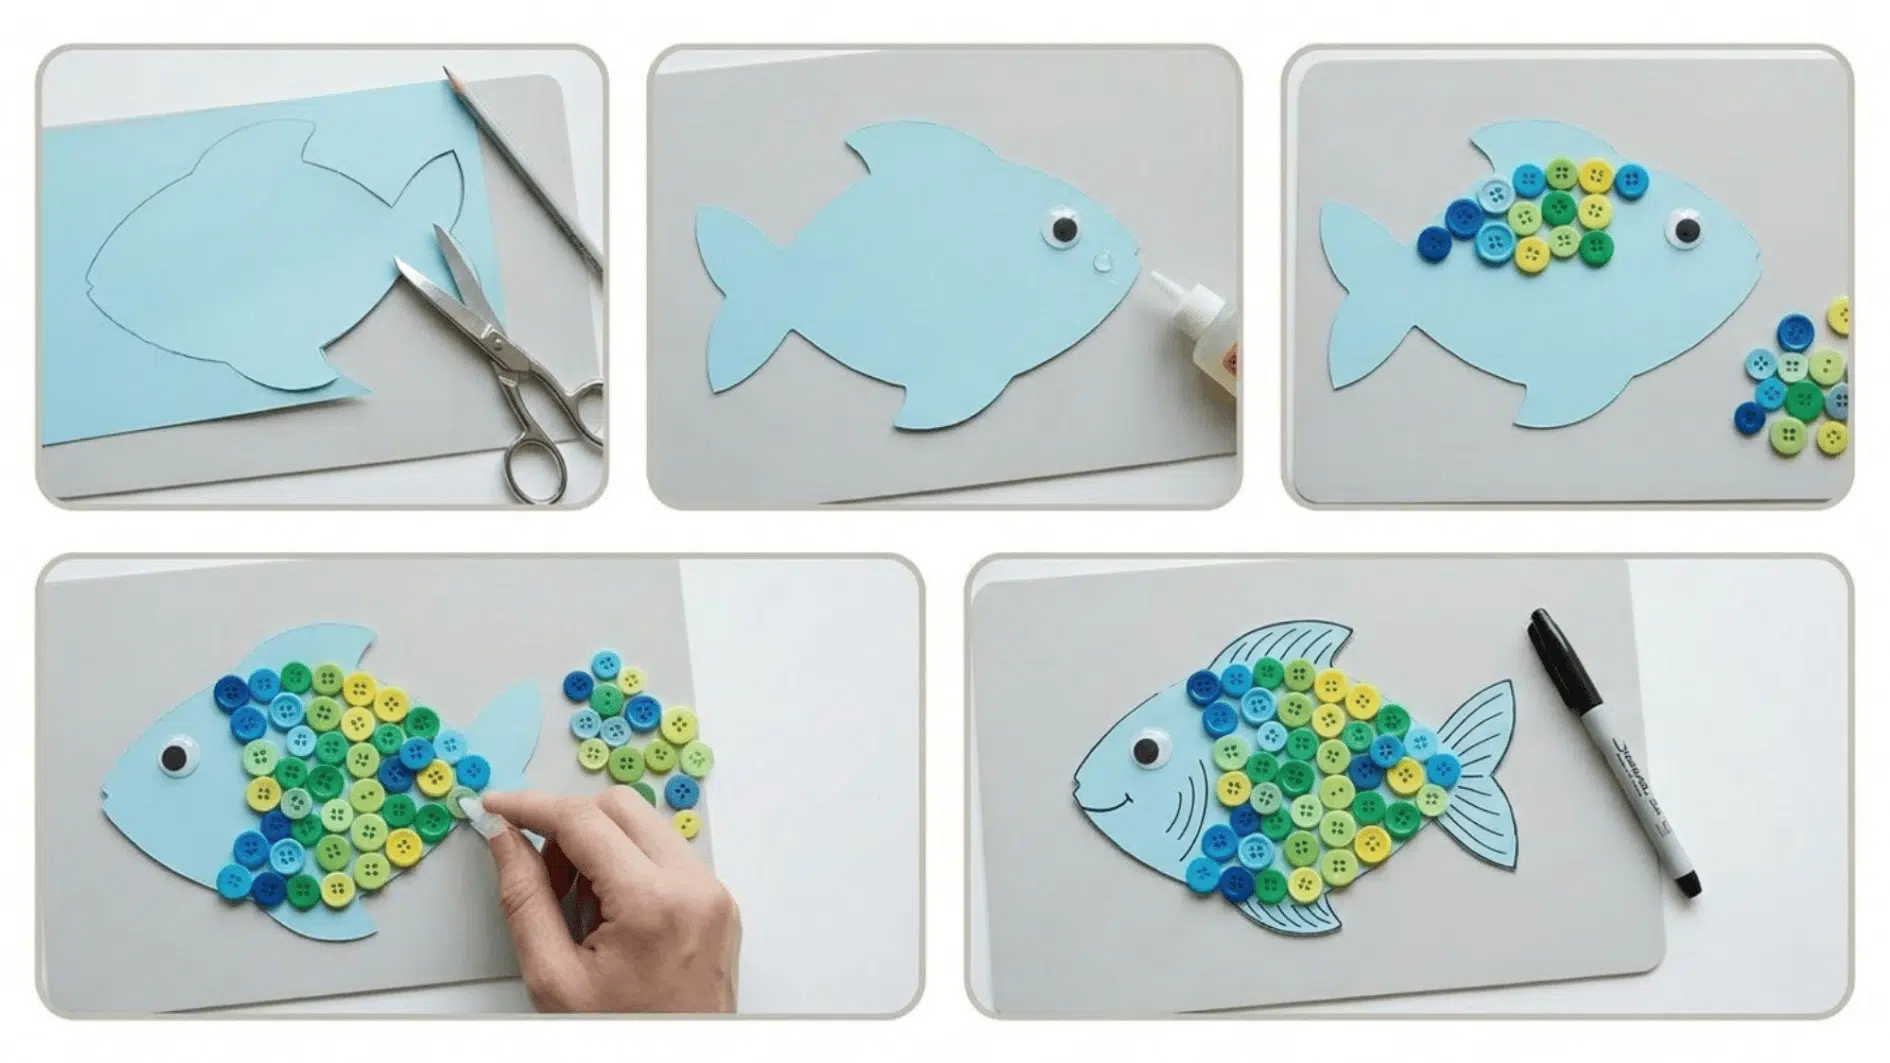
Button scale fish use small buttons as colorful scales. This craft helps kids practice sorting, placing, and gluing as they make a textured fish design.
What you’ll need: Cardstock, buttons, glue, pencil, scissors, googly eyes, and markers.
Steps:
- Draw and cut out a fish shape from cardstock.
- Glue a googly eye near the front.
- Arrange buttons across the fish’s body like scales.
- Glue each button in place.
- Use markers to add fins, tail lines, and extra details.
17. Bubble Wrap Fish
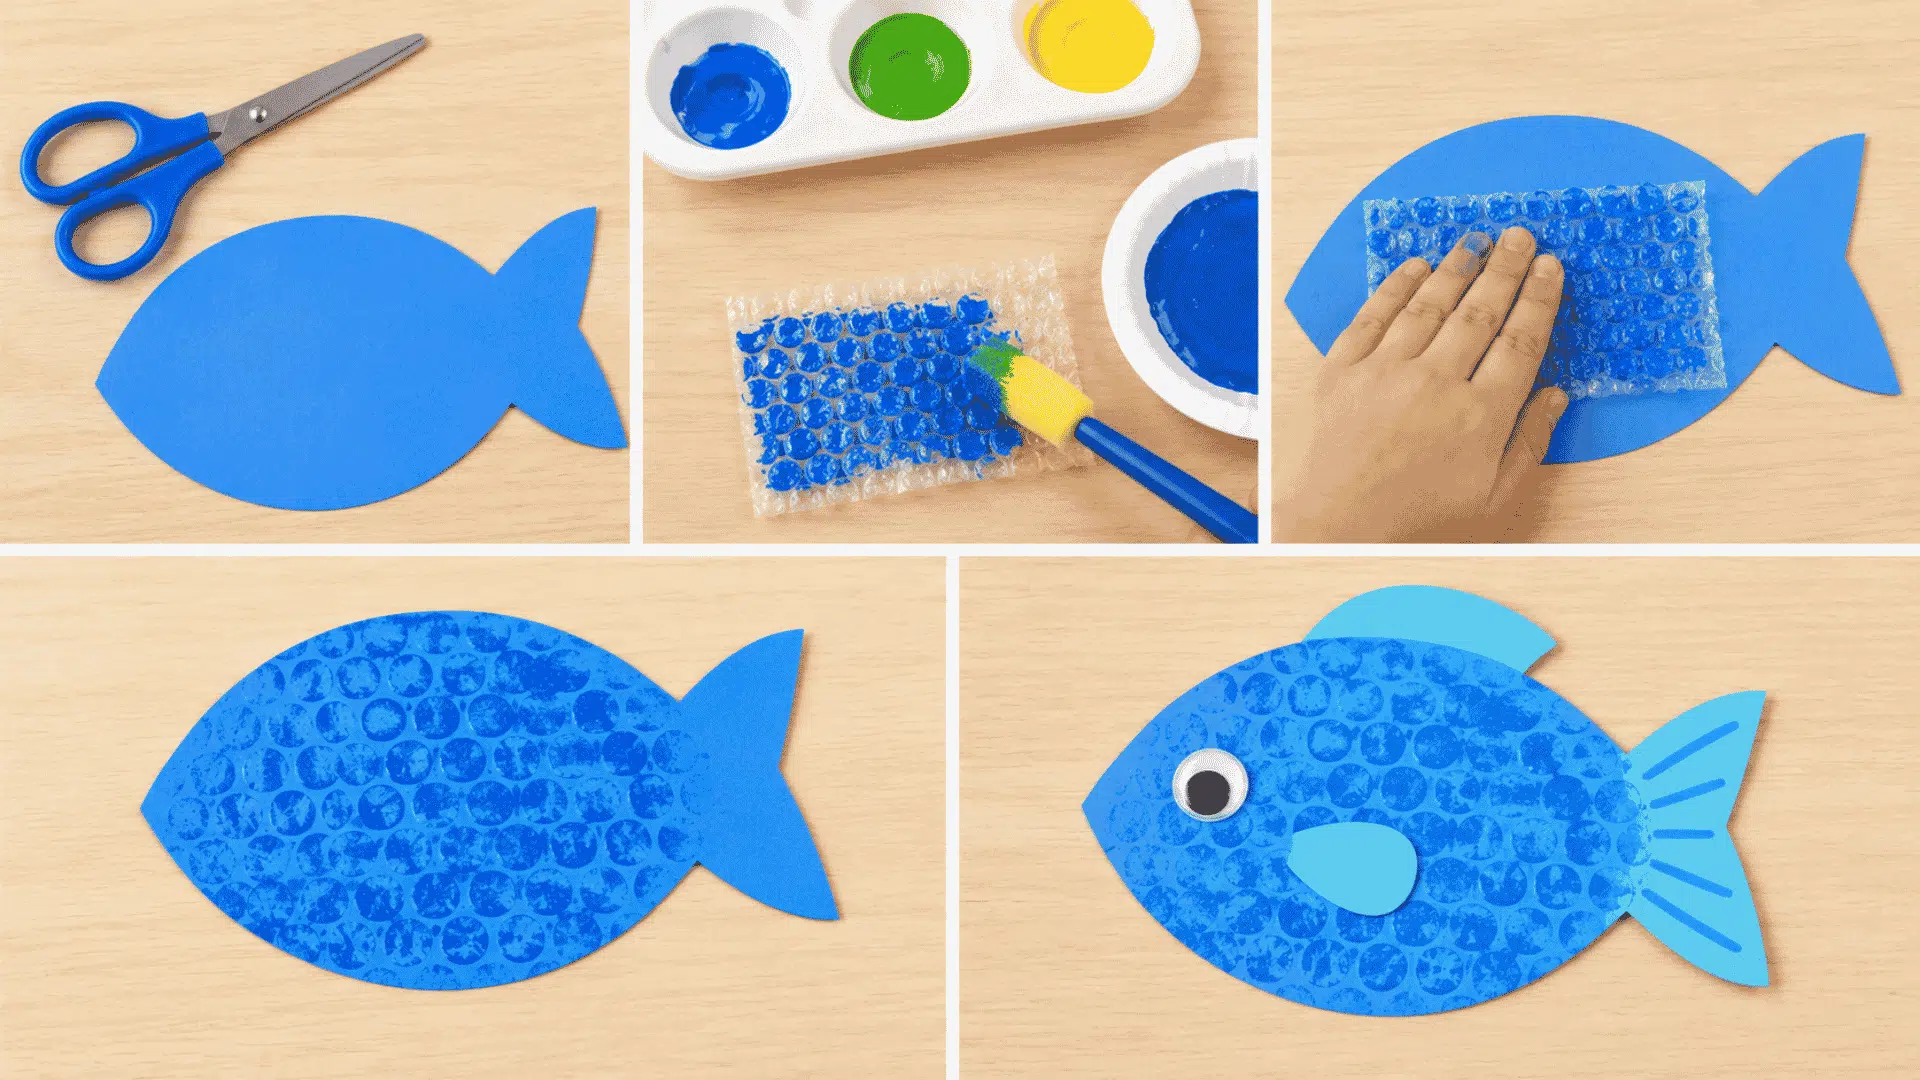
Bubble wrap fish are fun because the bubbles create a scale-like texture when painted or stamped. This craft is simple, low-cost, and great for sensory art.
What you’ll need: Bubble wrap, paint, cardstock, scissors, glue, and googly eyes.
Steps:
- Cut a fish shape from cardstock.
- Paint a small piece of bubble wrap.
- Press the painted bubble wrap onto the fish’s body to make scale marks.
- Let the paint dry.
- Add a googly eye and glue on paper fins if needed.
Wrapping it up
There are lots of fish craft, and different ways to make them. Mix colors, swap materials, or try a new one each week.
Start with the easy ones, like the paper plate or cupcake liner fish. Once those feel comfortable, move on to fabric or clay.
Keep a few templates ready for classroom or group crafting; they save time and help everyone finish together. Pick a project, grab your supplies, and start making.
Frequently Asked Questions
What Age Group Are Fish Crafts Best For?
Most ideas suit ages 3 and up with adult help for cutting or painting. Kids 6 and older can manage folding, gluing, and detail work like button scales on their own.
How Can You Make Paper Fish Crafts Last Longer?
Coat finished paper or cardstock fish with clear contact paper or a thin layer of Mod Podge. This protects colors and edges from bending, tearing, or fading over time.
What Can You Use Instead of Glue for Fish Crafts?
Double-sided tape or glue dots work well for lightweight pieces like paper scales or fins. They dry instantly and hold cleaner than liquid glue for younger kids.