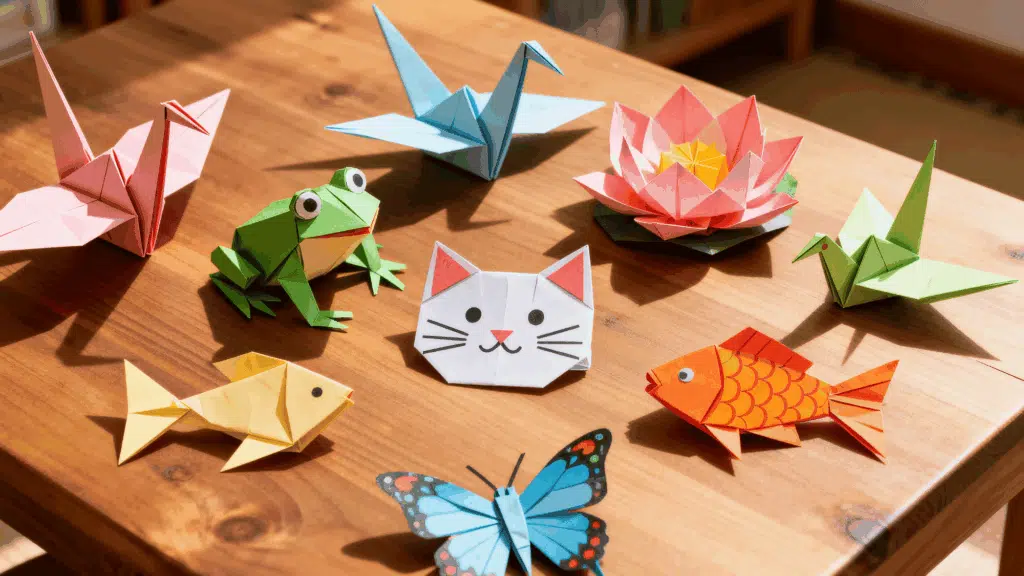
A square of paper, no scissors, no glue. Just your hands, and suddenly, you have a crane, a jumping frog, or a flower that looks impressive.
But if a tutorial ever left you with a crumpled mess instead of a clean design, the problem is usually the instructions, not your effort. Most guides skip the basics and rush the folds.
This blog covers origami ideas for all skill levels, from beginner easy origami to decorative designs worth displaying.
How Origami Helps Build Patience and Focus
Origami helps build patience and focus because every fold requires attention to detail and careful movement. Unlike many fast-paced activities, it encourages slowing down and concentrating on one step at a time.
Following the folding instructions helps improve problem-solving skills and attention span. Small mistakes often require adjustment, which can strengthen patience and persistence.
The repetitive nature of folding can also feel calming and reduce distractions. Over time, origami becomes a simple way to practice mindfulness while creating something meaningful from a single sheet of paper.
Beginner Origami Ideas
These beginner-friendly projects build confidence and core folding skills, giving kids a solid foundation in paper folding without feeling overwhelmed.
1. Classic Origami Crane
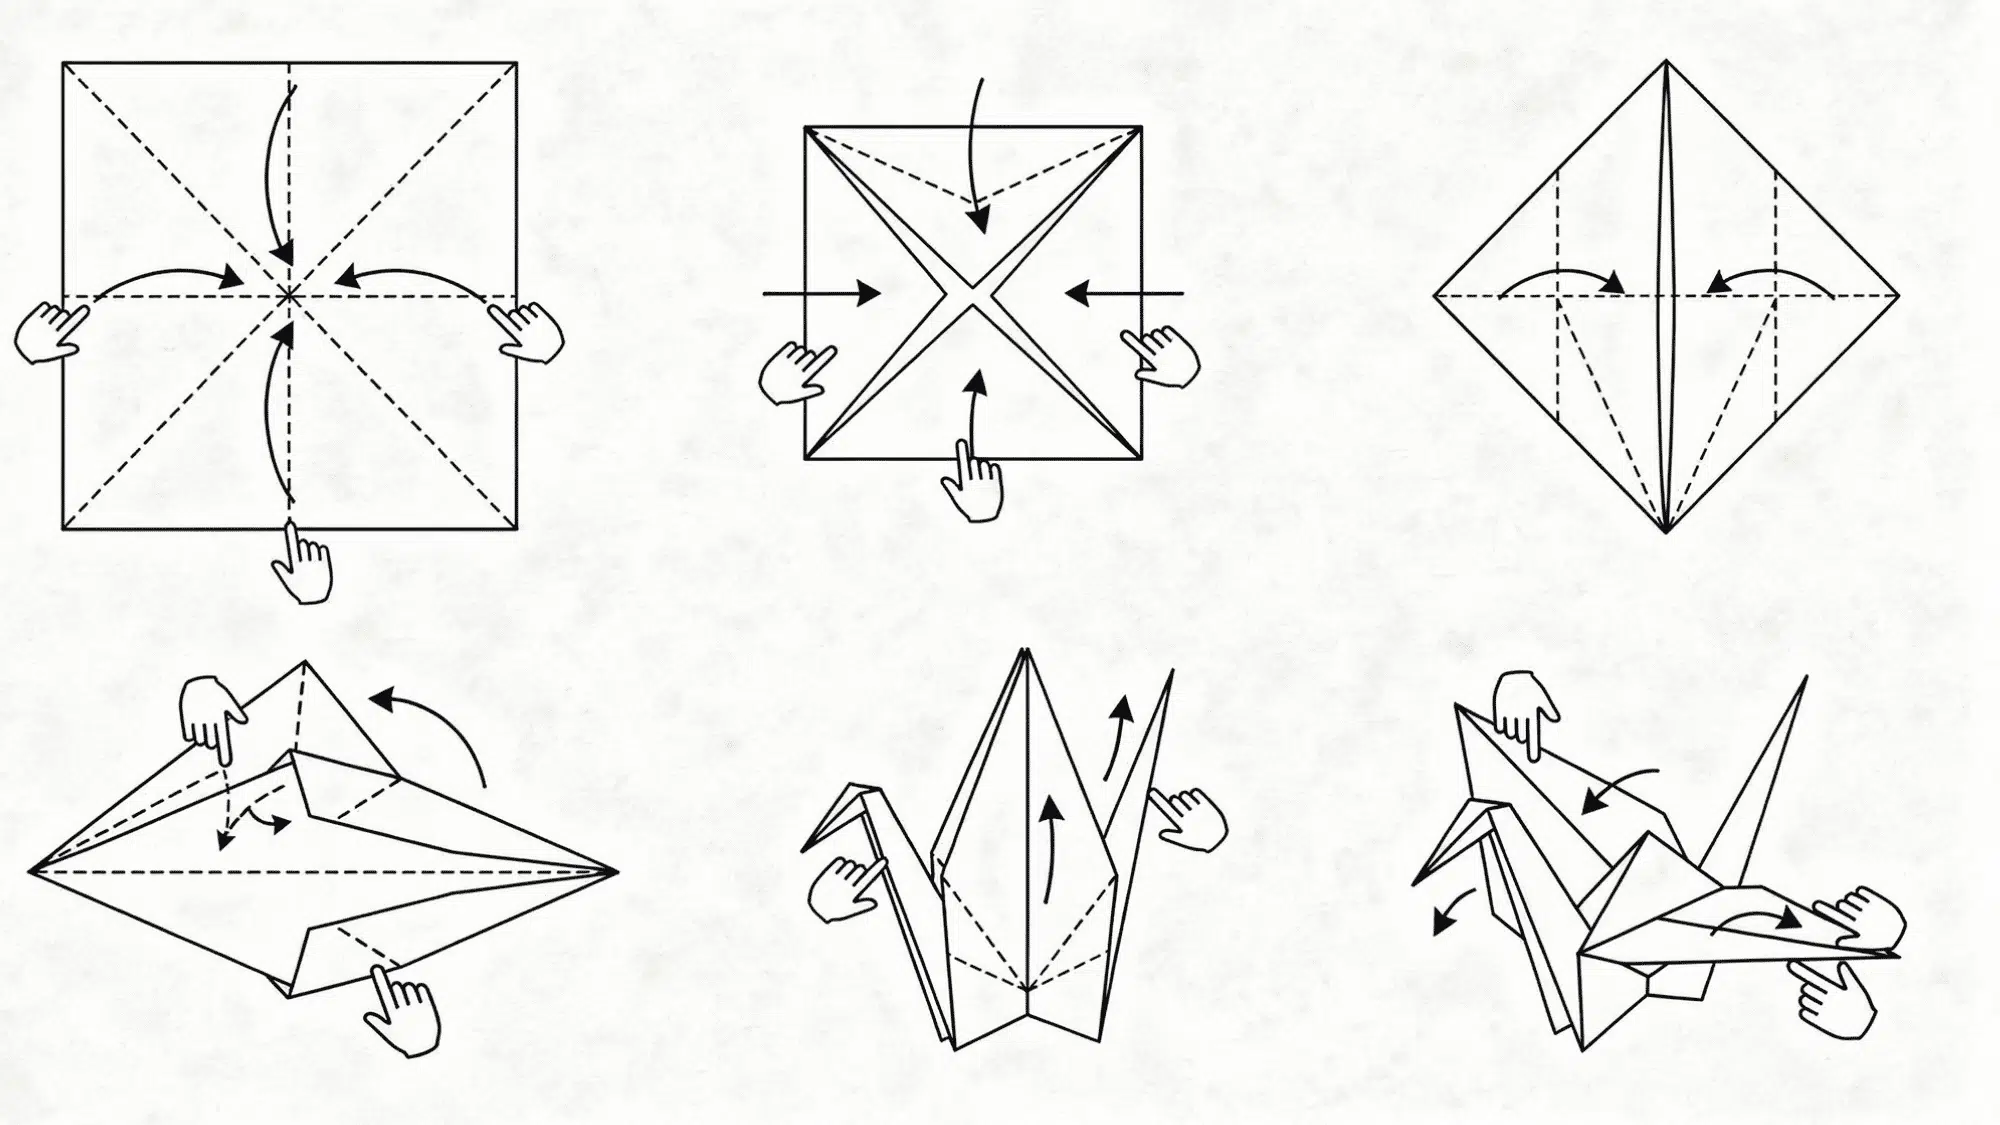
The origami crane is the most recognized design in the world, introducing the bird base, which is essential for many bird and animal origami models, making it a foundational skill for beginners and advanced folders alike.
Time: 15 minutes
Paper: 6×6 inch square
Steps:
- Fold both ways diagonally, then unfold. Fold horizontally and vertically, then unfold.
- Collapse into a square base by bringing corners together.
- Fold the left and right edges of the top layer into the center, unfold, then squash the fold upward into a diamond, and repeat on the back.
- Fold the top triangle down, unfold it, then open it and push the sides inward to form the bird base.
- Fold the bottom points up for the neck and tail. Pull them apart to puff wings.
- Inside, reverse-fold neck and tail to shape head and tail tip.
2. Simple Origami Lotus Flower
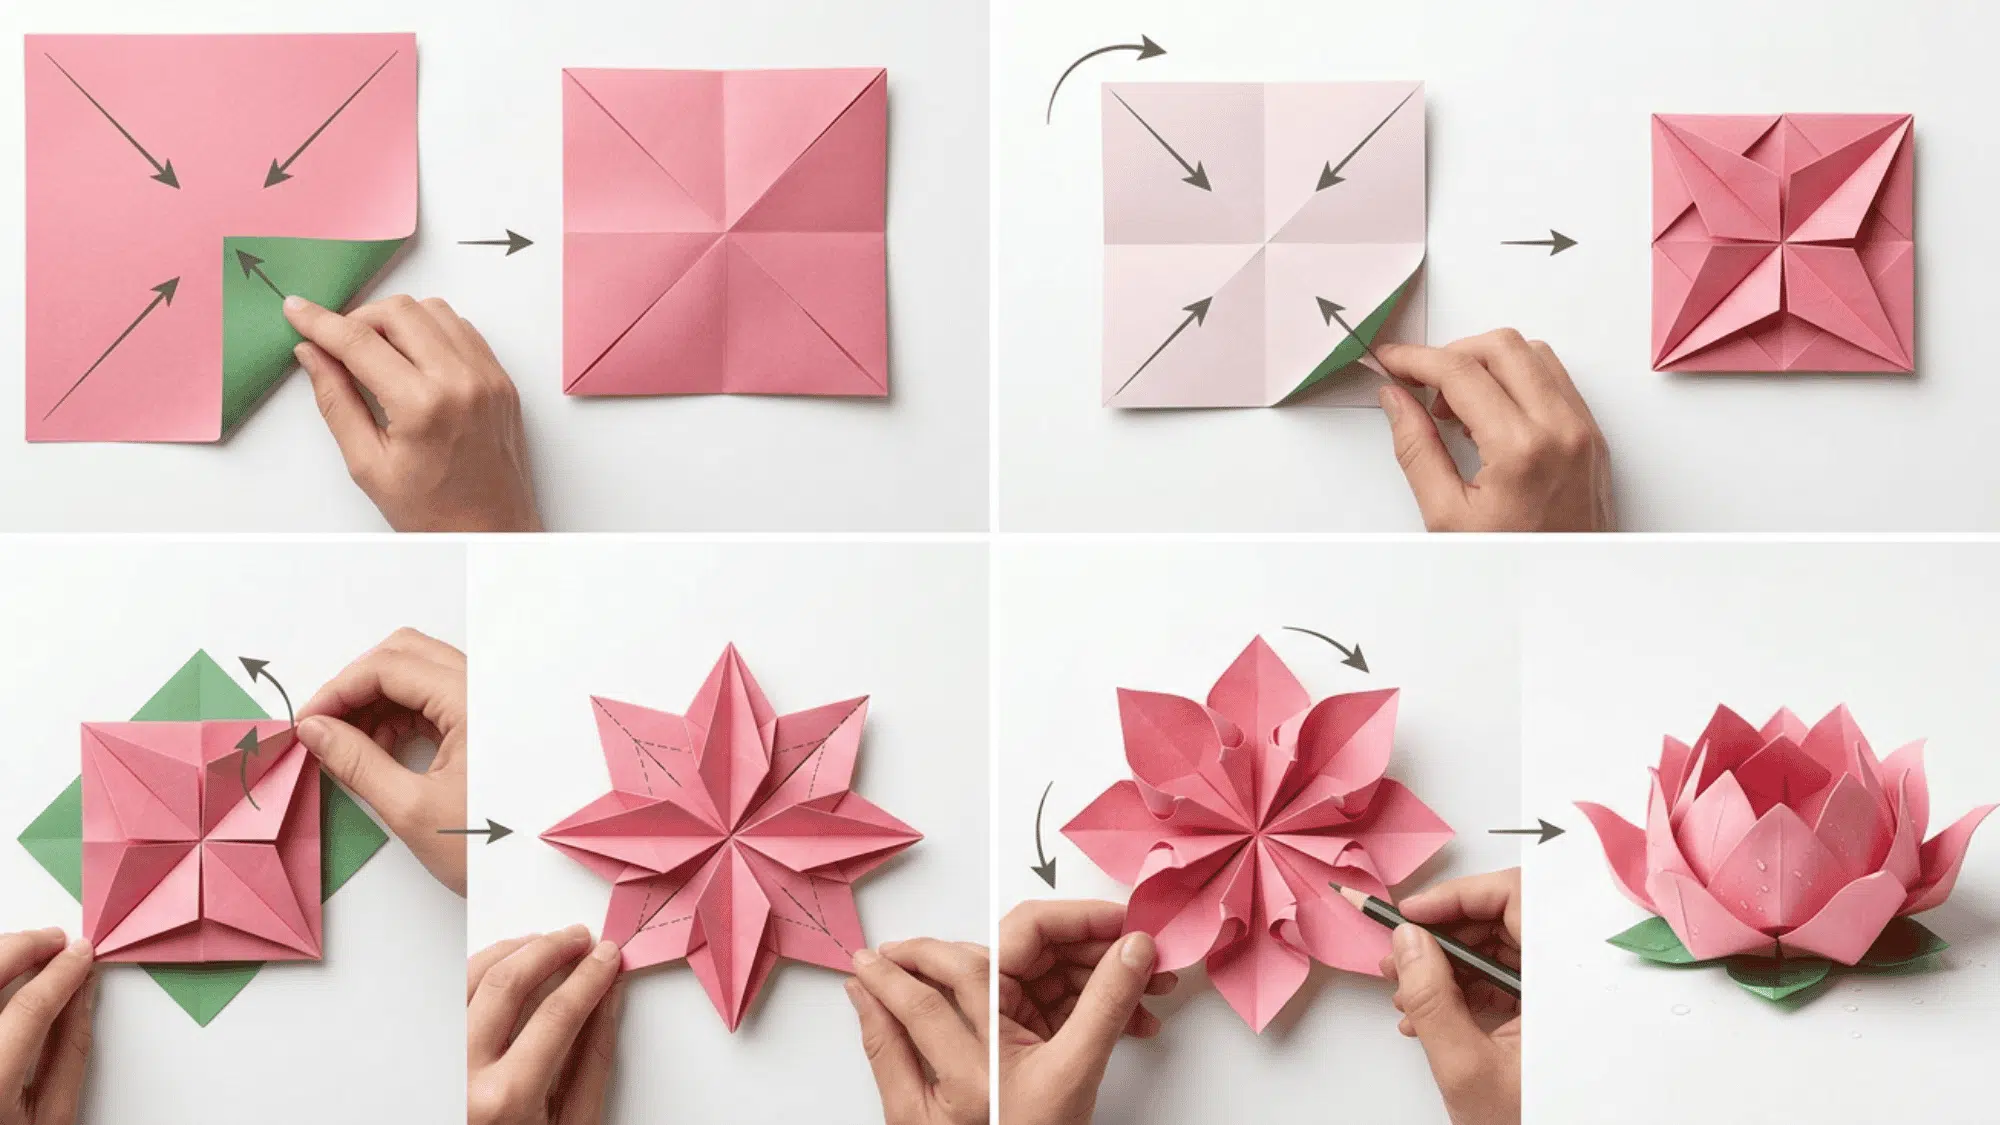
This origami idea requires no cuts or glue, yet creates an elegant, impressive design, making it a perfect project for beginners looking to practice precise folding techniques
Time: 5-8 minutes
Paper: 6×6 inch square
Steps:
- Fold all four corners to the center. Flip over.
- Fold the corners to the center again. Flip once more.
- Lift each corner flap, open slightly, and perform a petal fold. Repeat for all four.
- Gently pull petals apart and curl edges back with a pencil.
3. Easy Origami Box
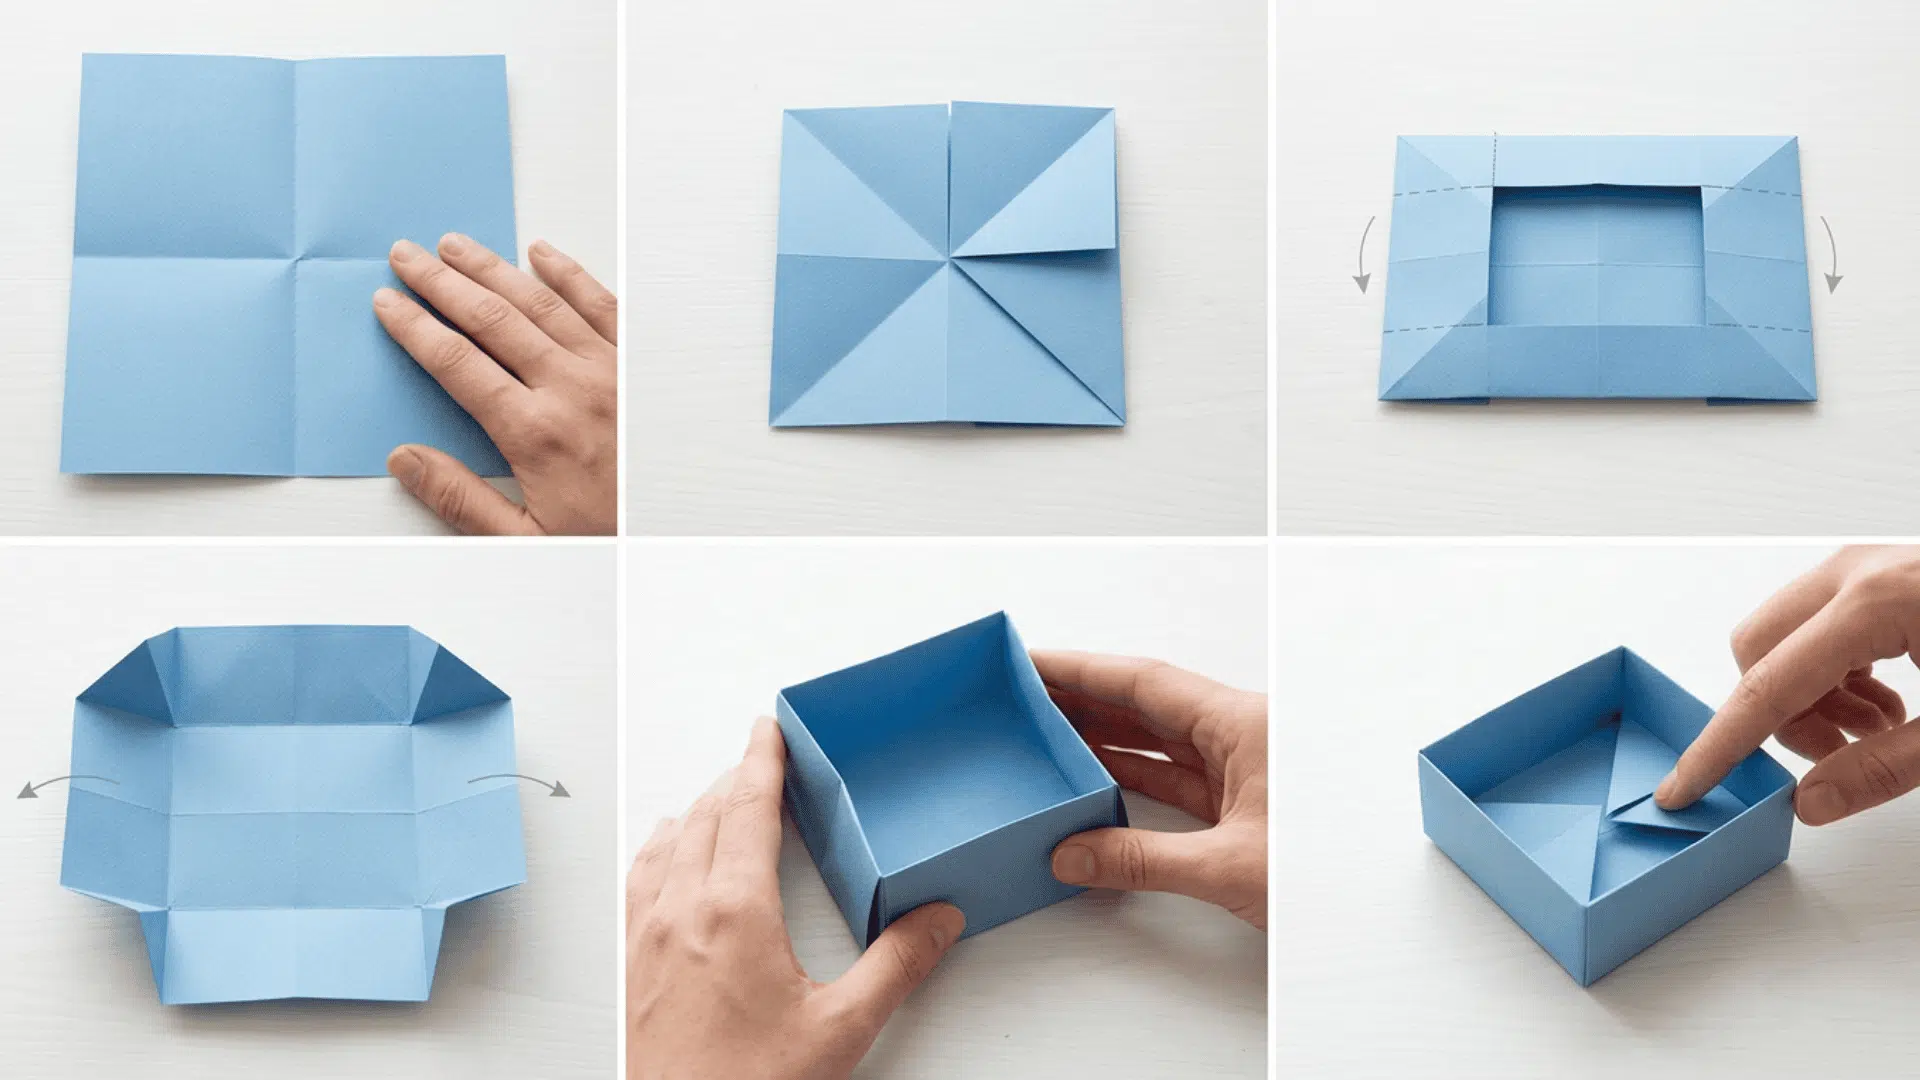
The origami box is both functional and satisfying, perfect for holding small items, organizing a desk, or serving as a creative gift container, while also being simple and fun to fold.
Time: 5–7 minutes
Paper: 6×6 inch square
Steps:
- Fold in half both ways, then unfold.
- Fold all four corners to the center.
- Fold the top and bottom edges to the center, then unfold; repeat on the left and right, and unfold.
- Open the left and right flaps, then lift the top and bottom sides.
- Squash the side corners inward and bring the walls up to form a box.
- Tuck loose flaps inside.
4. Origami Bookmark Corner
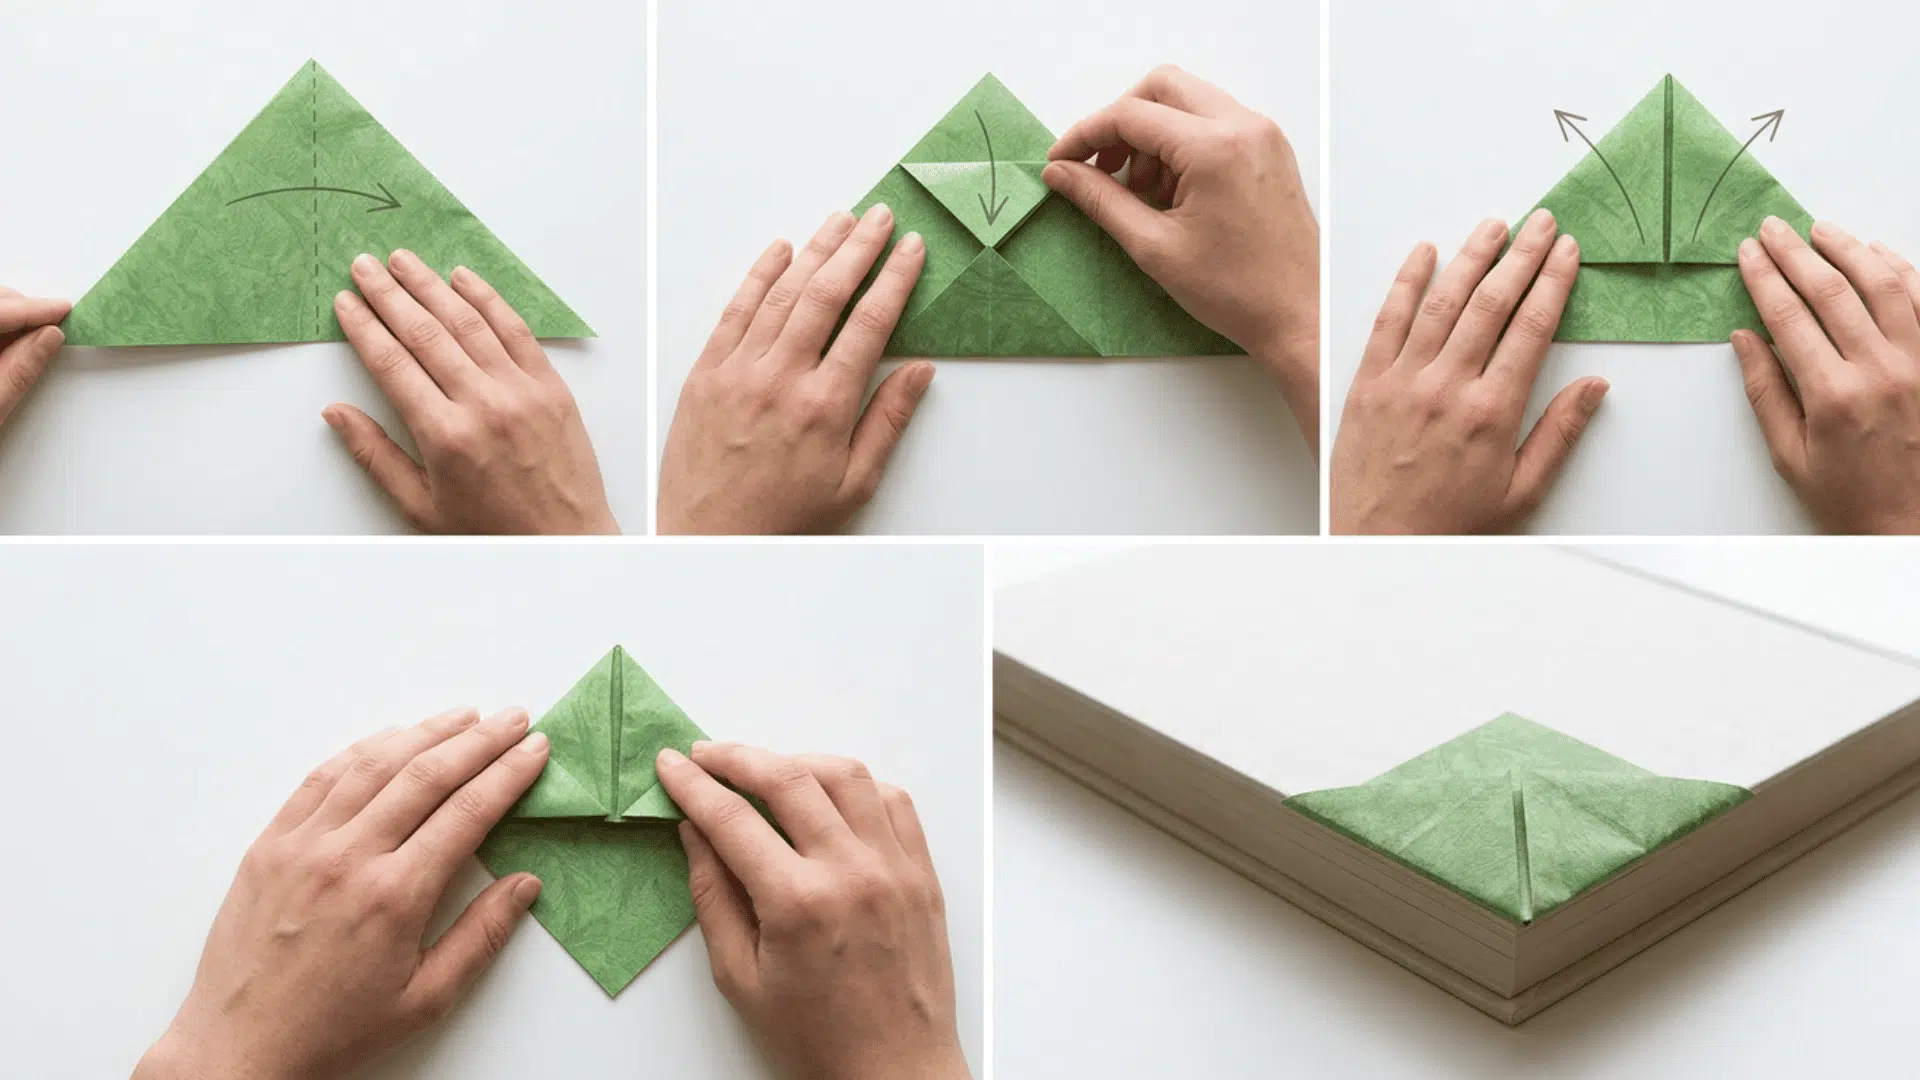
The origami bookmark corner is quick and practical, taking just a few minutes to fold, and makes a perfect personalized gift or a handy addition to your own books.
Time: 3–5 minutes
Paper: 6×6 inch square
Steps:
- Fold diagonally to make a triangle.
- Fold the top corner of the top layer down to the bottom edge.
- Fold the left and right corners up to meet the top center
- Tuck into the pocket from Step 2.
- Slip over a page corner.
5. Origami Cat Face
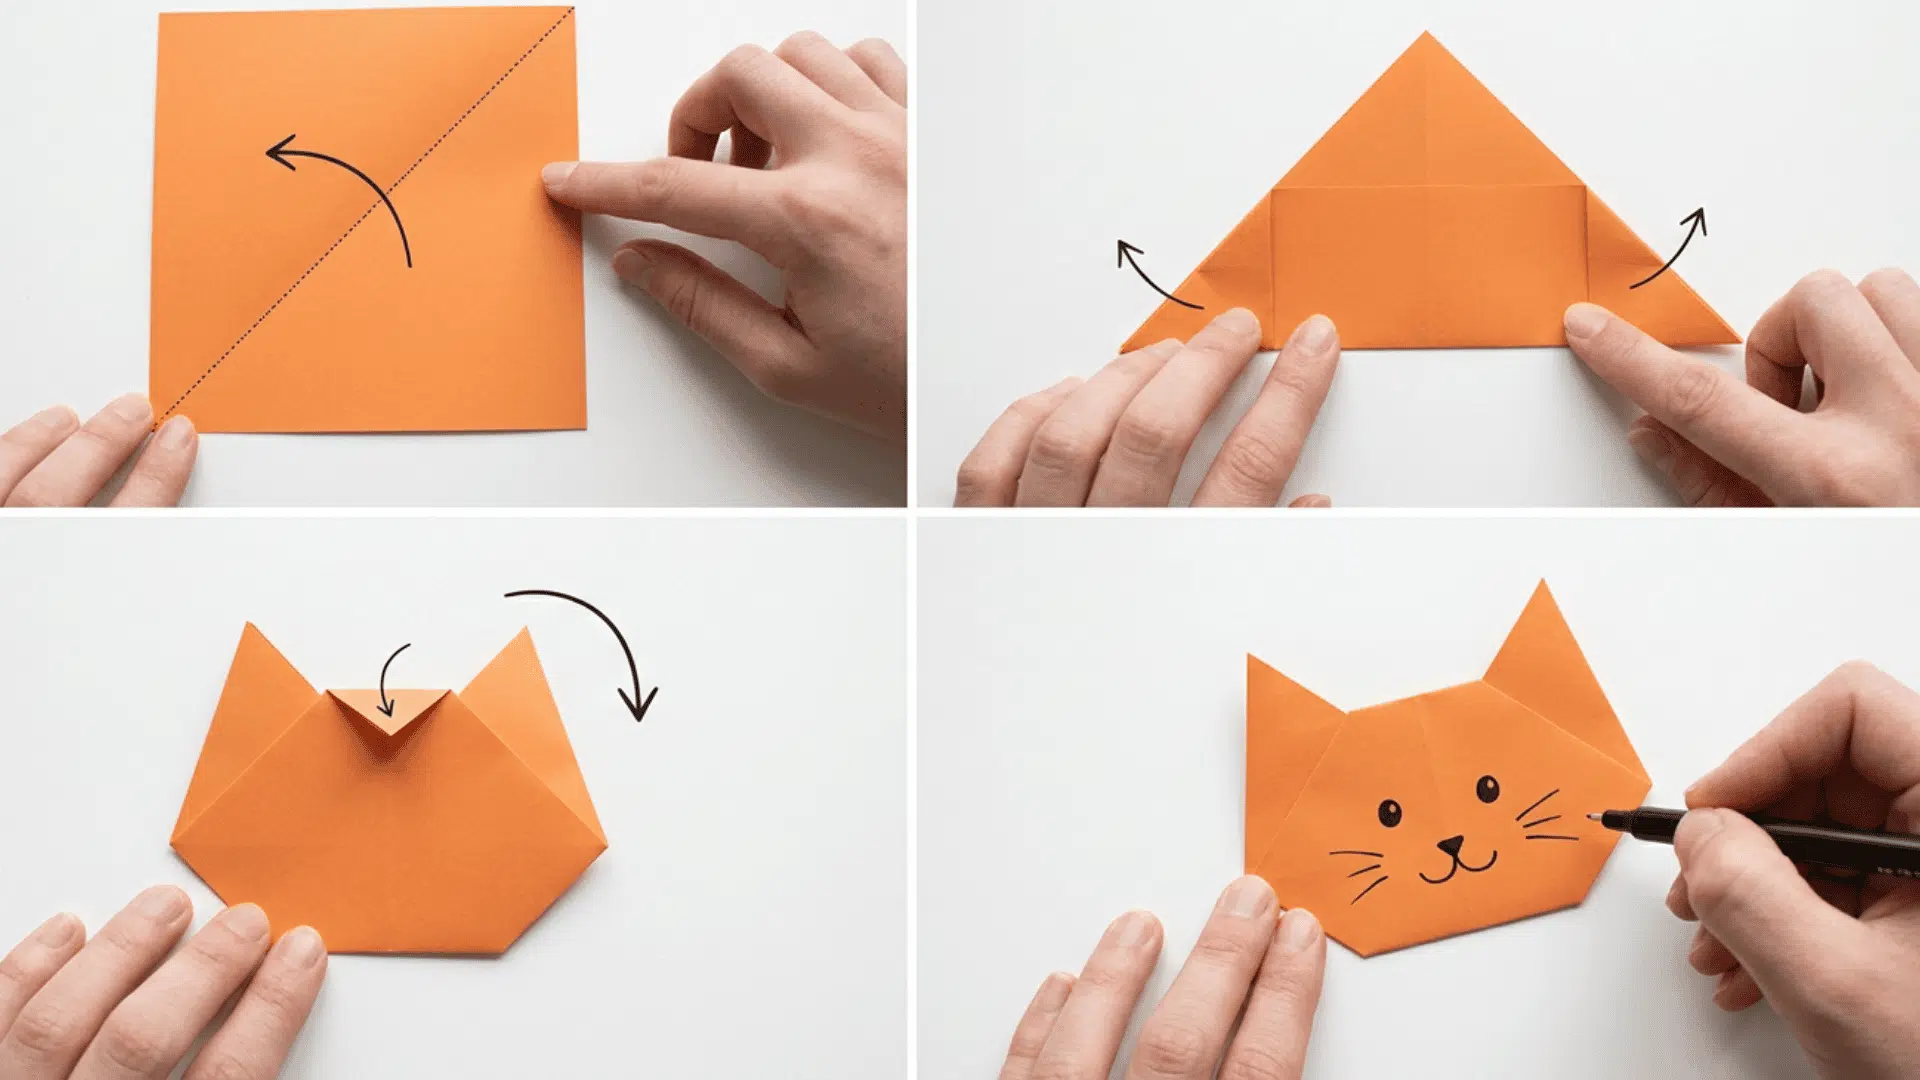
The origami cat face is simple and quick to make, featuring a flat 2D design that’s perfect for beginners and kids. Its playful shape makes it ideal for greeting cards, decorations, or small craft projects.
Time: 3–5 minutes
Paper: 6×6 inch square
Steps:
- Fold diagonally to make a triangle.
- Fold the bottom corners up and outward for ears.
- Fold the top point down slightly to flatten the head.
- Flip and draw a face.
6. Origami Jumping Frog
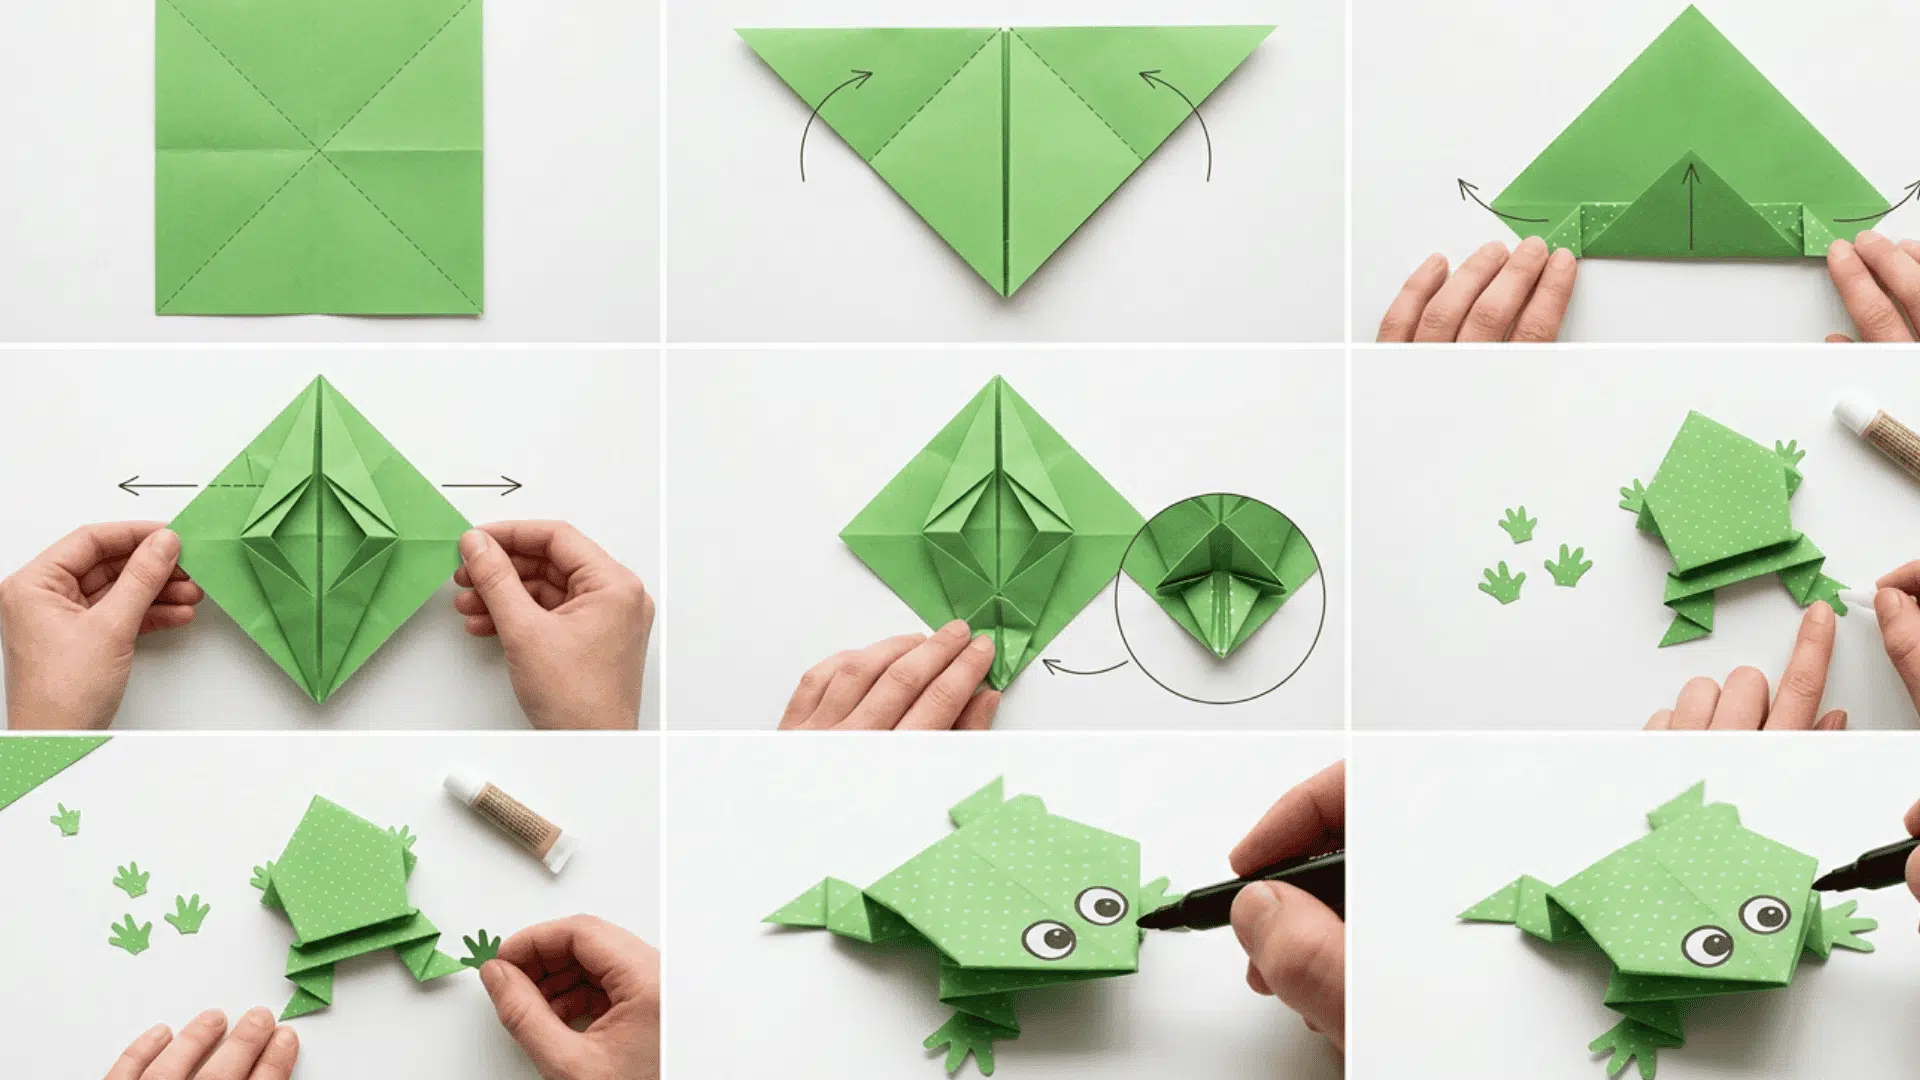
Pressing the back of the origami frog makes it jump, providing a fun, interactive experience that kids adore. Its simple design also appeals to adults, making it a playful and engaging craft for all ages.
Time: 8–10 minutes
Paper: 6×6 inch square
Steps:
- Start with a square sheet, crease both diagonals, and unfold.
- Fold both top corners down to meet the center crease, forming a wide triangle.
- Fold the bottom point up and crease the leg flaps outward.
- Pull the side points out — the body kite shape locks into place.
- Use an inside-reverse fold on the tail end to create the split rear.
- Cut out paper hand shapes and glue them to the front leg tips.
- Draw two big round eyes on the top face – your frog is done.
Tip: Spring fold must be crisp. Test on a smooth surface for best jumping.
7. Origami Butterfly
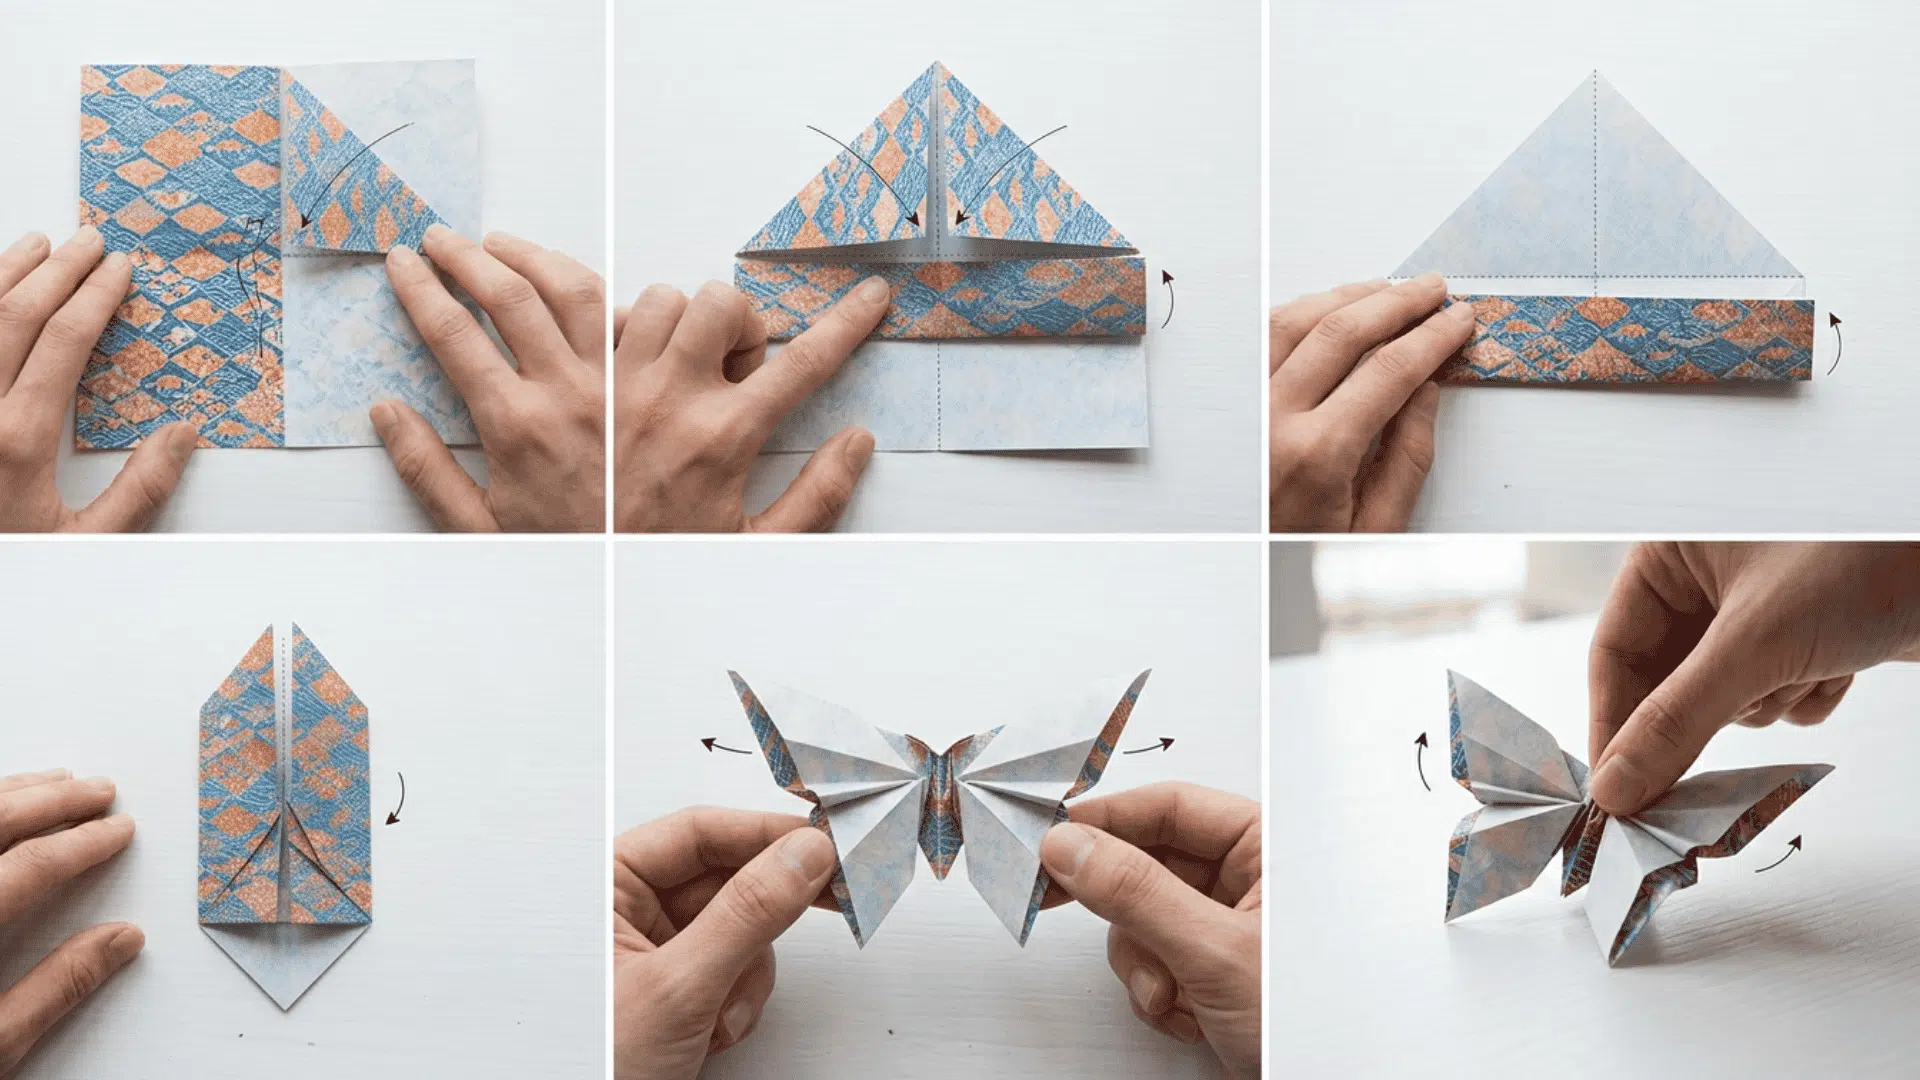
Light and decorative, origami butterflies work beautifully in multiples, making them ideal for creating vibrant garlands. Their simple folds allow them to hang easily, adding movement and charm to walls, ceilings, or party decorations.
Time: 5–7 minutes
Paper: 6×6 inch square
Steps:
- Fold lengthwise, unfold.
- Fold the top corners to the center crease.
- Flip, fold the bottom edge up one-third, then back down.
- Fold in half vertically.
- Pinch the center and pull the wings outward.
8. Origami Fish
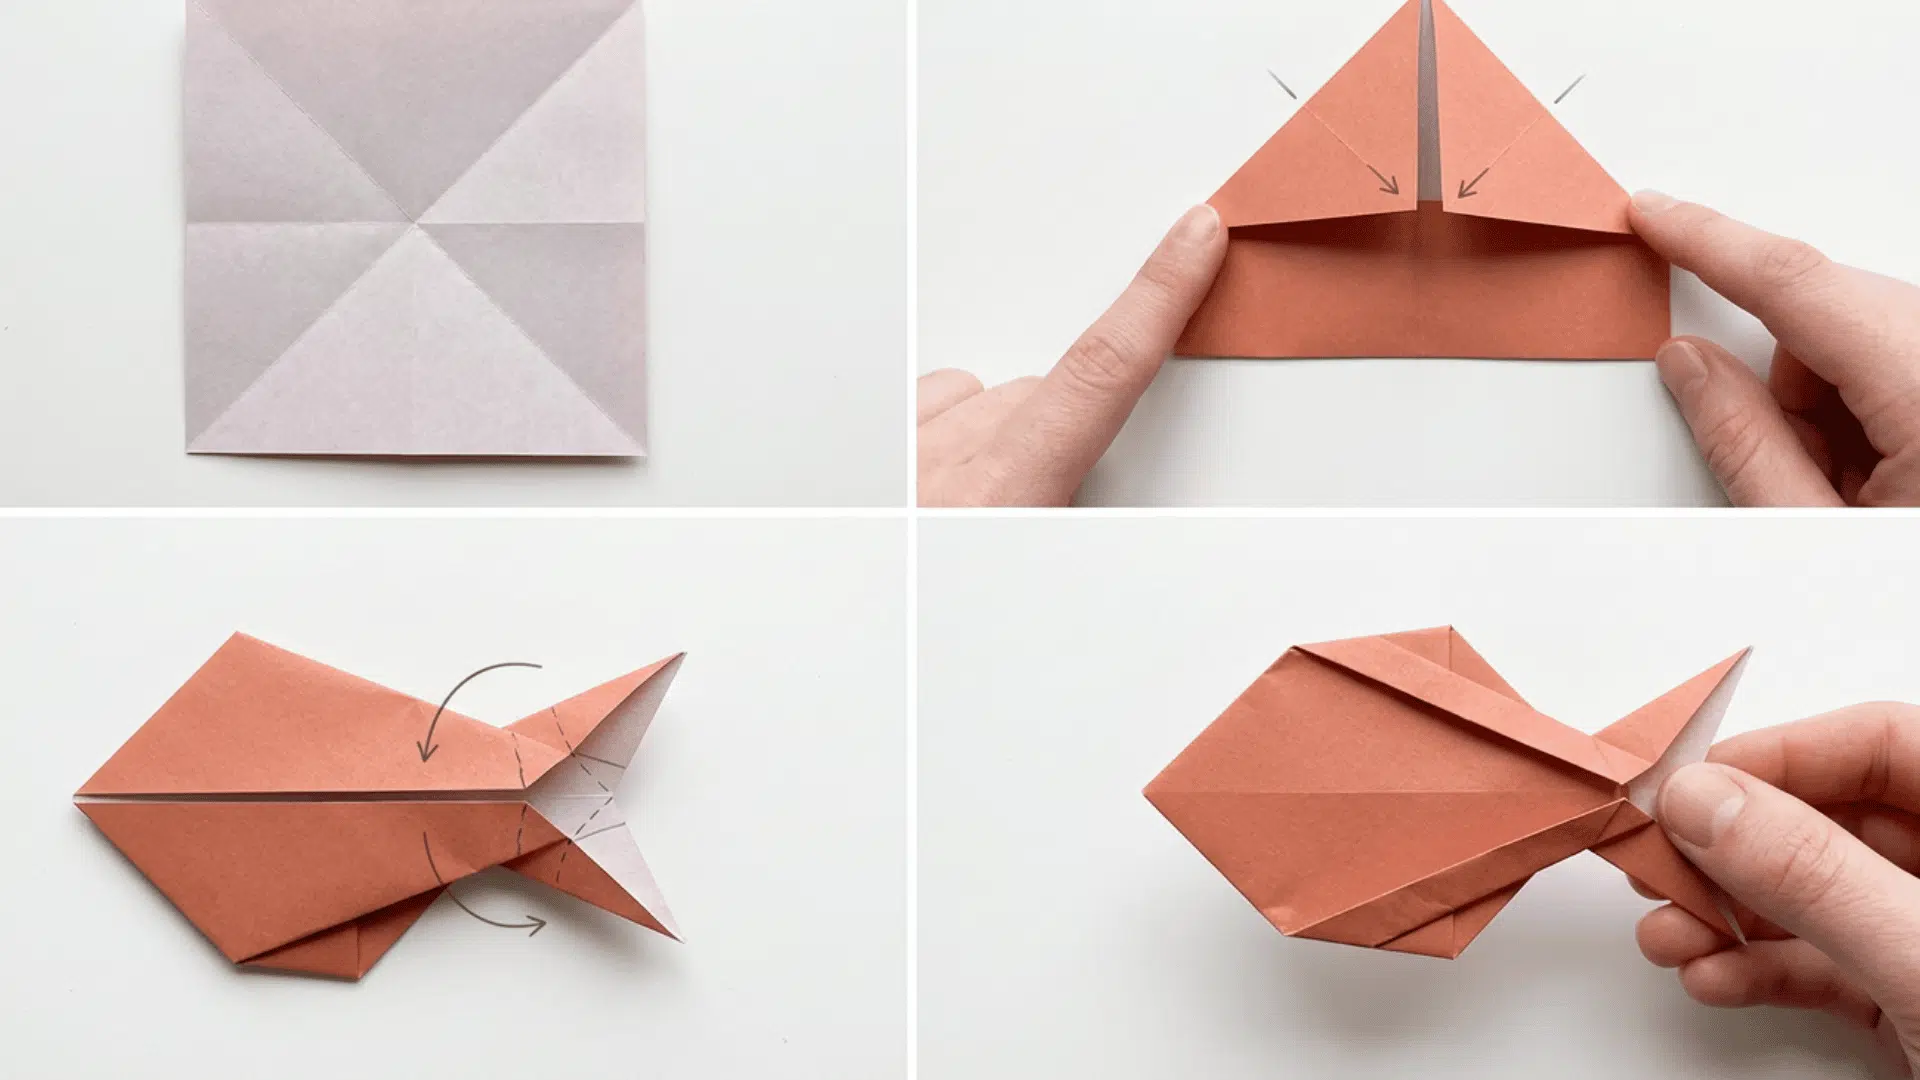
Clean, minimal design makes the origami fish perfect for both mobile-friendly projects and wall displays, enabling easy viewing and a neat presentation. Its simple folds highlight the shape while keeping it lightweight and versatile for decoration or educational use
Time: 5–7 minutes
Paper: 6×6 inch square
Steps:
- Fold both ways diagonally, unfold.
- Fold two adjacent corners to the center.
- Flip, fold one point across and back for the tail.
- Fold the top and bottom edges in slightly.
9. Origami Crab
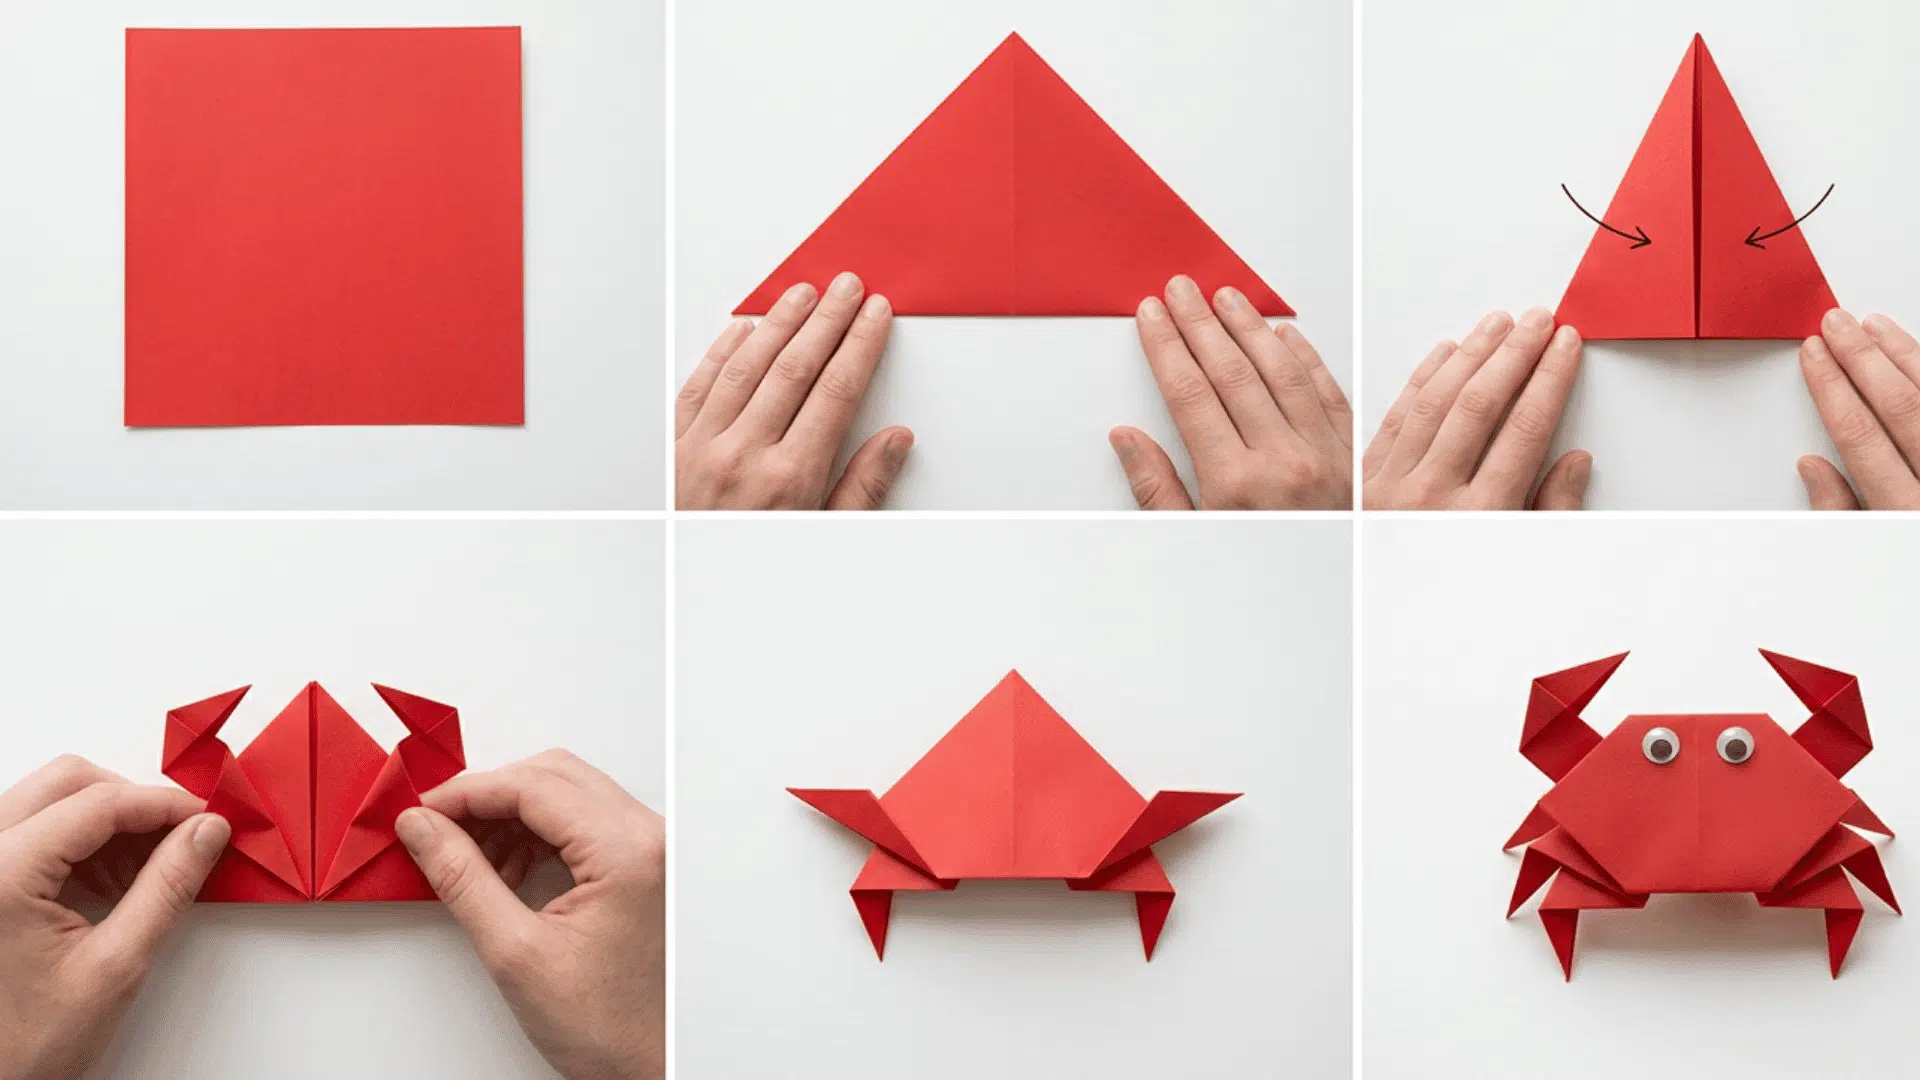
This origami idea is a great hands-on activity for kids aged 5 and up. It helps build focus, fine motor skills, and patience while keeping things fun. The folding steps are straightforward enough for beginners to follow without any prior experience.
Time: 10–12 minutes
Paper: 6 x 6 inches square
Steps:
- Place a square sheet of paper flat on the surface. Red paper works best for a classic crab look, but any color works fine.
- Fold the paper in half diagonally to form a large triangle. Press the crease firmly along the fold line.
- Bring the two outer corners of the triangle together and fold once more. This creates a smaller, thicker triangle with a clean, pointed tip.
- Open the folded layers slightly and pull the inner flaps outward on both sides. Press them down flat to create the two front claws.
- Fold the lower sections of the paper outward on each side to form the legs. Press each fold firmly so the shape stays symmetrical.
- Stick two googly eyes onto the front face of the crab, side by side near the top center, to finish.
10. Origami Whale
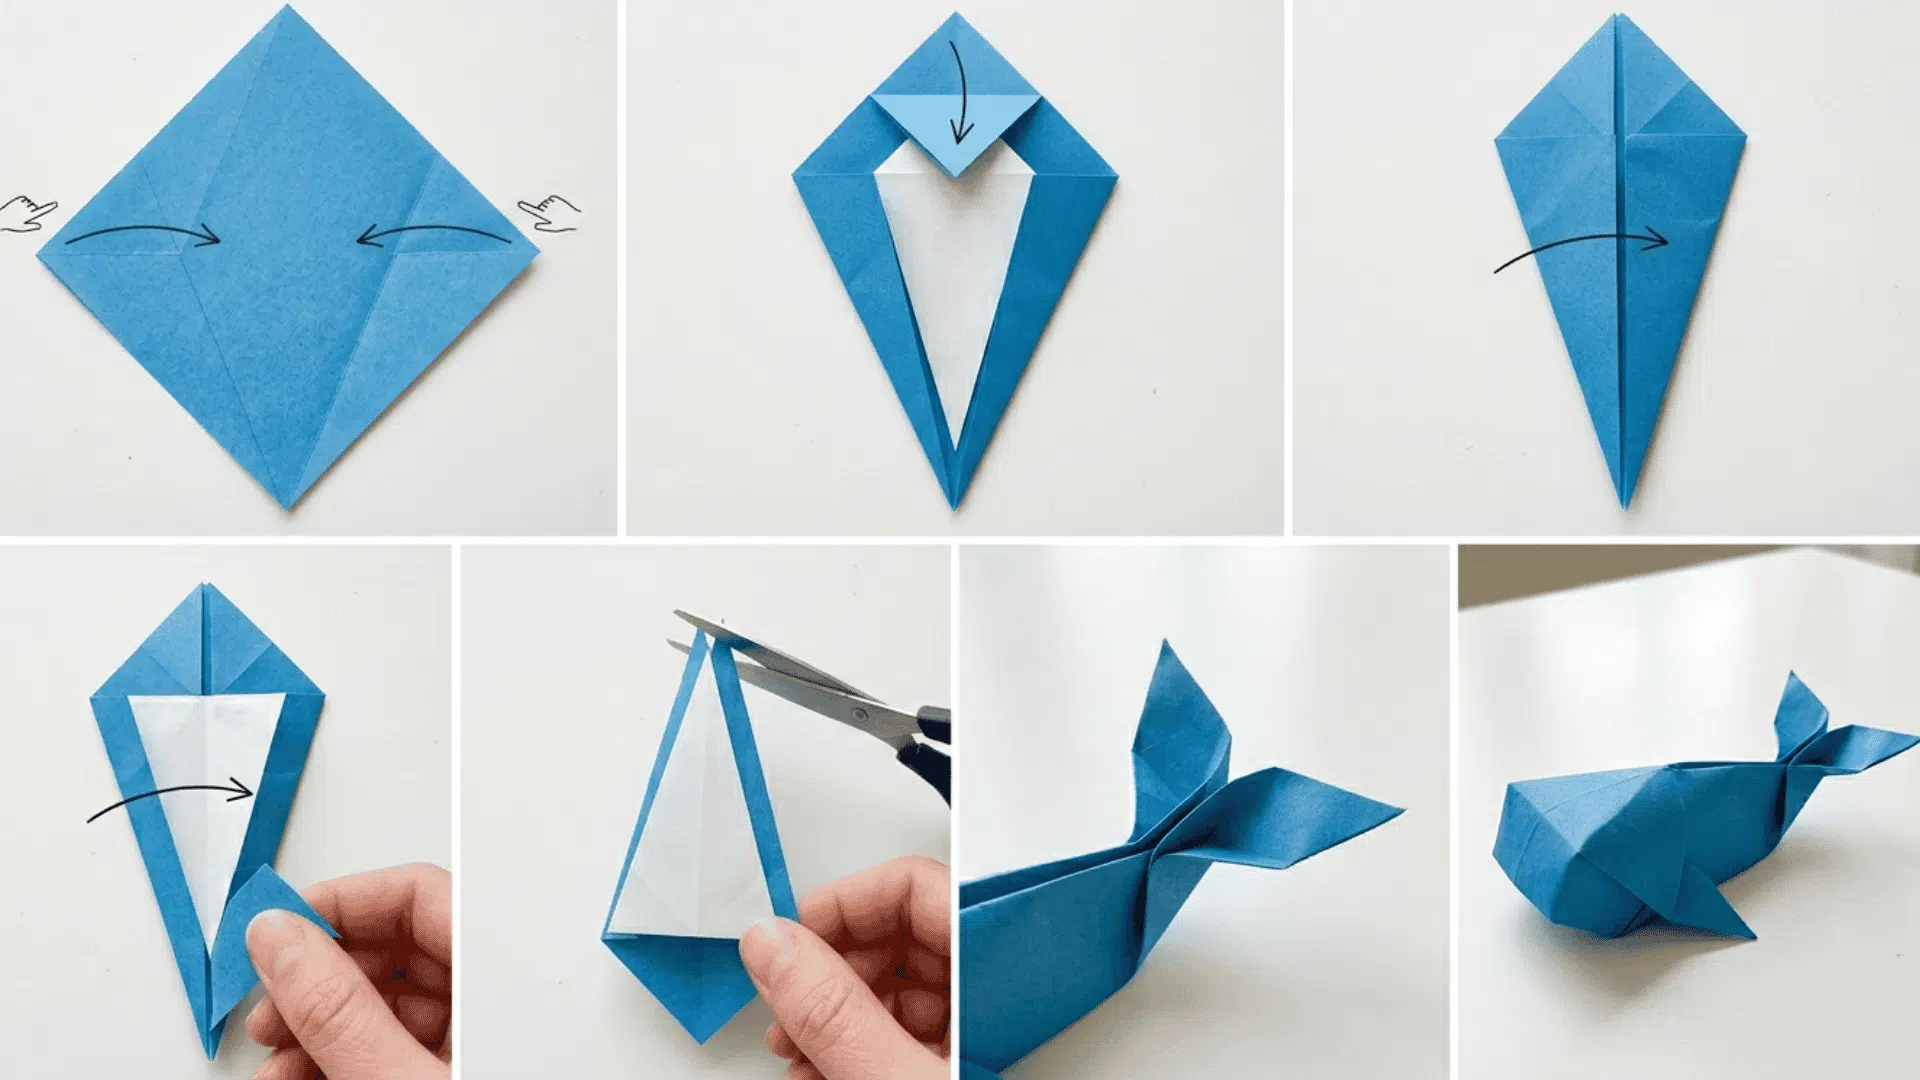
This origami whale is a fun and easy paper craft that kids aged 6 and up can make in just a few minutes. It supports creativity, hand-eye coordination, and basic spatial thinking without needing any special materials.
Time: 5-7minutes
Paper: 6 x 6 inche square
- Start with a square sheet of paper oriented as a diamond.
- Fold the left and right corners inward along the center line to form a kite shape.
- Fold the top corner down toward the center to make a small flap.
- Fold the left side over along the indicated line.
- Fold the bottom tip upward and make a small cut along the dotted line.
- Fold the flap created by the cut to shape the whale’s tail.
11. Origami Bear
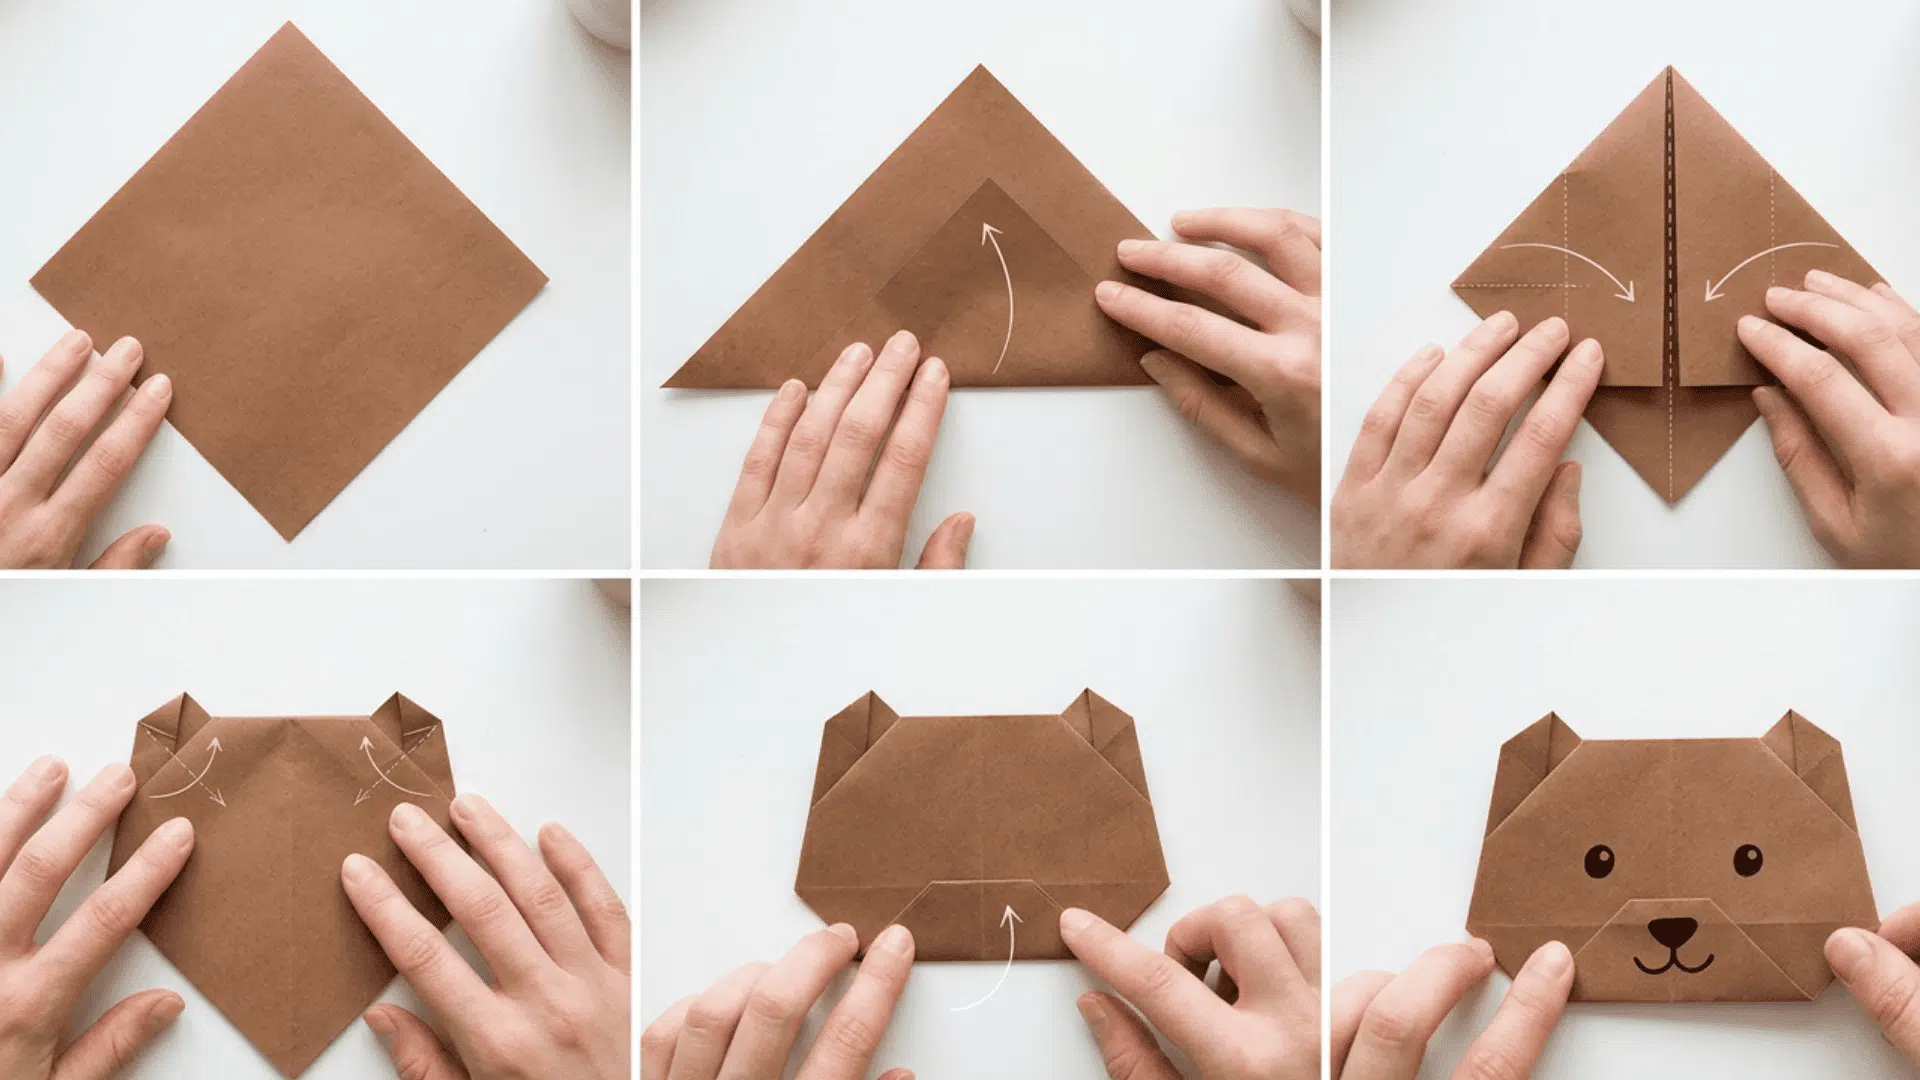
This origami idea needs just one square sheet of paper and no cutting, making it safe for kids as young as 5. It builds fine motor skills and patience while doubling as a creative art activity when kids draw on the face themselves.
Time: 10-12 minutes
Size: 6 x 6 inches square
Steps:
- Start with a square sheet of paper oriented as a diamond.
- Fold the bottom corner up to meet the top corner.
- Fold the left and right corners inward along the center line.
- Fold the top corners outward to form the bear’s ears.
- Fold the bottom tip upward to shape the bear’s snout.
- Draw the eyes, nose, and mouth on the bear’s face
Tips for Clean Folds
If you’re working with paper, fabric, or other materials, a few simple techniques can help you achieve crisp and accurate folds every time.
- Measure before folding to ensure accurate alignment and symmetrical results.
- Use a flat, clean surface to prevent wrinkles, uneven creases, or unwanted marks.
- Make light guide marks before folding, especially for detailed or complex projects.
- Crease slowly and firmly rather than rushing, which can lead to crooked folds.
- Use a ruler or bone folder to create sharper, cleaner edges.
- Align corners and edges carefully before pressing down the fold.
- Work with dry, wrinkle-free materials to achieve the smoothest and most professional finish.
Wrapping Up
Origami ideas turn simple paper into captivating art for every skill level, from beginner-easy origami animals.
Each design includes clear difficulty ratings, time estimates, and step-by-step instructions with checkpoints to help you.
Start with the right 6×6-inch origami paper, master the four core folds – valley, mountain, squash, and petal- and practice on scrap to build confidence.
Pick one project, fold it twice, and enjoy the rewarding process of turning paper into beautiful art. Your next origami masterpiece is just a fold away.