Learning how to draw a person can feel overwhelming at first, especially when you are not sure where to begin.
With the right steps, the right tools, and a little patience, drawing a lifelike face from a three-quarter angle is completely achievable for anyone.
This step-by-step breakdown takes you from a basic head outline all the way through feature placement, hair, and shading, giving you a clear and simple path to a realistic, well-proportioned face drawing every time
What You Need to Know Before You Start Drawing?
Before starting, a few proportion rules are worth knowing. The face is roughly five eyes wide, with the gap between the eyes equaling one eye’s width.
The eyes sit at the midpoint of the head, not near the top, which is where most beginners place them. The bottom half then divides into thirds: the nose, the space between the nose and the lips, and the chin.
A three-quarter angle is trickier than a front-facing view since features shift in perspective.
Starting with the right pencil and the right pressure makes corrections easier before committing to final lines.
Also, perfect symmetry is not the goal; slight asymmetry makes a face look more natural, since no real face is perfectly even.
How to Draw a Person: All About The Face
Drawing a person becomes much simpler when broken down into clear, manageable steps. Here is exactly how to do it.
A short list of beginner-friendly tools for human drawing includes pencils, erasers, sketchbooks, and fine liners, providing the essentials for starting to practice confidently and develop fundamental skills.
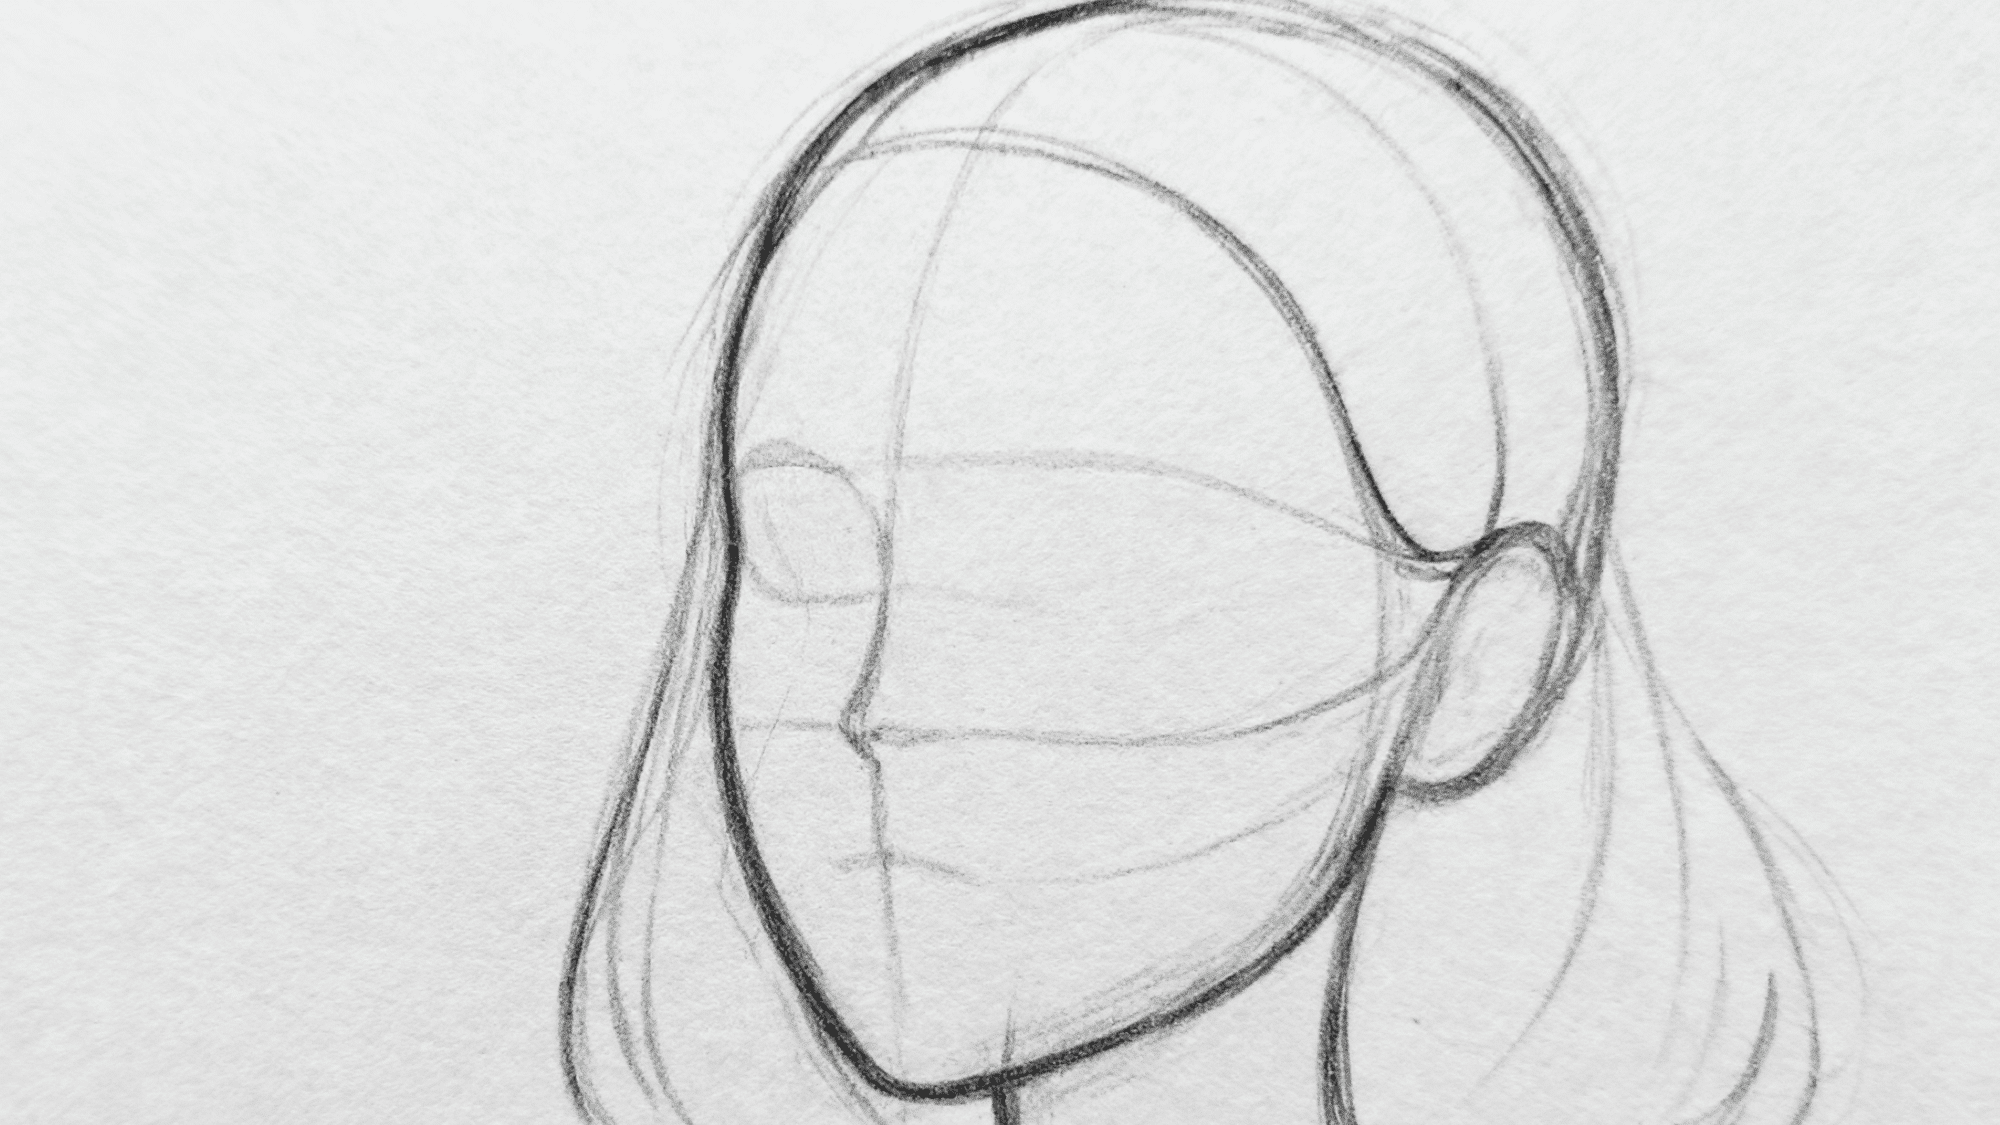
Step 1: Draw the Head Structure
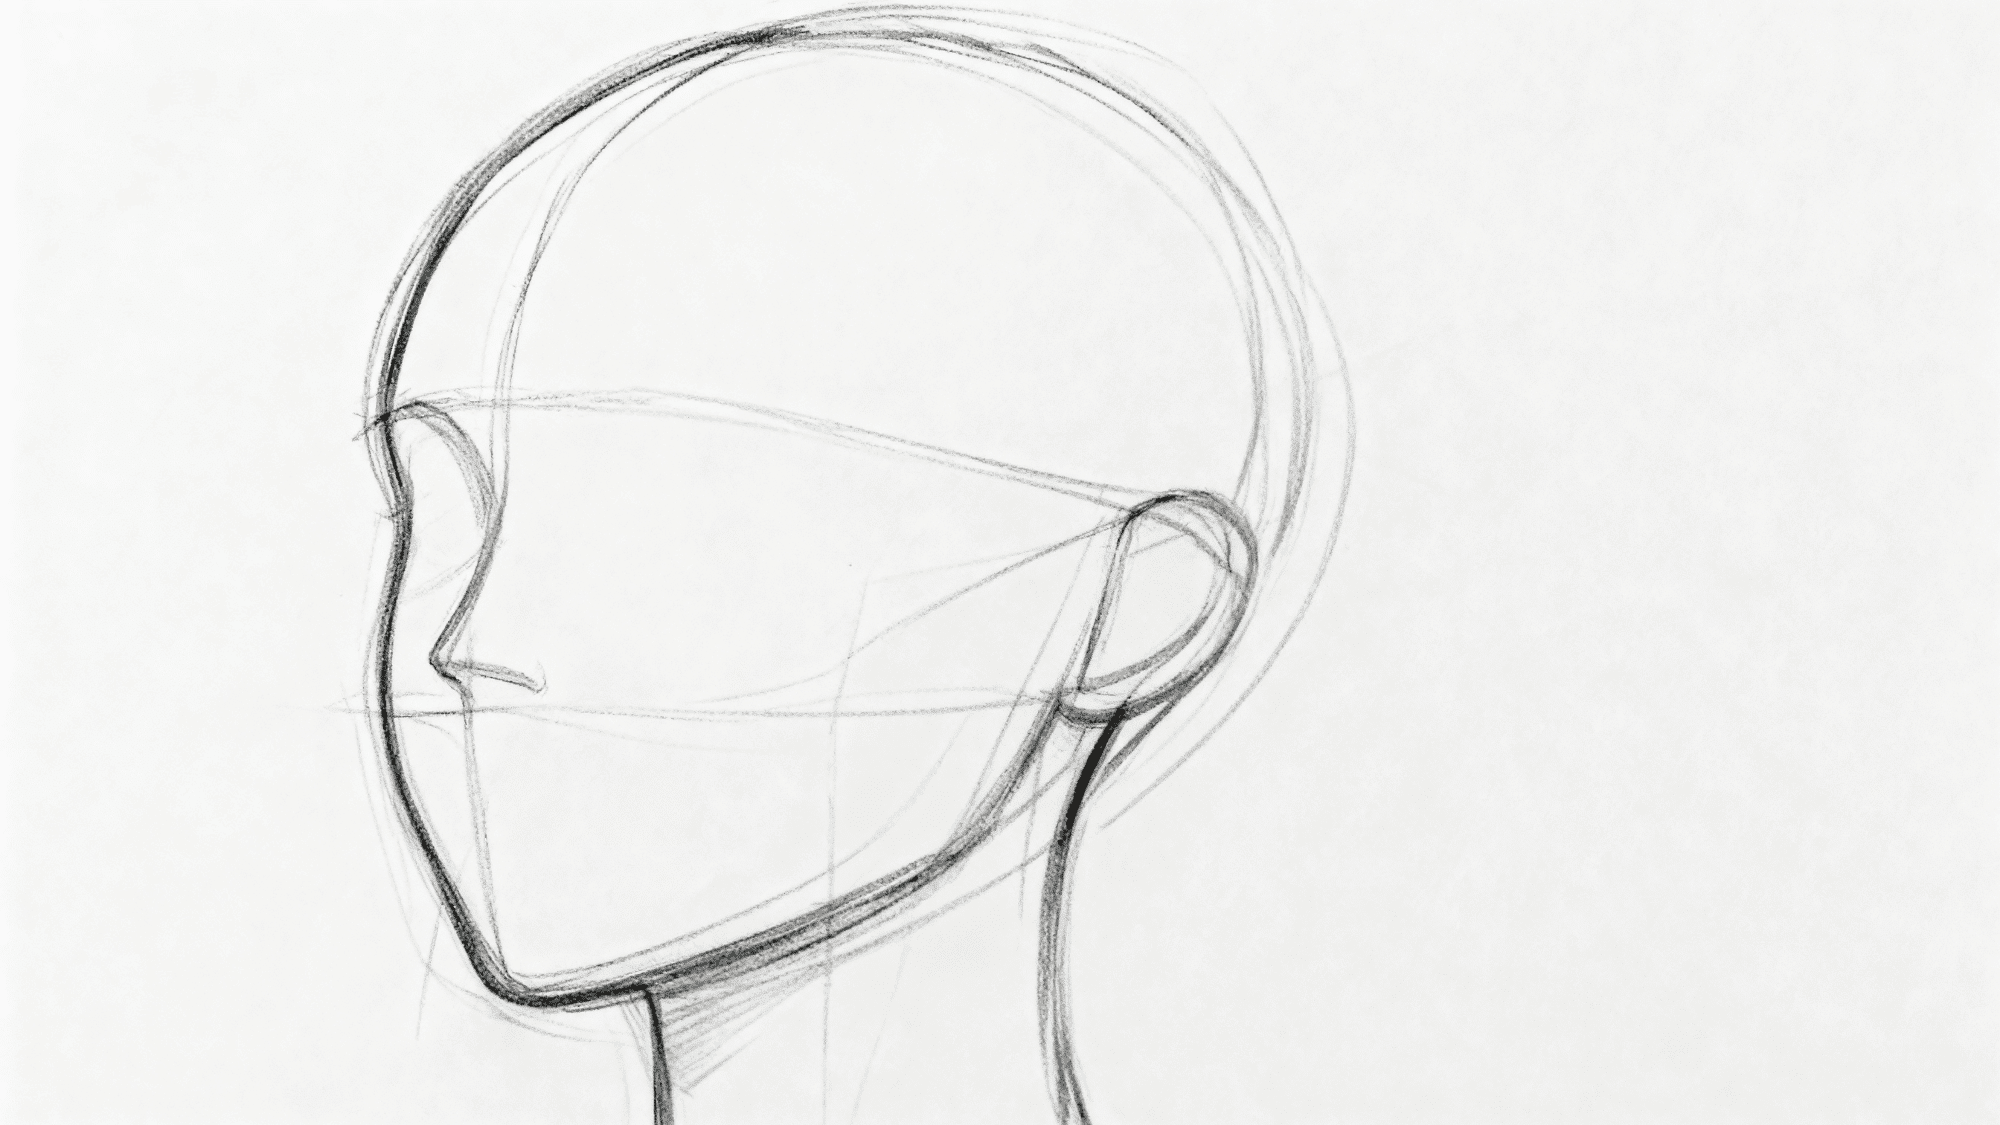
Sketch a basic head shape from a three-quarter angle, including the rounded cranium, jawline, chin, and a simple ear placement on the side.
Keep the lines light and loose at this stage, as this is just the base structure on which everything else will be built.
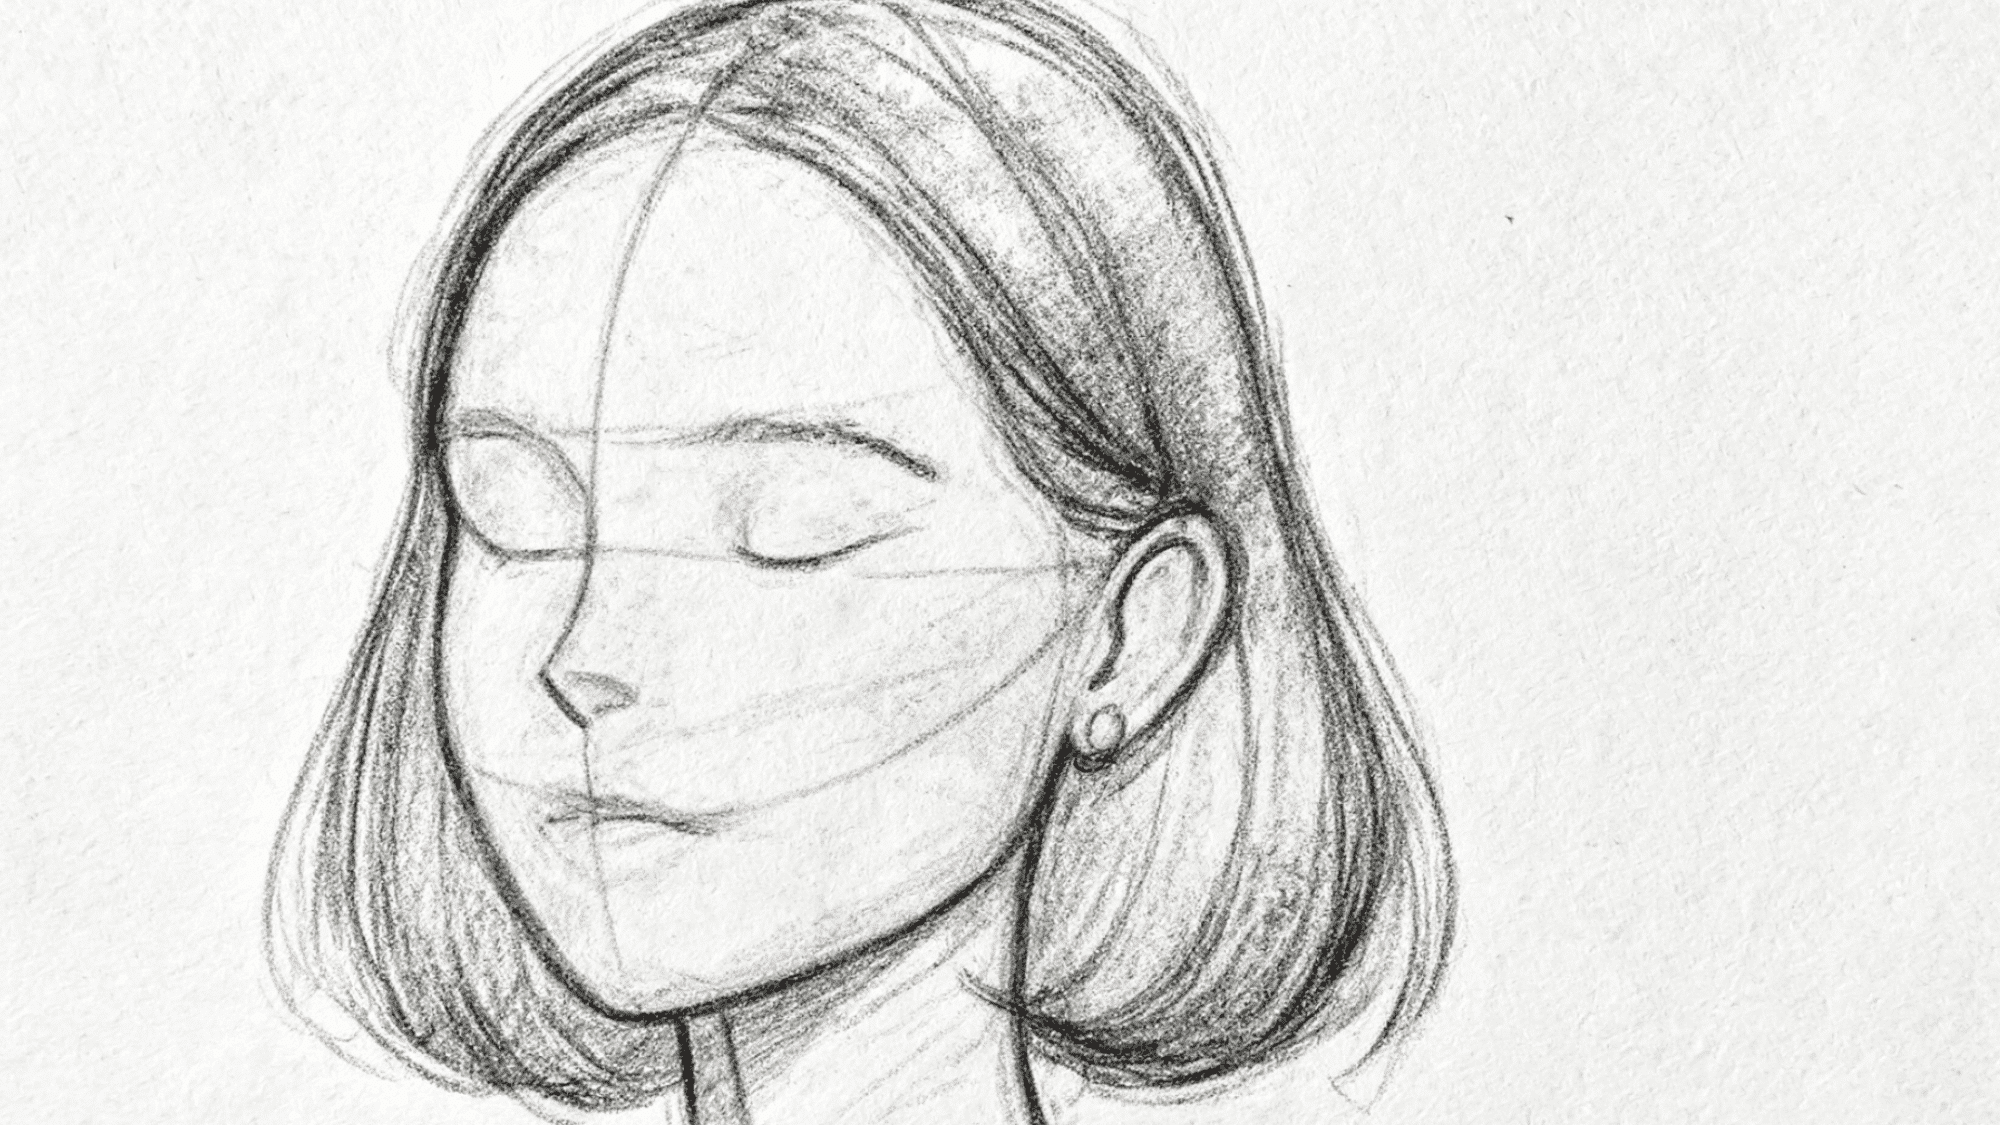
Step 2: Add Guidelines and Hair Flow
Draw a vertical center line and horizontal guide lines across the face, then lightly sketch the flow of the hair falling to the sides.
These guidelines are key to keeping the features symmetrical and correctly positioned, so take your time to ensure they are evenly spaced before moving forward.
Learning scale and proportion in art at this point will help you place everything more confidently.
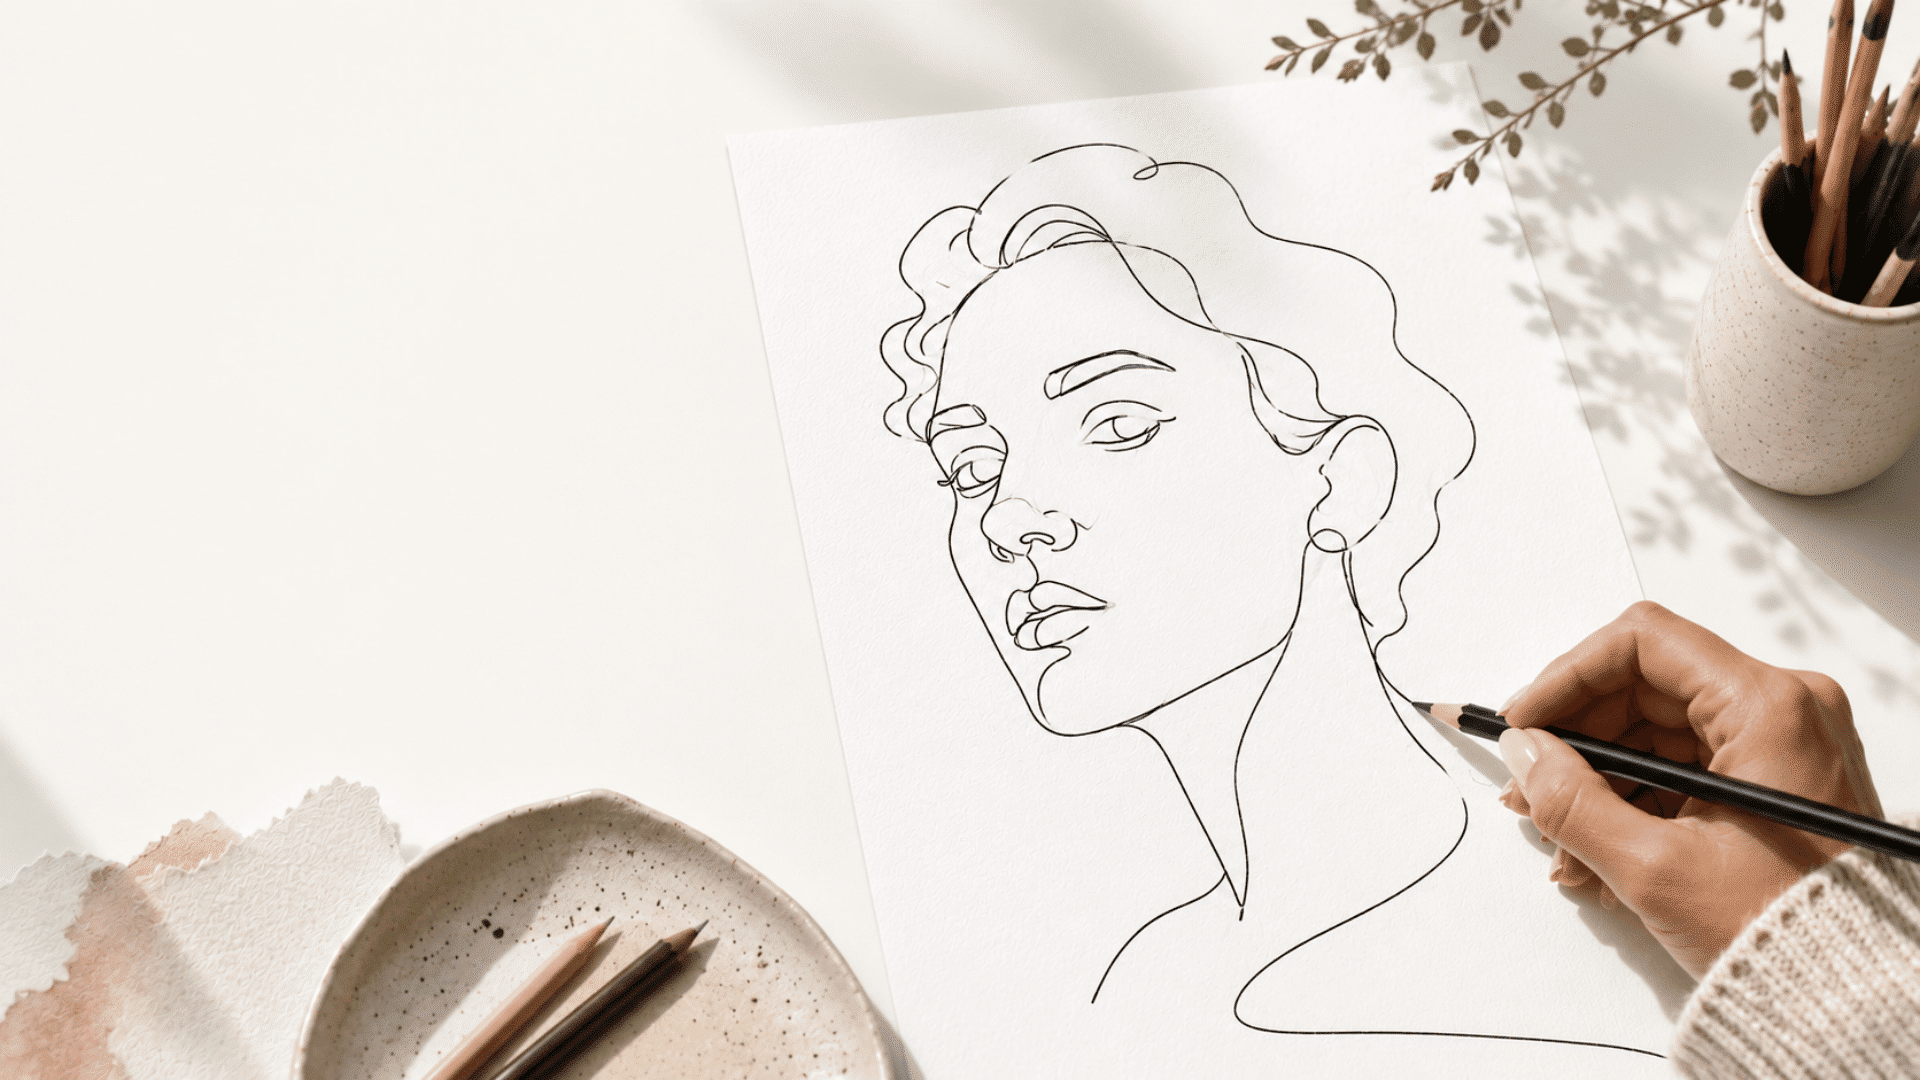
Step 3: Place the Facial Features
Using the guidelines, place the eyes, nose, and mouth in correct proportions, keeping the features light and loose at this stage.
At this point, focus on getting the spacing right rather than perfecting each feature, as these are just the foundation marks that will be refined in the later steps.
Step 4: Refine the Features
Sharpen the eyes, nose, lips, and ears with more defined lines, and refine the hairline and hair flow around the face.
Pay close attention to the curves, lip shading, and the shape of the eyelids, as these small details make the face look more lifelike and natural.
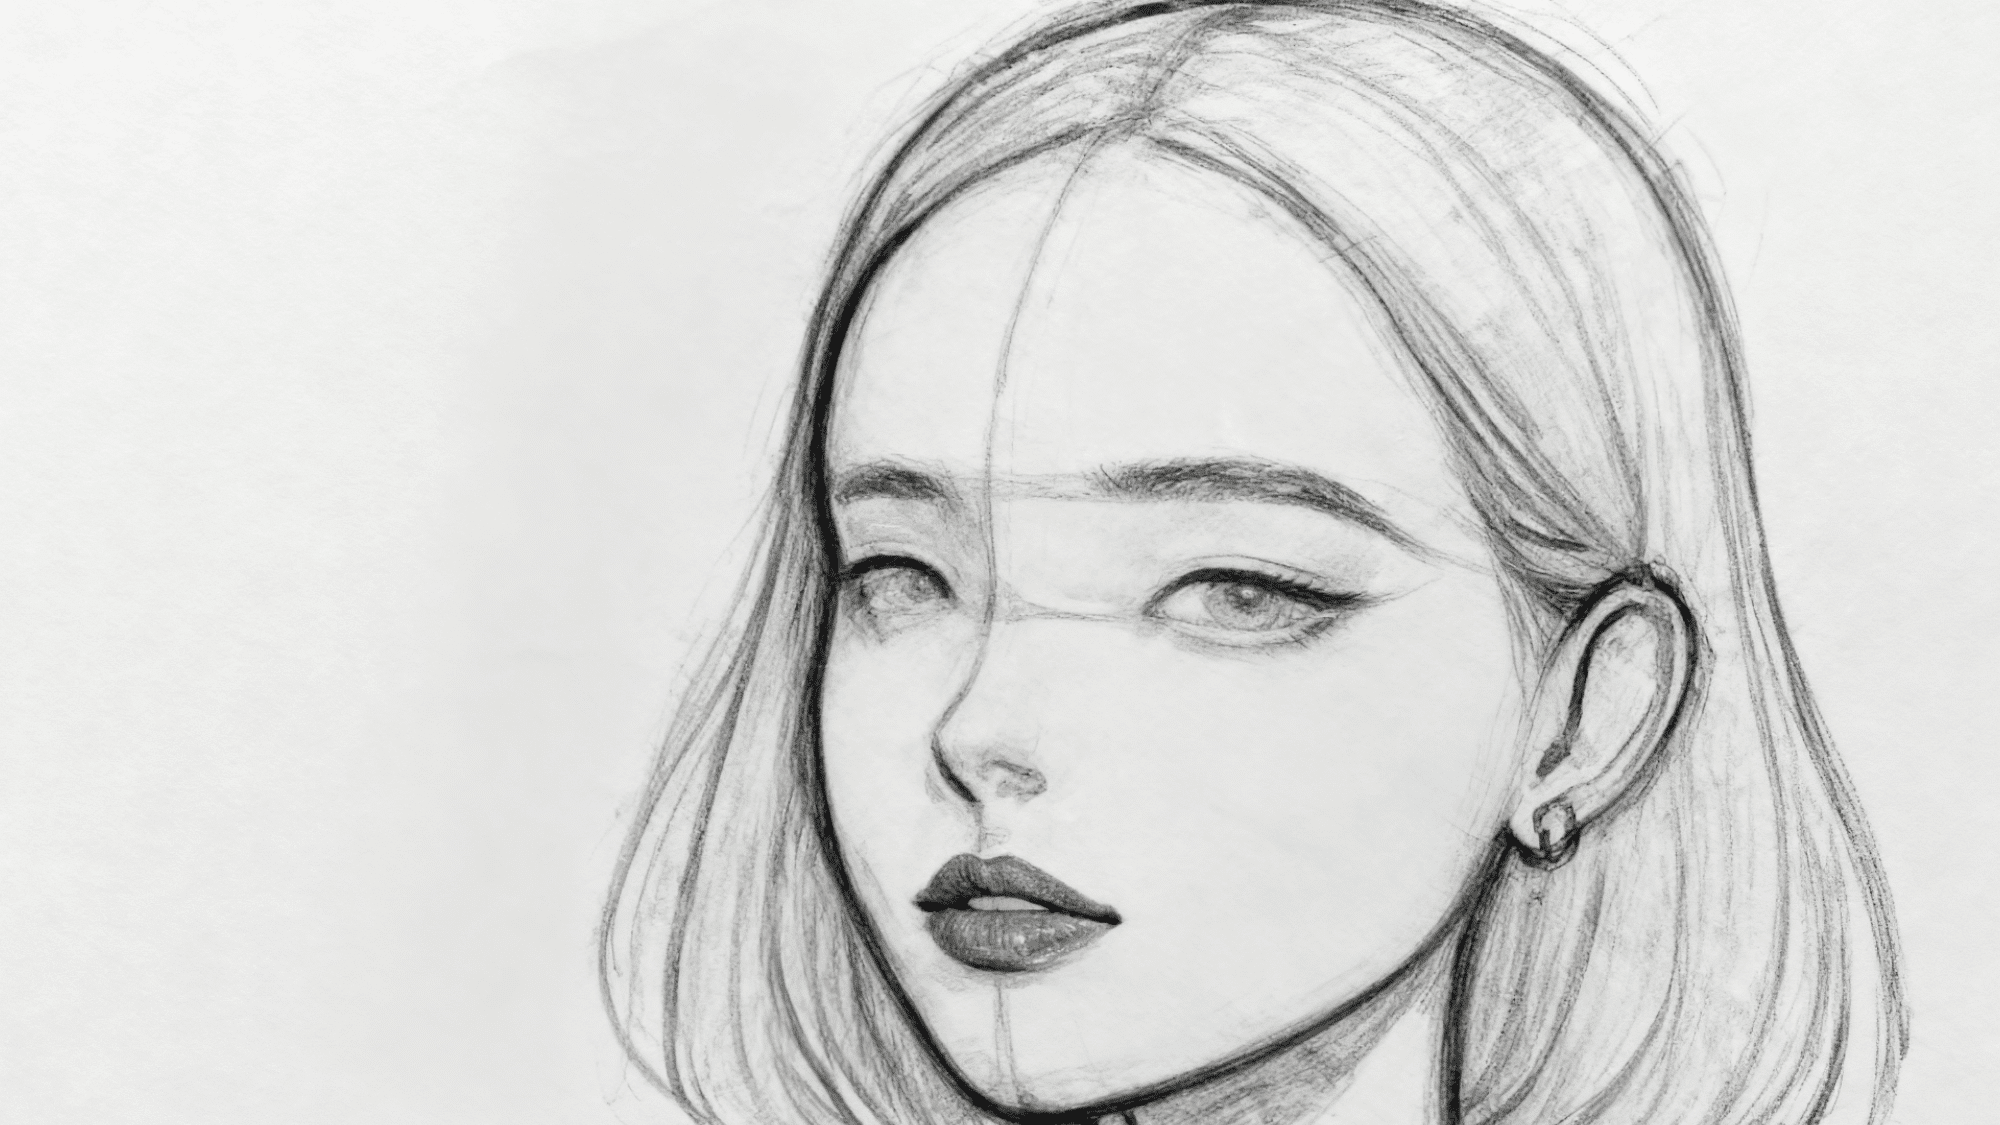
Step 5: Add Detail, Shading, and Finish

Strengthen the facial structure by adding more detail to the eyes, nose, and mouth; build up the hair strands with longer directional pencil strokes.
Then add shading across the face, hair, and neck to create depth and dimension, before erasing any remaining guide lines.
Brushing up on shading techniques before this step will help you get the most out of your pencil work.
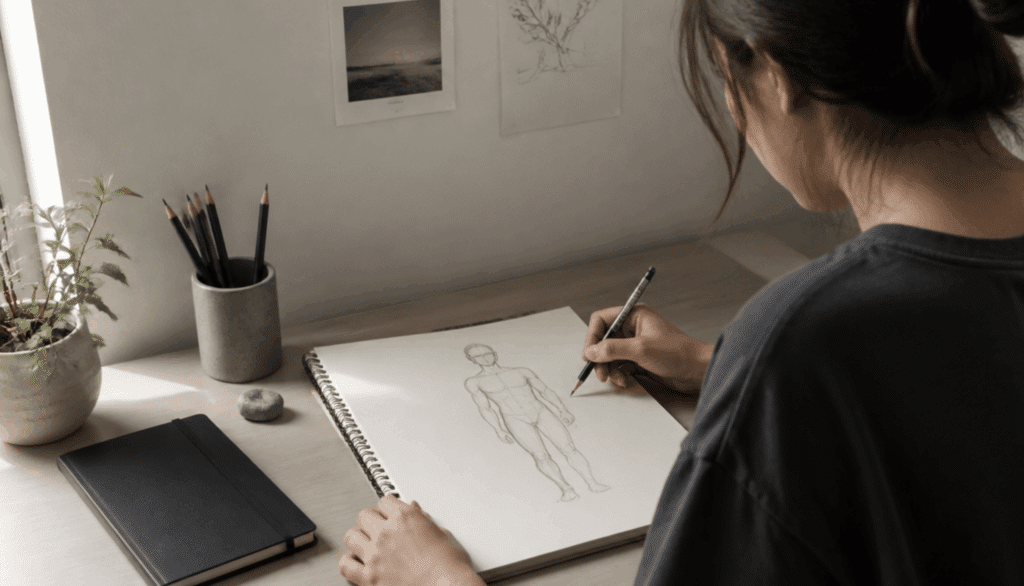
How to Draw Bodies: The Complete Human Figure
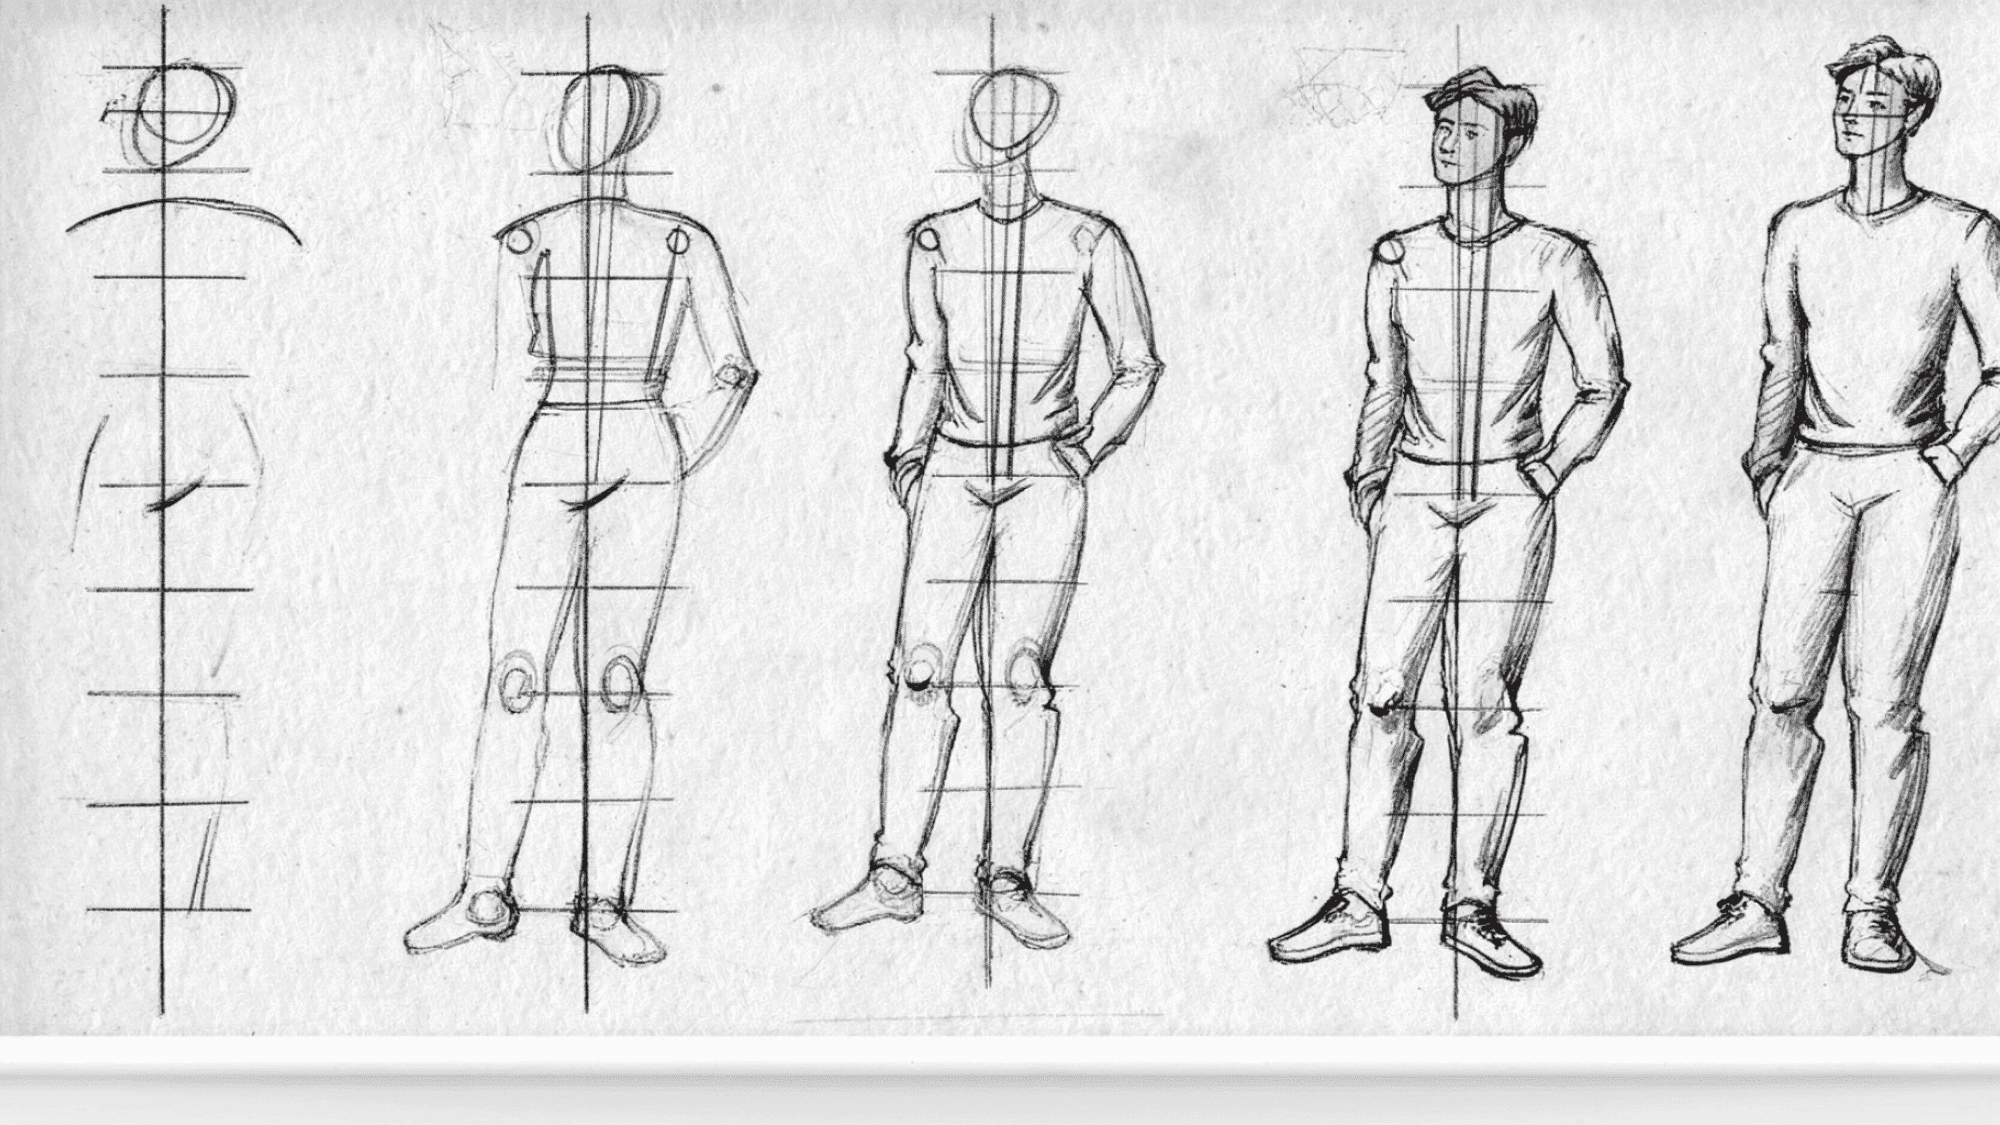
By breaking the figure into simple forms and practicing regularly, you can create more balanced, natural-looking human drawings.
Step 1:
Draw a vertical line with horizontal crossbars to map out body proportions, using the head as the base unit of measurement.
Step 2:
Block in the basic body structure using geometric shapes, circles for joints, cylinders for limbs, and a rough torso form to establish volume.
Step 3:
Refine the outline by smoothing the shapes into a natural human silhouette, keeping the proportional grid lines visible for reference.
Step 4:
Add facial features, hair, and clothing details such as a sweatshirt and trousers, while keeping the construction lines visible underneath.
Step 5:
Complete the figure with full shading, refined clothing folds, shoes, and a clean, finished look, removing all construction lines for the final drawing.
Ways to Refine Your Human Drawings
Practical tips for steady improvement focus on consistent daily practice, observing real-life references, and experimenting with different expressions and angles to build accuracy and confidence in human drawing.
- Study Human Anatomy: Learn the basic structure of bones and muscles to create more realistic and believable figures.
- Improve Body Proportions: Use standard proportion guidelines to keep body parts balanced and accurately sized.
- Practice Gesture Drawing: Create quick sketches that capture movement, energy, and the overall flow of the pose.
- Use Reference Photos: Observe real people to better understand posture, anatomy, lighting, and natural details.
- Focus on Facial Features: Refine the eyes, nose, mouth, and ears to make facial expressions look more convincing.
- Add Depth with Shading: Apply highlights and shadows to give the figure a stronger sense of form and dimension.
- Review and Correct Mistakes: Regularly compare your drawing to references and make adjustments to improve accuracy.
Final Thoughts
Drawing a realistic human face from a three-quarter angle becomes much easier when broken down into clear steps.
Starting with a solid head structure and guidelines, then gradually building up features, hair, and shading layer by layer, gives you full control over proportions at every stage.
The key is patience in keeping lines light early on, focusing on spacing before detail, and refining as you go.
With the right tools and consistent practice, anyone can develop the skills to produce a balanced, lifelike face drawing that looks natural and confident on the page.
Frequently Asked Questions
Can a 12-Year-Old Draw?
Yes, a 12-year-old can absolutely draw! They are fully capable of creating impressive, recognizable, and expressive artwork.
How to Draw a 3D Human Face?
Drawing a 3D human face involves building it on a base of geometric shapes to establish form, volume, and perspective.
What is the 4-8-8 Method?
A structured beginner drawing technique to achieve proper proportions, or a specific breathing exercise used to calm the nervous system.