Ever noticed how bathroom tiles fit together perfectly without gaps? That’s tessellation art! Tessellation is when shapes lock together like puzzle pieces to create never-ending patterns.
Artists like M.C. Escher made these designs famous by turning simple shapes into birds, fish, and lizards that repeat across canvases.
Ready to unlock the hidden art of tessellation? Find how shapes lock together to create patterns that repeat forever.
What is Tessellation Art?
It features repeating patterns in which shapes fit together perfectly, with no gaps or overlaps. Think of a honeycomb; these are tessellations in everyday life.
Artists create geometric designs with interlocking triangles, squares, hexagons, or complex shapes that connect seamlessly across surfaces.
This mathematical art form combines creativity with precision, creating mesmerizing visual patterns through systematic repetition.
The Intriguing History of Tessellation Art
It has progressed from ancient pattern-making traditions to a refined geometric language that reveals how cultures across history found beauty in repetition and symmetry.
| SECTION | KEY POINTS |
|---|---|
| Ancient Origins | Early patternwork in Sumerian tiles (4000 BC) plus Egyptian and Roman mosaics. |
| Islamic Geometric Art | Alhambra, Moroccan Zellige, and Persian Girih rooted in religious preference for abstract geometry. |
| Modern Renaissance | Medieval math exploration laid groundwork for modern tessellation art. |
MC Escher: The Master of Tessellation Patterns
M.C. Escher altered tessellation into fine art through his incredible pattern work. The Dutch artist discovered Islamic geometric designs during his 1936 visit to Spain’s Alhambra palace, sparking lifelong intrigue.
MC Escher pattern created mesmerizing tessellations featuring recognizable creatures like lizards, birds, and fish that interlock perfectly. His mathematical precision produced masterpieces, including “Sky and Water” and “Metamorphosis.”
Escher believed tessellation represented “the richest source of inspiration” he’d ever encountered, blending artistic creativity with geometric perfection.
The Mathematics Behind Tessellation Art
It is rooted in simple yet powerful mathematical rules that determine how shapes can repeat across a plane to form seamless, visually balanced patterns.
| SECTION | KEY POINTS |
|---|---|
| Geometric Principles | Basics of plane geometry, why specific shapes tessellate cleanly, and how angle sums allow perfect tiling. |
| Three Types of Transformations | Translation slides a shape, rotation turns it, and reflection flips it, each creating repeatable pattern structures. |
| Symmetry in Tessellations | A short look at wallpaper groups and examples of repeated symmetry found in natural formations. |
Tessellation Art Ideas for Beginners
Start your tessellation journey with these beginner-friendly designs, ranging from simple animals to geometric patterns and themed creations.
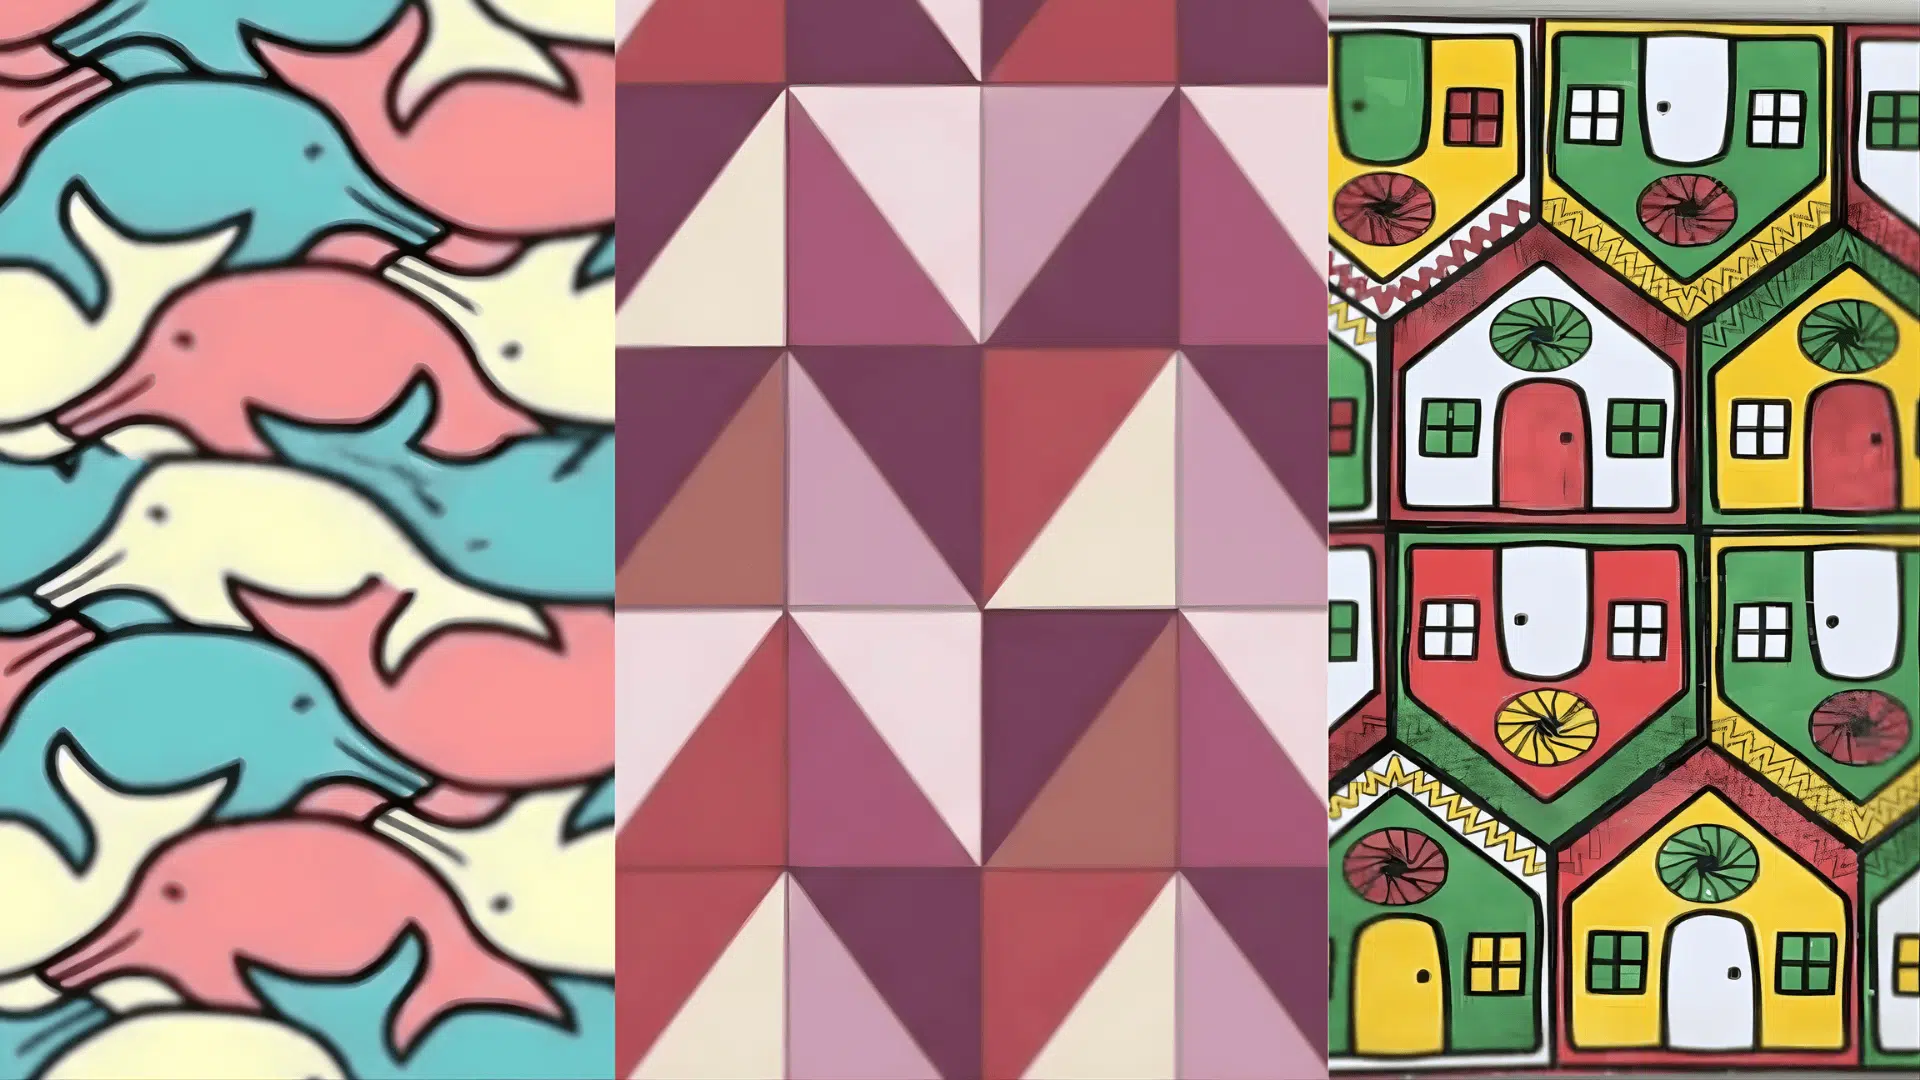
1. Simple Animal Designs
Animal tessellations work perfectly for beginners because they’re recognizable and fun. Fish create flowing patterns with curved bodies. Birds fit together using wings and tail feathers.
Lizards interlock through their legs and tails. Cats, dogs, butterflies, and insects also make excellent starting choices for simple tessellation projects.
2. Geometric Pattern Ideas
Geometric tessellations offer the easiest starting point. Hexagons create honeycomb-like designs that fit naturally. Triangles provide endless possibilities through rotation and flipping.
Interlocking squares form classic checkerboard variations. Combine different shapes to create unique patterns while learning fundamental tessellation principles.
3. Seasonal and Thematic Concepts
Theme-based tessellations add personal meaning to artwork. Holiday designs feature snowflakes, pumpkins, or hearts. Nature-inspired patterns incorporate leaves, flowers, or waves.
Abstract modern designs use asymmetrical shapes and bold colors for a contemporary style. Choose themes that interest you personally.
How to Create Tessellation Art: Step-by-Step Tutorial
Creating it is easier than you think! Follow these simple methods using basic materials you probably already have at home.
Materials You’ll Need
- Index cards or cardstock
- Scissors
- Tape
- Pencil and paper
- Markers or colored pencils
Method 1: Translation Tessellation
Translation tessellation slides shapes in straight lines without rotating or flipping them. This beginner-friendly method creates interlocking patterns that repeat perfectly across your paper. This is the easiest one to do.
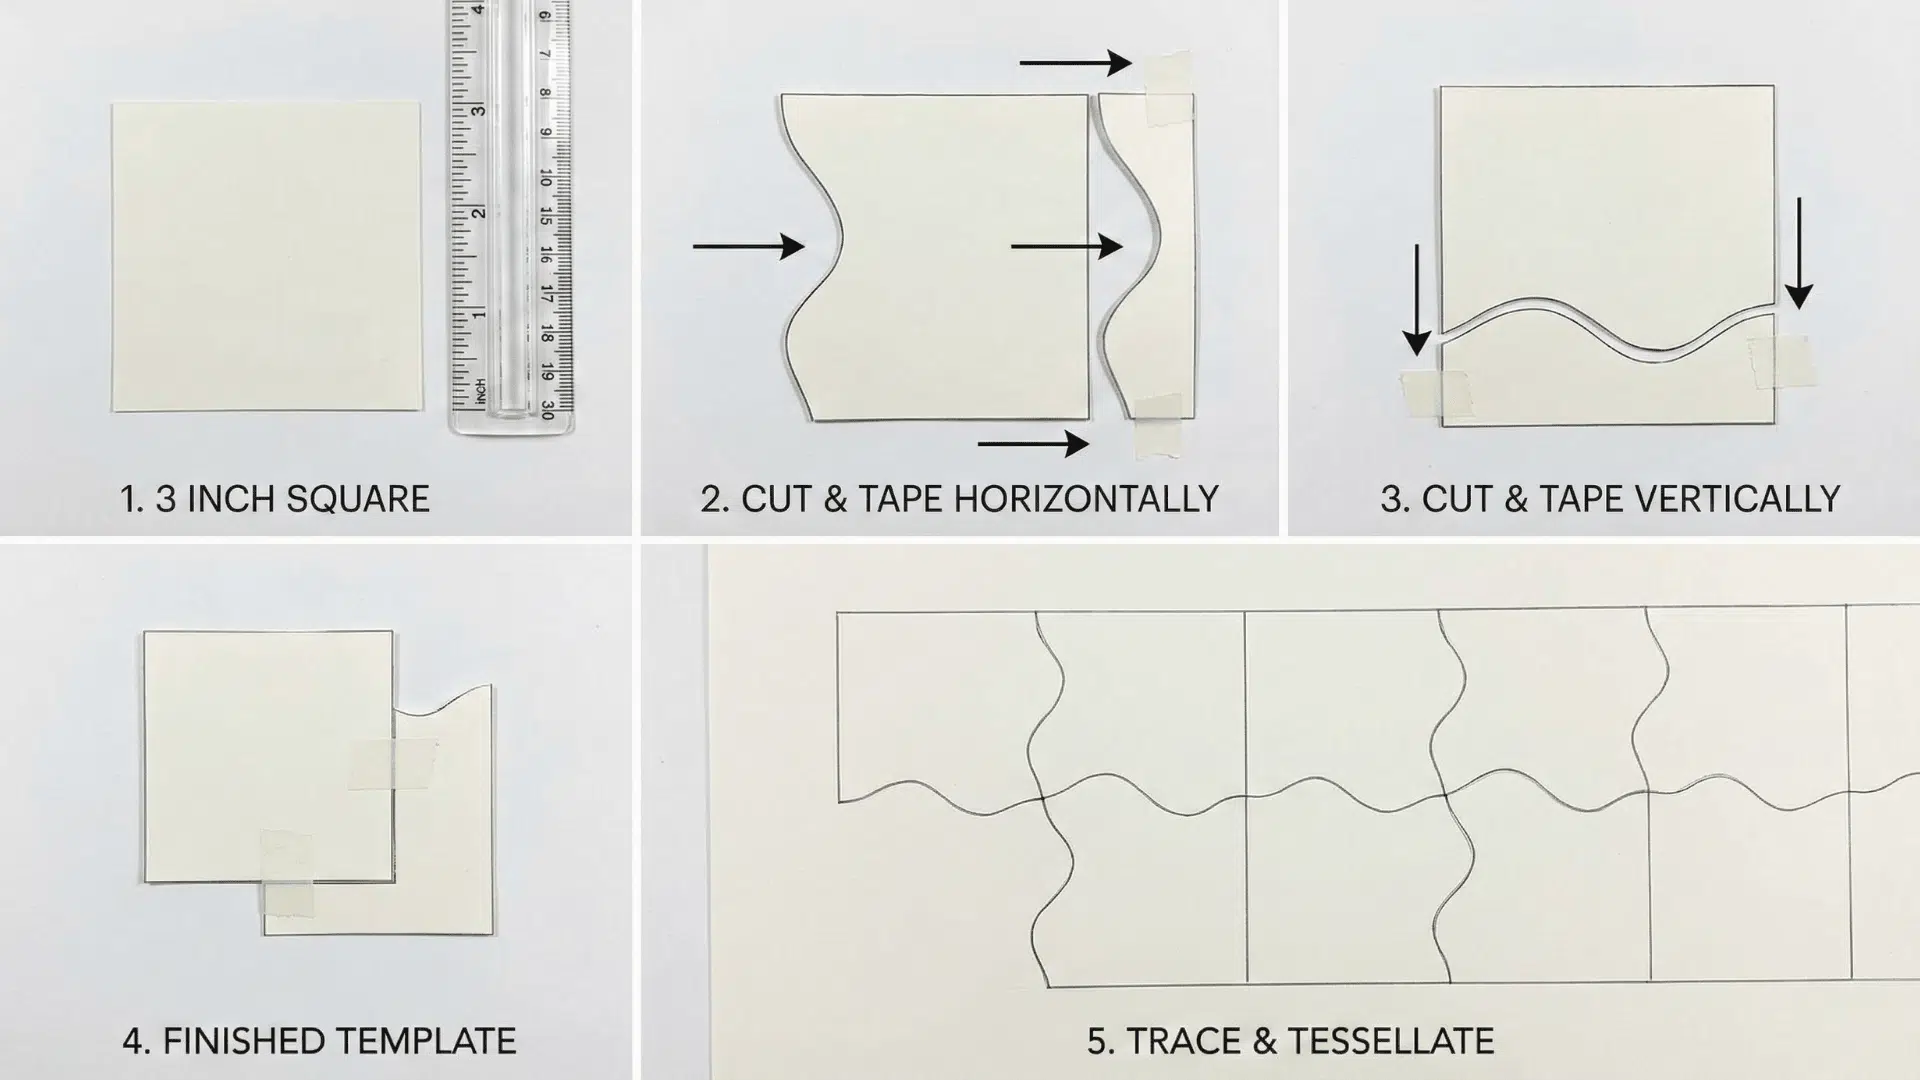
Step 1: Cut a 3 Inch Square
Cut a neat 3 inch by 3 inch square from cardstock or index card. Use a ruler and pencil to mark the measurements before cutting. Trim carefully so all sides are straight and equal.
This square will be your starting tile for the tessellation.
Step 2: Cut and Tape Horizontally
Draw a wavy or curved line from the top edge of the square down to the bottom edge, staying inside the square. Cut along this line so you have a skinny, wavy strip and a larger piece.
Slide the skinny strip straight across to the opposite side without flipping it. Tape it in place so the edges line up perfectly and the square outline is restored.
Step 3: Cut and Tape Vertically
Now draw another wavy or curved line from the left edge of the new shape to the right edge. Cut along this line to make a second wavy strip.
Move this strip straight up or straight down to the opposite side, again without flipping it. Tape it so the outer edges make a new irregular tile that still fits into a rectangle.
Step 4: Use the Finished Template
Trim off any extra tape that sticks out from the sides. Check that all pieces are firmly attached and the template does not fall apart. Place the template on a blank sheet of paper. Trace all the way around it with a pencil to copy its outline.
Step 5: Trace and Tessellate
Slide the template right next to the first outline, matching edges so there are no gaps. Trace around it again to create the second tile. Continue sliding the template in rows across the page and tracing each time.
Then move to a new row and repeat the process until the page is filled with a repeating tessellation pattern.
Tips for alignment : Use a light pencil when tracing so you can erase mistakes easily. Keep your template flat against the paper to avoid gaps. If shapes aren’t fitting together, check that you taped pieces to the correct opposite sides.
Method 2: Rotation Tessellation

Rotation tessellations spin shapes around a central point. Start with a square and cut a design from one corner. Rotate that piece 90 degrees and tape it to an adjacent corner.
Repeat for all four corners. Your template will interlock when rotated around meeting points. This method creates pinwheel-like patterns that spiral across your page beautifully.
Method 3: Reflection Tessellation
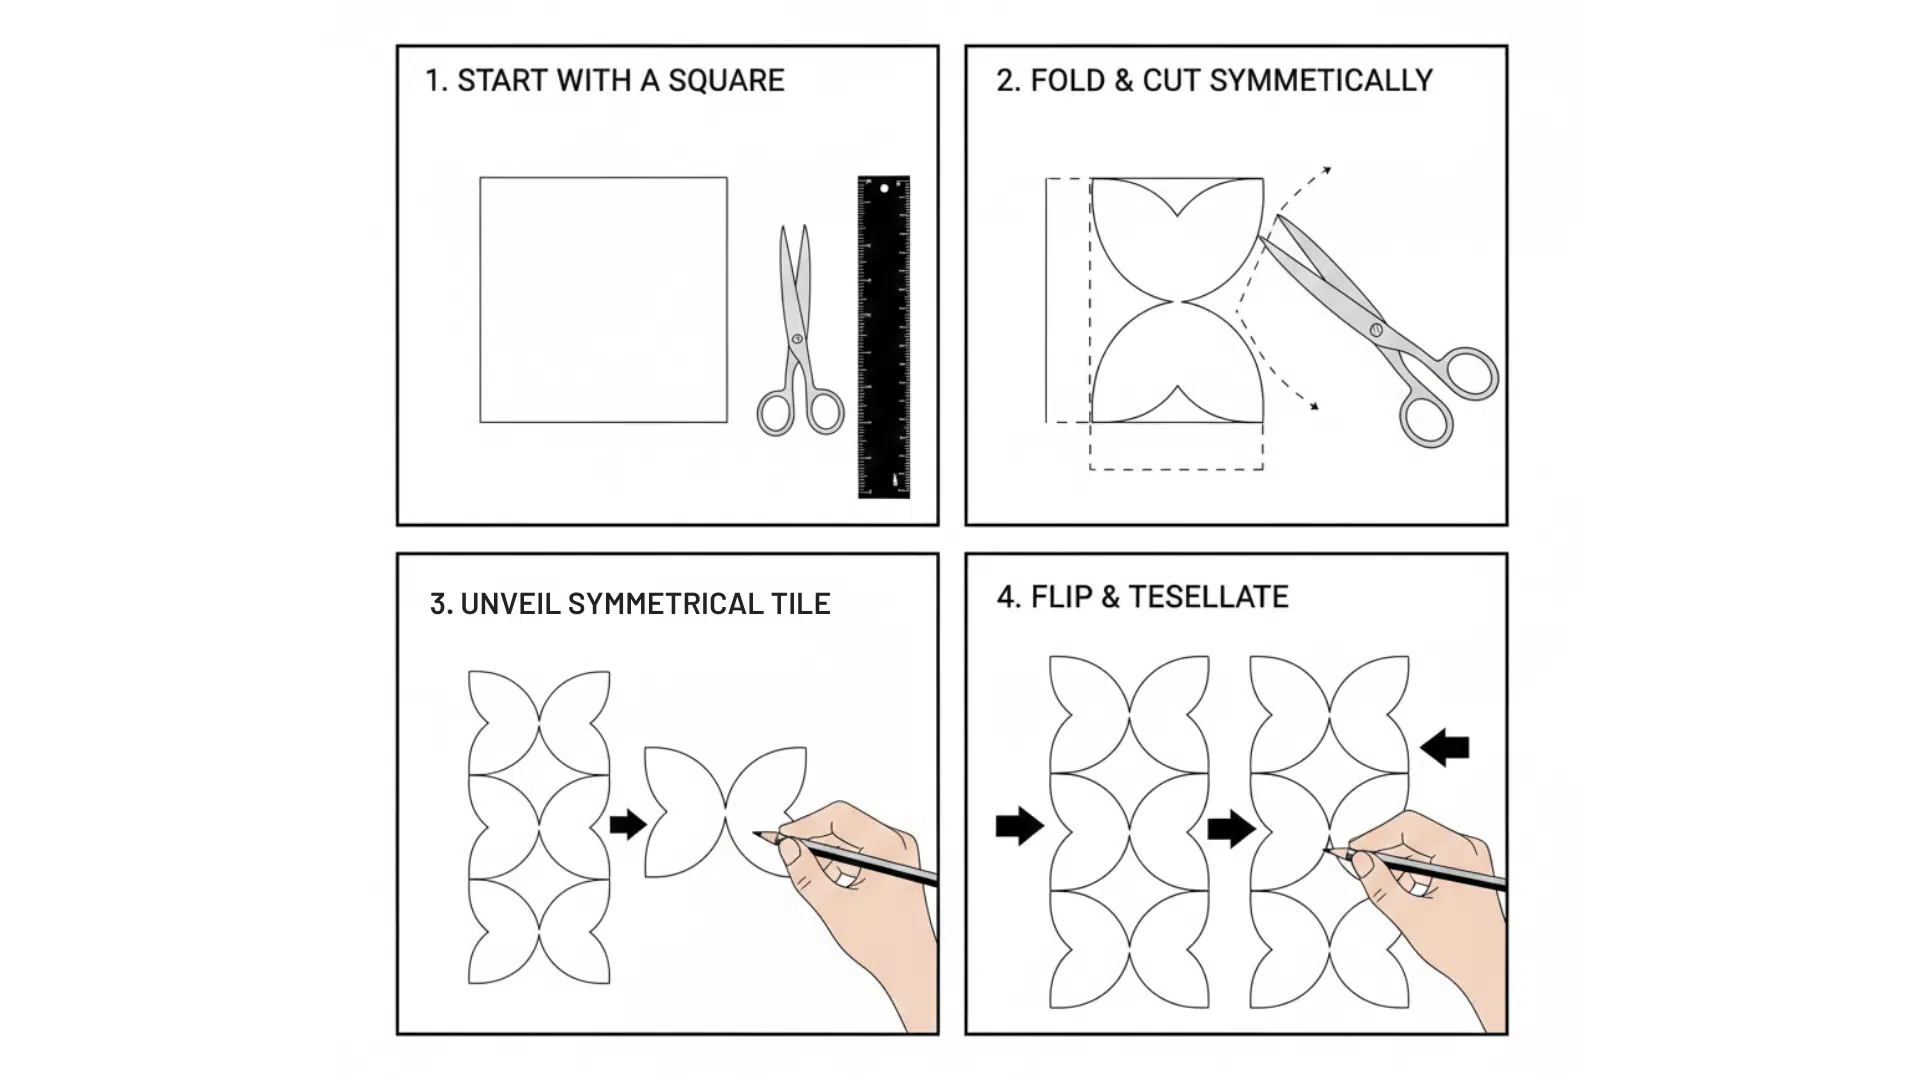
Reflection tessellations use mirror symmetry to create patterns. Fold your square in half and cut a design along one edge. When unfolded, both sides mirror each other perfectly.
This technique works wonderfully for creating symmetrical animals, such as butterflies or fish. The mirrored shapes flip and connect seamlessly across your artwork.
Advanced Tessellation Art Techniques
Once you’ve mastered basic tessellations, take your artwork to the next level with these advanced techniques that add complexity and visual interest.
- Creating Recognizable Figures: Change abstract shapes into animals, people, or objects by adding eyes, limbs, and defining features that tell a story.
- Adding Character Details: Include textures, expressions, and small elements that add personality to your repeating pattern.s
- Multi-Color Tessellations: Use color theory to create contrast and depth, alternating hues to make individual shapes stand out within the pattern.
- Escher-Inspired Color Schemes: Apply complementary colors to create visual illusions in which foreground and background shapes shift and compete for attention.
- Combining Transformation Types: Mix translation, rotation, and reflection methods to produce intricate, professional-level tessellation designs.
Mistakes to Avoid
Learning tessellation art involves some trial and error, but avoiding these common mistakes will save you time and frustration as you create your patterns.
- Rotating or Flipping Cut Pieces: Always tape cut pieces in the same orientation to the opposite side, or your shapes won’t fit together correctly.
- Cutting Too Complex Shapes: Start with simple curves and angles before attempting intricate designs that are difficult to trace accurately.
- Skipping the Template: Never try freehand tessellations without a template, as even slight variations prevent shapes from interlocking perfectly.
- Ignoring Alignment: Keep your template flat and trace carefully to avoid gaps or overlaps that ruin the repeating pattern.
- Using Too Many Colors: Limit your color palette to 3-4 colors to maintain visual harmony and prevent your tessellation from looking chaotic.
Wrapping It Up
Tessellation art proves that math and creativity go hand in hand. Whether you’re drawing interlocking shapes on graph paper or designing digital patterns, you’re following the same principles ancient artists used. The best part?
Just grab paper, pencil, and scissors to transform simple shapes into unique designs.
Every tessellation teaches you something new about symmetry and geometry. Start creating your first repeating masterpiece today!