
Learning to draw a room with one-point perspective feels like unlocking a hidden system behind realistic art.
All lines in linear perspective naturally converge to a single vanishing point.
This same awareness of placement also shapes how scenes feel visually, especially when working with sunset colors, where position and contrast define how light is perceived.
What is a 1-Point Perspective in Drawing?
One-point perspective is a drawing method that uses a single vanishing point to create the illusion of depth on a flat surface.
All lines that show depth travel toward that one point on the horizon. It works best when you’re looking straight at a scene, like standing in a hallway or facing a wall head-on.
Artists and architects use it to make flat drawings feel three-dimensional and realistic, much as light and structure are handled in sun drawing.
Tools You Need to Draw a Room in 1-Point Perspective
Before you begin drawing a room in 1-point perspective, it helps to have the right tools ready. You only need a few basic supplies to get started, with some optional extras for cleaner results.
| BASIC TOOLS | OPTIONAL TOOLS |
|---|---|
| Pencil | Fineliner |
| Eraser | Colored pencils |
| Ruler | Sketchbook |
| Plain paper |
Before You Start: Understand the Room Layout
Most beginners jump straight into drawing and get confused halfway through. Taking a minute to plan your room layout first makes everything easier and cleaner.
- Place the horizon line in the middle of your page for the easiest starting point.
- Put the vanishing point on the horizon line, ideally near the center.
- Keep the back wall flat; it faces you directly and needs no perspective lines.
- The side walls, floor, and ceiling all recede toward the vanishing point.
- Start with a simple front-facing room view before trying complex angles.
How to Draw a Room With 1-Point Perspective Step by Step
Follow these five steps in order, and your room drawing will come together naturally. Each step builds directly on the last, so don’t skip ahead. Keep your lines light at first so mistakes are easy to fix.
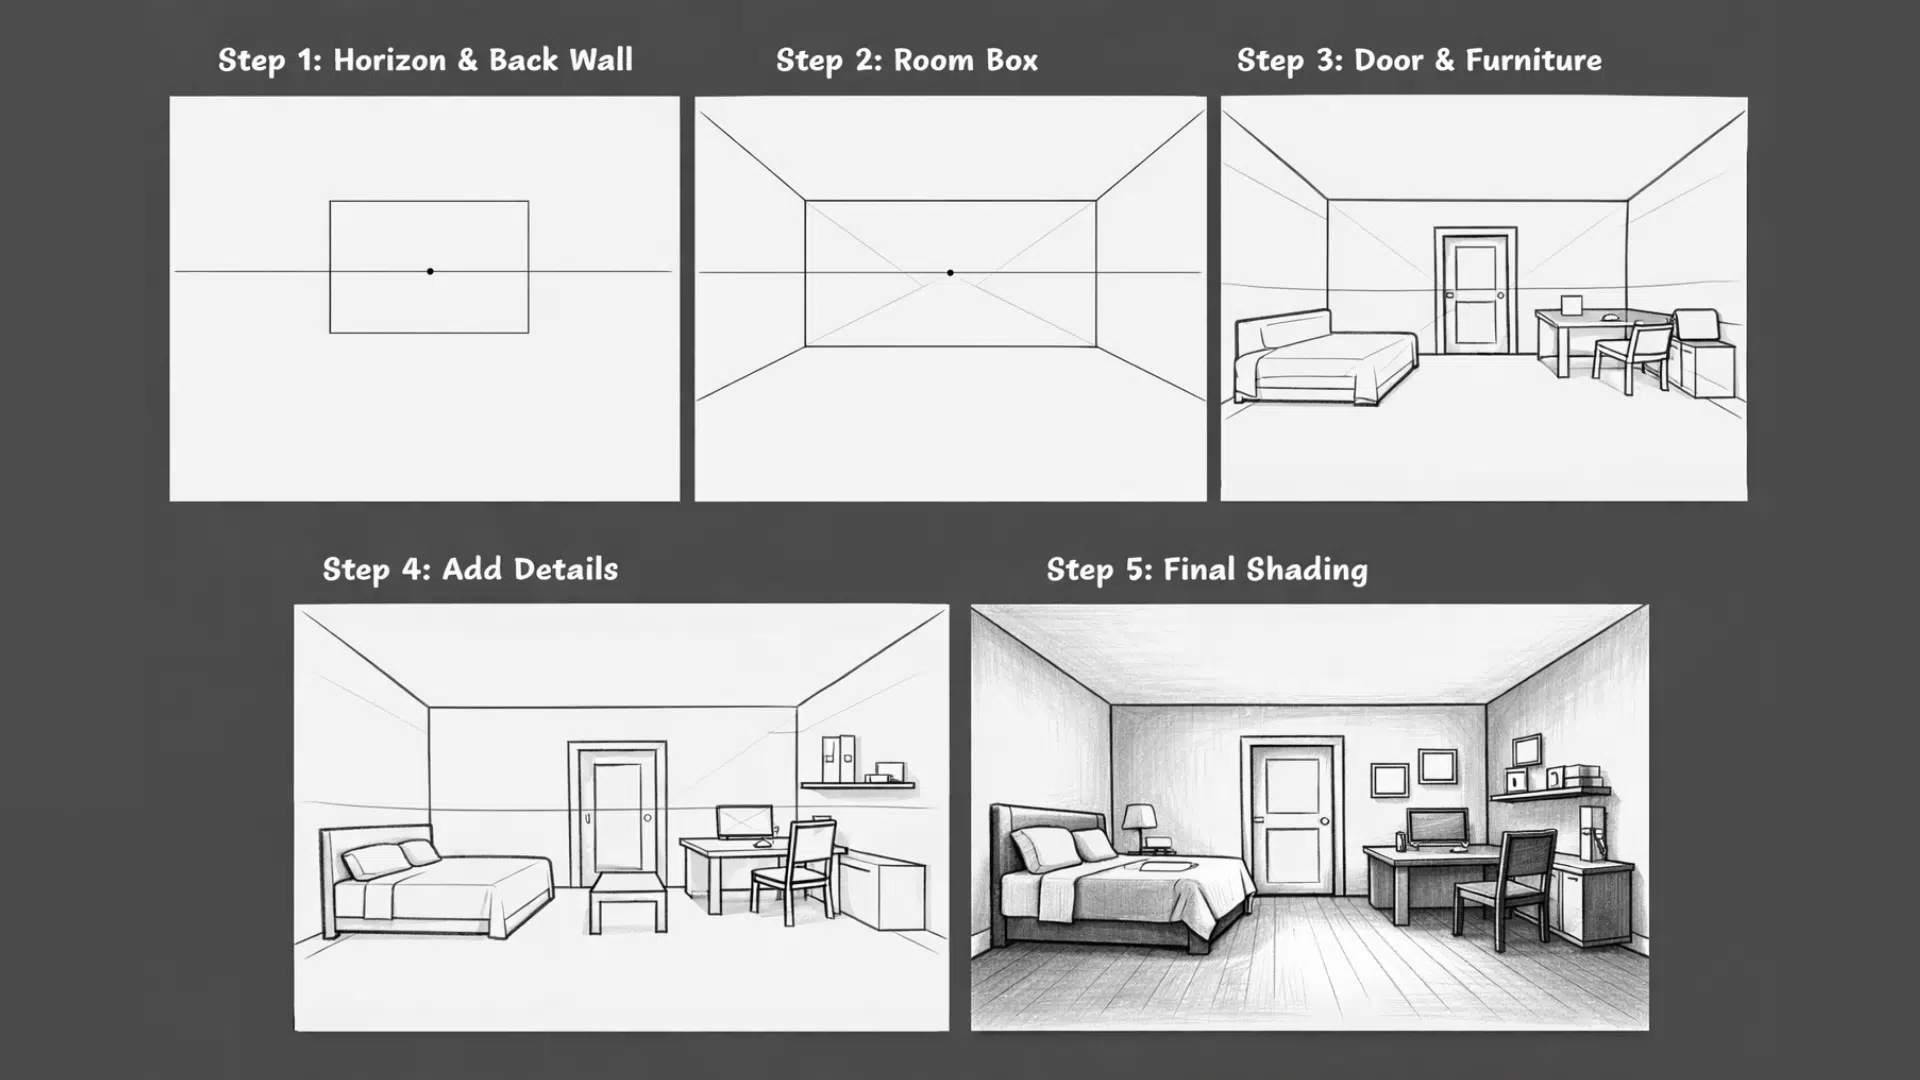
Step 1: Draw the Horizon Line, Vanishing Point, and Back Wall
Draw a horizontal line across the middle of your page and place a dot near the center for your vanishing point.
Next, draw a rectangle centered on that dot; this is the flat back wall that faces you directly. Getting these two things placed correctly sets up everything else in the drawing.
Step 2: Connect the Corners and Build the Room Box
Draw light lines from each corner of the back wall out to the vanishing point. Then close them off with horizontal and vertical lines to form the floor, ceiling, and side walls.
Step back and check that the room box feels balanced and proportional before moving forward.
Step 3: Add a Door, Window, and Basic Furniture Shapes
Draw a door or window on the back wall, and connect its top corners to the vanishing point to create realistic depth.
Then block in simple box shapes for furniture, such as a bed, desk, or table. Make sure every depth line on the furniture also points back to the same vanishing point.
Step 4: Add Details and Clean Up Construction Lines
Layer in smaller details, such as picture frames, shelves, or a headboard, using the same vanishing-point rules.
Once your details are in place, lightly erase all guidelines you no longer need. Work slowly here so you don’t accidentally remove lines that belong in the final drawing.
Step 5: Darken Final Lines and Add Shading
Go over the final lines with a darker pen. Pick a light source, then shade the walls, floor, and furniture to add depth.
Even simple shading changes a flat line drawing into something that feels deep and three-dimensional.
Why Perspective Matters Beyond Rooms
Interestingly, perspective thinking also helps when drawing organic subjects. Even something as simple as lips benefits from understanding depth and form.
The transition from flat shapes to dimension becomes clearer when practicing lip shading.
This same understanding of structure and light applies across different subjects, helping your drawings feel more natural and realistic.
Common Mistakes When Drawing a Room in One-Point Perspective
Even small perspective drawing errors can make a room feel broken or unrealistic. Knowing common mistakes beforehand helps avoid redoing everything.
- Never place furniture or objects randomly; every depth edge must connect to the vanishing point
- Only receding lines meet the vanishing point; horizontal and vertical lines always stay straight
- Keep furniture proportional to the room size; nothing should look too big or too small
- Avoid darkening guide lines too early, keep everything light until the final step
- Double-check that walls, floor, and ceiling all recede toward the exact same single point
Easy Ideas to Make Your Perspective Room Look Better
Good perspective drawing comes alive through small, intentional details that transform a plain box into a believable space.
- Furnish with simple objects: Rugs, lamps, and wall frames add life without complexity; keep all receding lines pointed to the vanishing point.
- Adapt the room to any setting: Swap furniture to create a bedroom, classroom, or living room while keeping the same perspective rules.
- Shade from one light source: Darken surfaces away from the light and brighten those facing it to instantly add depth.
- Add subtle texture: Floor planks and wall patterns should follow perspective lines, kept light enough to enhance atmosphere without cluttering the drawing.
Wrapping It Up
Now you know exactly how to draw a room with 1-point perspective step by step. The more you practice, the faster that single vanishing point starts to feel like second nature.
Try a bedroom first, then challenge yourself with a classroom or living room.
Grab your pencil, pick your vanishing point, and see how far one dot can take you. The results might surprise you.