DIY Christmas ornaments bring magic to your holiday celebrations. Whether you’re crafting with kids, decorating on a budget, or making heartfelt gifts, handmade ornaments add special meaning.
These creative projects use simple materials you already have at home.
You’ll create beautiful ornaments that match your style while building memories and saving money. Let’s turn everyday supplies into holiday magic!
Why Make DIY Christmas Ornaments?
Making your own Christmas ornaments brings families together while saving money compared to store-bought decorations.
You’ll create personalized gifts that friends and family will treasure for years. These handmade pieces are eco-friendly and let you match your home’s unique style perfectly.
Plus, crafting is surprisingly therapeutic – it melts away holiday stress while you build new traditions.
If you’re decorating your tree or gifting to loved ones, DIY ornaments add heartfelt meaning to every celebration.
Easy Beginner Ornaments
Start your DIY Christmas ornament projects with these simple projects that require minimal supplies and no special skills. Perfect for crafting newcomers and families with young children, these designs deliver beautiful results in under an hour.
1. Salt Dough Cutout Ornaments
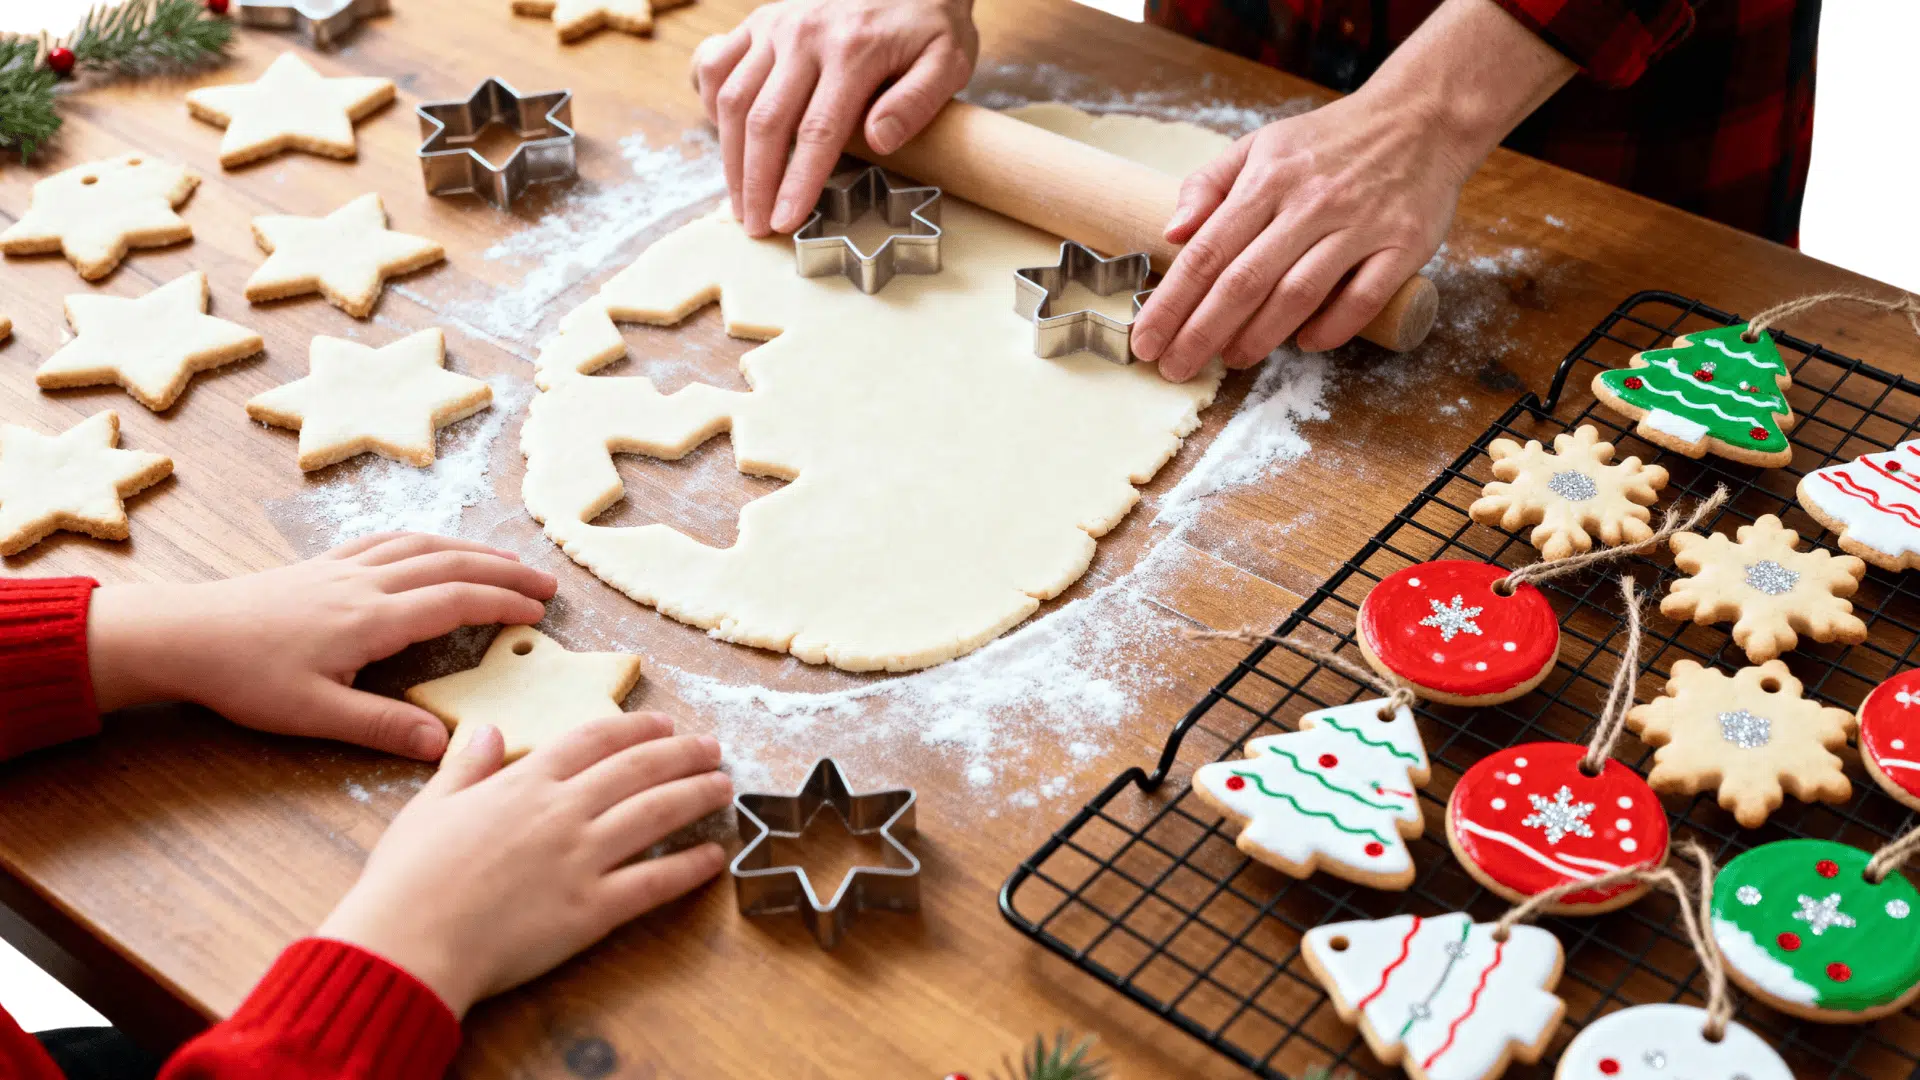
Mix flour, salt, and water to create moldable dough that bakes into durable ornaments. Cut festive shapes with cookie cutters, bake until hardened, then paint and seal for personalized tree decorations that last for years.
- Age Group: 4+ with supervision, 8+ independently
- Safety: Adult supervision required for oven use; dough is safe but very salty if tasted
- Time: 30 minutes prep, 2-3 hours baking, plus cooling and decorating time
Pro Tip: Add 1 tablespoon of cinnamon to your dough for natural color and a subtle holiday scent that lasts through baking.
2. Dried Orange Slice Ornaments
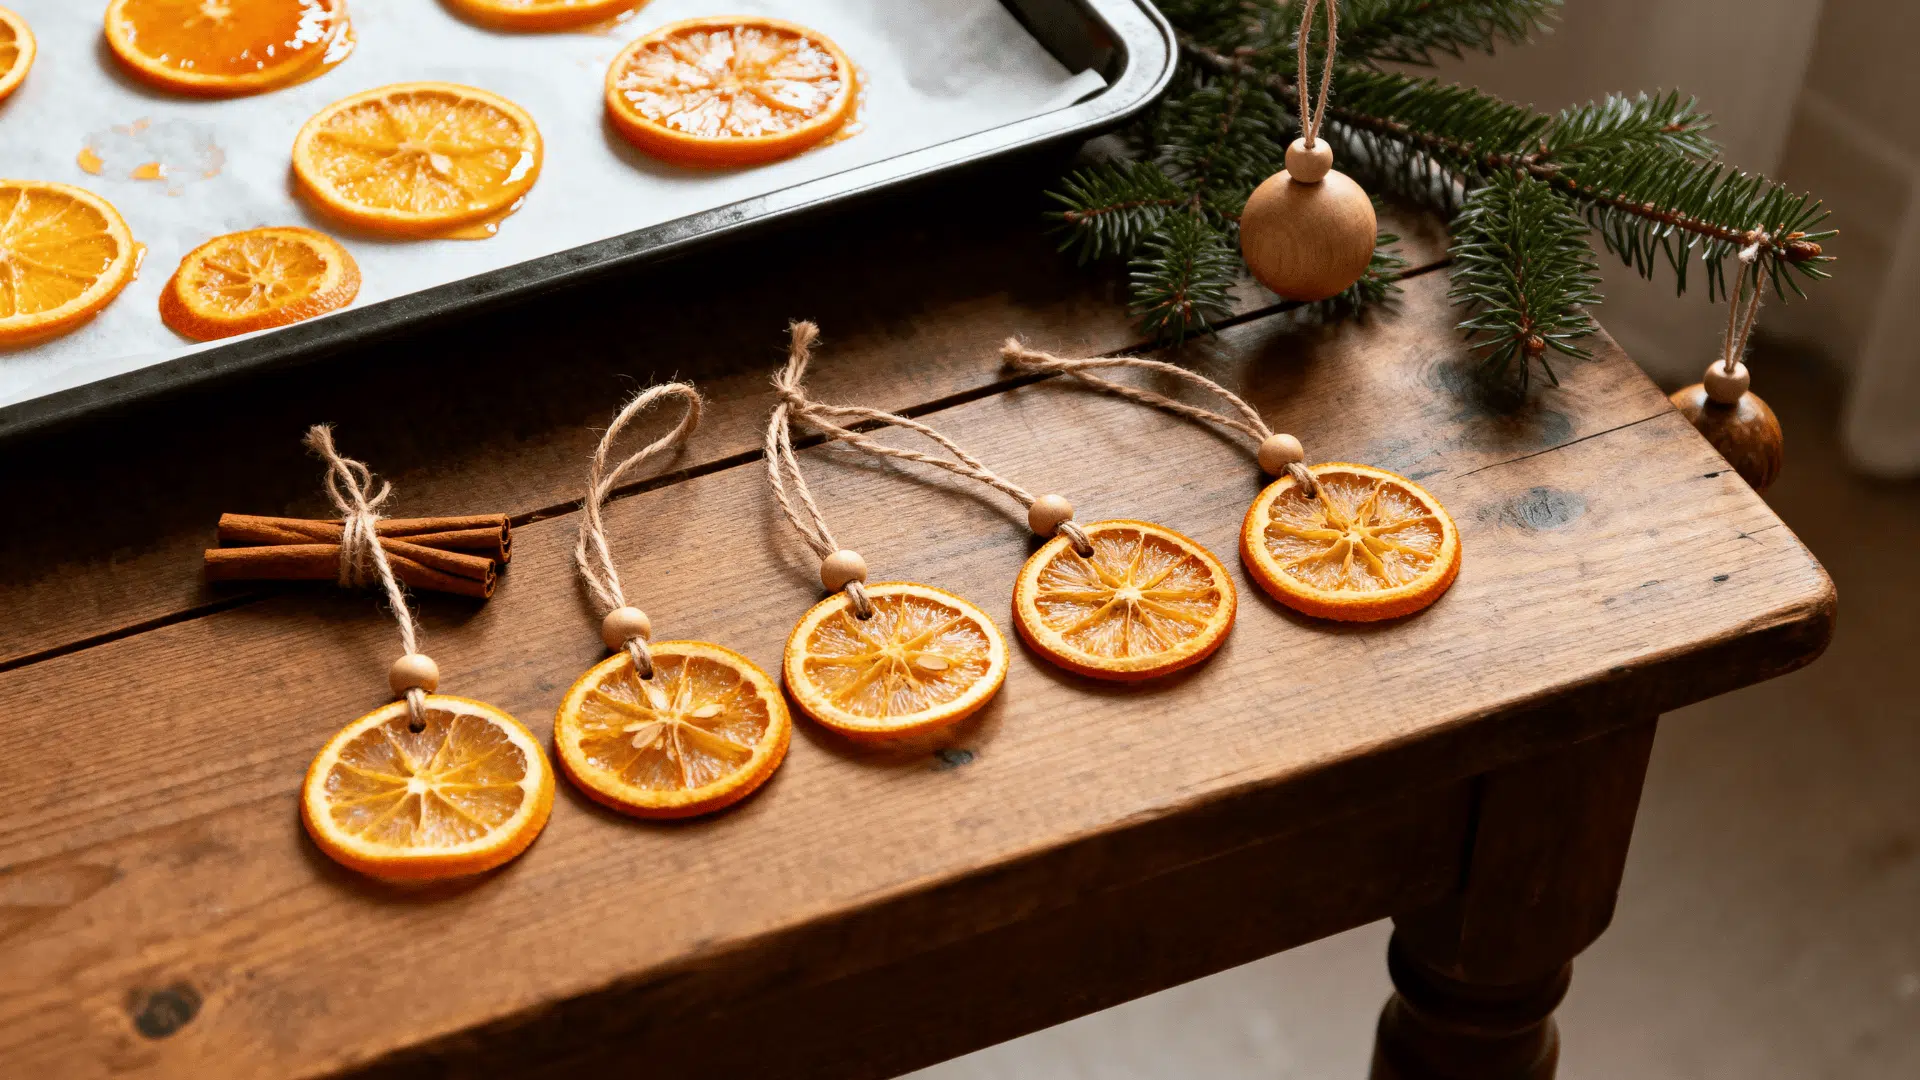
Alter fresh orange slices into beautiful rustic ornaments through simple oven-drying. Thread dried slices with twine and add cinnamon sticks or wooden beads for farmhouse-style decorations with natural fragrance.
- Age Group: 10+ with supervision for slicing, adults handle baking
- Safety: Adult supervision for oven use and sharp knives when slicing
- Time: 10 minutes prep, 3-4 hours drying time
Pro Tip: Pat orange slices with paper towels before baking to reduce drying time and prevent stickiness.
3. Paper Snowflakes

Fold paper into triangles and cut intricate patterns to reveal subtle snowflakes when unfolded. Add sparkle with glitter or leave plain for chic minimalist decorations that look stunning clustered on branches.
- Age Group: 5+ with safety scissors, 8+ with regular scissors
- Safety: Adult supervision for young children using scissors
- Time: 5-10 minutes per snowflake
Pro Tip: Use coffee filters instead of regular paper for more delicate, authentic-looking snowflakes with beautiful translucent qualities.
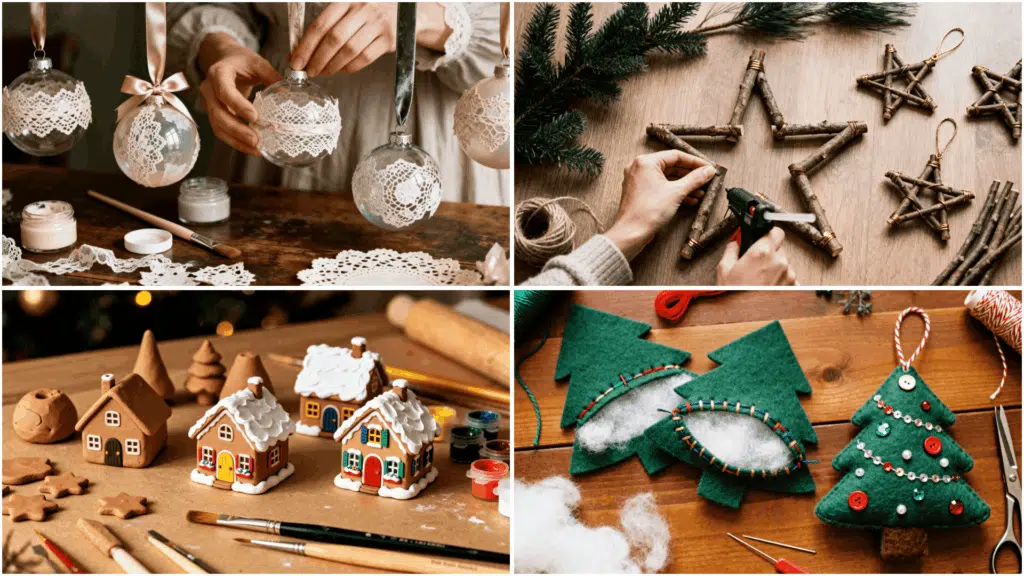
4. Yarn-Wrapped Clear Ball Ornaments
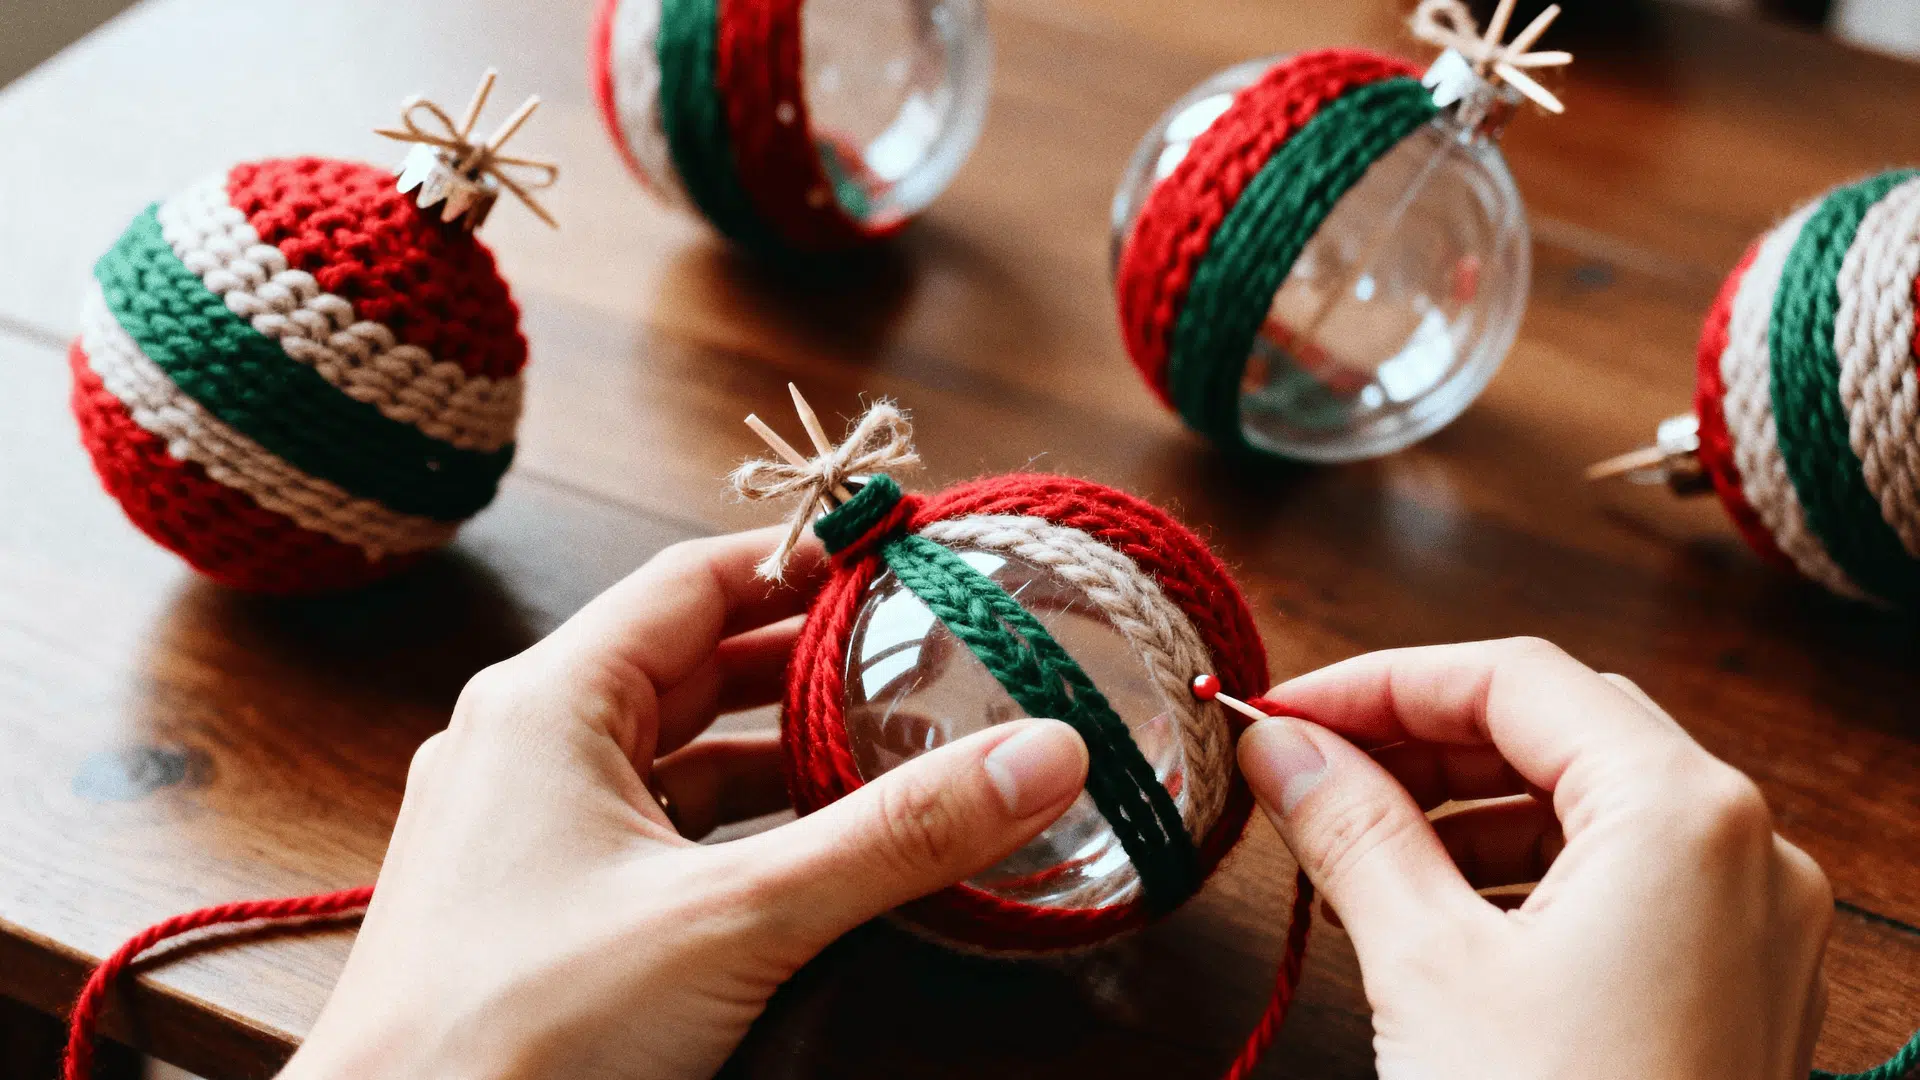
Wind colorful yarn around transparent plastic ornaments for textured, cozy decorations. Secure yarn ends with hot glue and add miniature faux knitting needles made from toothpicks for an adorable handcrafted charm.
- Age Group: 8+ with supervision, adults handle hot glue gun
- Safety: Hot glue gun requires adult handling; keep away from young children
- Time: 15-20 minutes per ornament
Pro Tip: Use ombré or variegated yarn for beautiful color transitions without switching colors or tying knots.
5. Painted Pinecone Ornaments

Collect pinecones from your yard and revamp them with white or metallic paint for frosty winter effects. Sprinkle glitter while the paint is wet, then attach ribbon loops for nature-inspired ornaments that cost practically nothing.
- Age Group: 5+ with supervision for painting, adults handle baking
- Safety: Wash hands after handling pinecones; use craft paint in a ventilated area
- Time: 20-25 minutes plus drying time
Pro Tip: Bake pinecones at 200°F for 30 minutes before crafting to kill bugs and open scales entirely.
6. Popsicle Stick Snowflakes
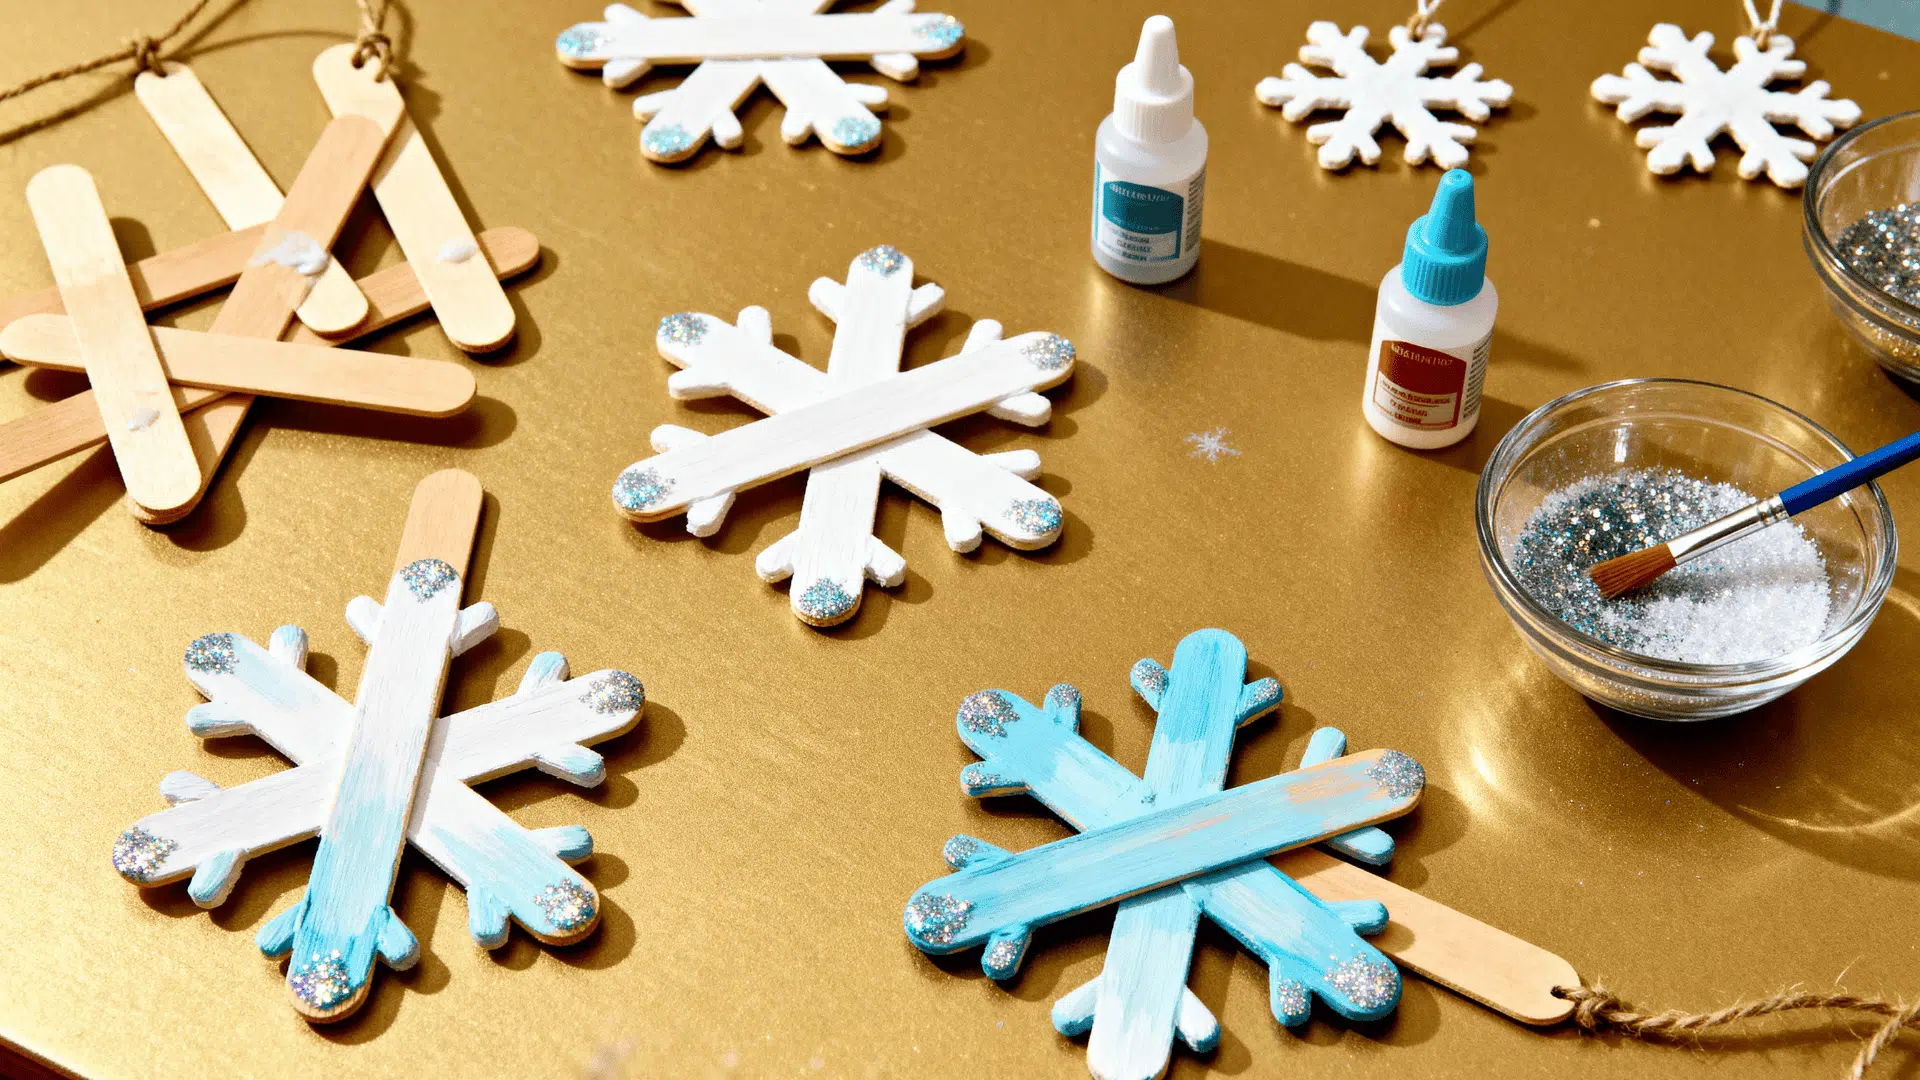
Glue popsicle sticks together in snowflake patterns, then paint in wintery whites or icy blues. Add glitter to the tips for extra sparkle; this kid-friendly project creates charming rustic decorations with minimal supplies.
- Age Group: 6+ with supervision, 10+ independently
- Safety: Use non-toxic glue; supervise younger children with glue guns
- Time: 15-20 minutes plus drying time
Pro Tip: Create a template on paper first to ensure your snowflake is symmetrical before gluing the sticks together.
7. Handprint and Footprint Keepsakes

Press your child’s hand or foot into salt dough or air-dry clay, then add their name and the year. These precious keepsakes become treasured memories as children grow, capturing tiny hands and feet at each age.
- Age Group: All ages (capturing prints), toddlers through teens
- Safety: Non-toxic clay recommended; adult supervision for baking salt dough
- Time: 15-20 minutes plus baking or drying time
Pro Tip: Make one ornament each year to create a timeline showing how much your child has grown.
Intermediate Craft Ornaments
Ready to level up your ornament crafting? These intermediate projects require more time and basic sewing or crafting skills, but create stunning results. Perfect for crafters looking to expand their techniques and create more detailed decorations.
8. Stuffed Felt Christmas Trees
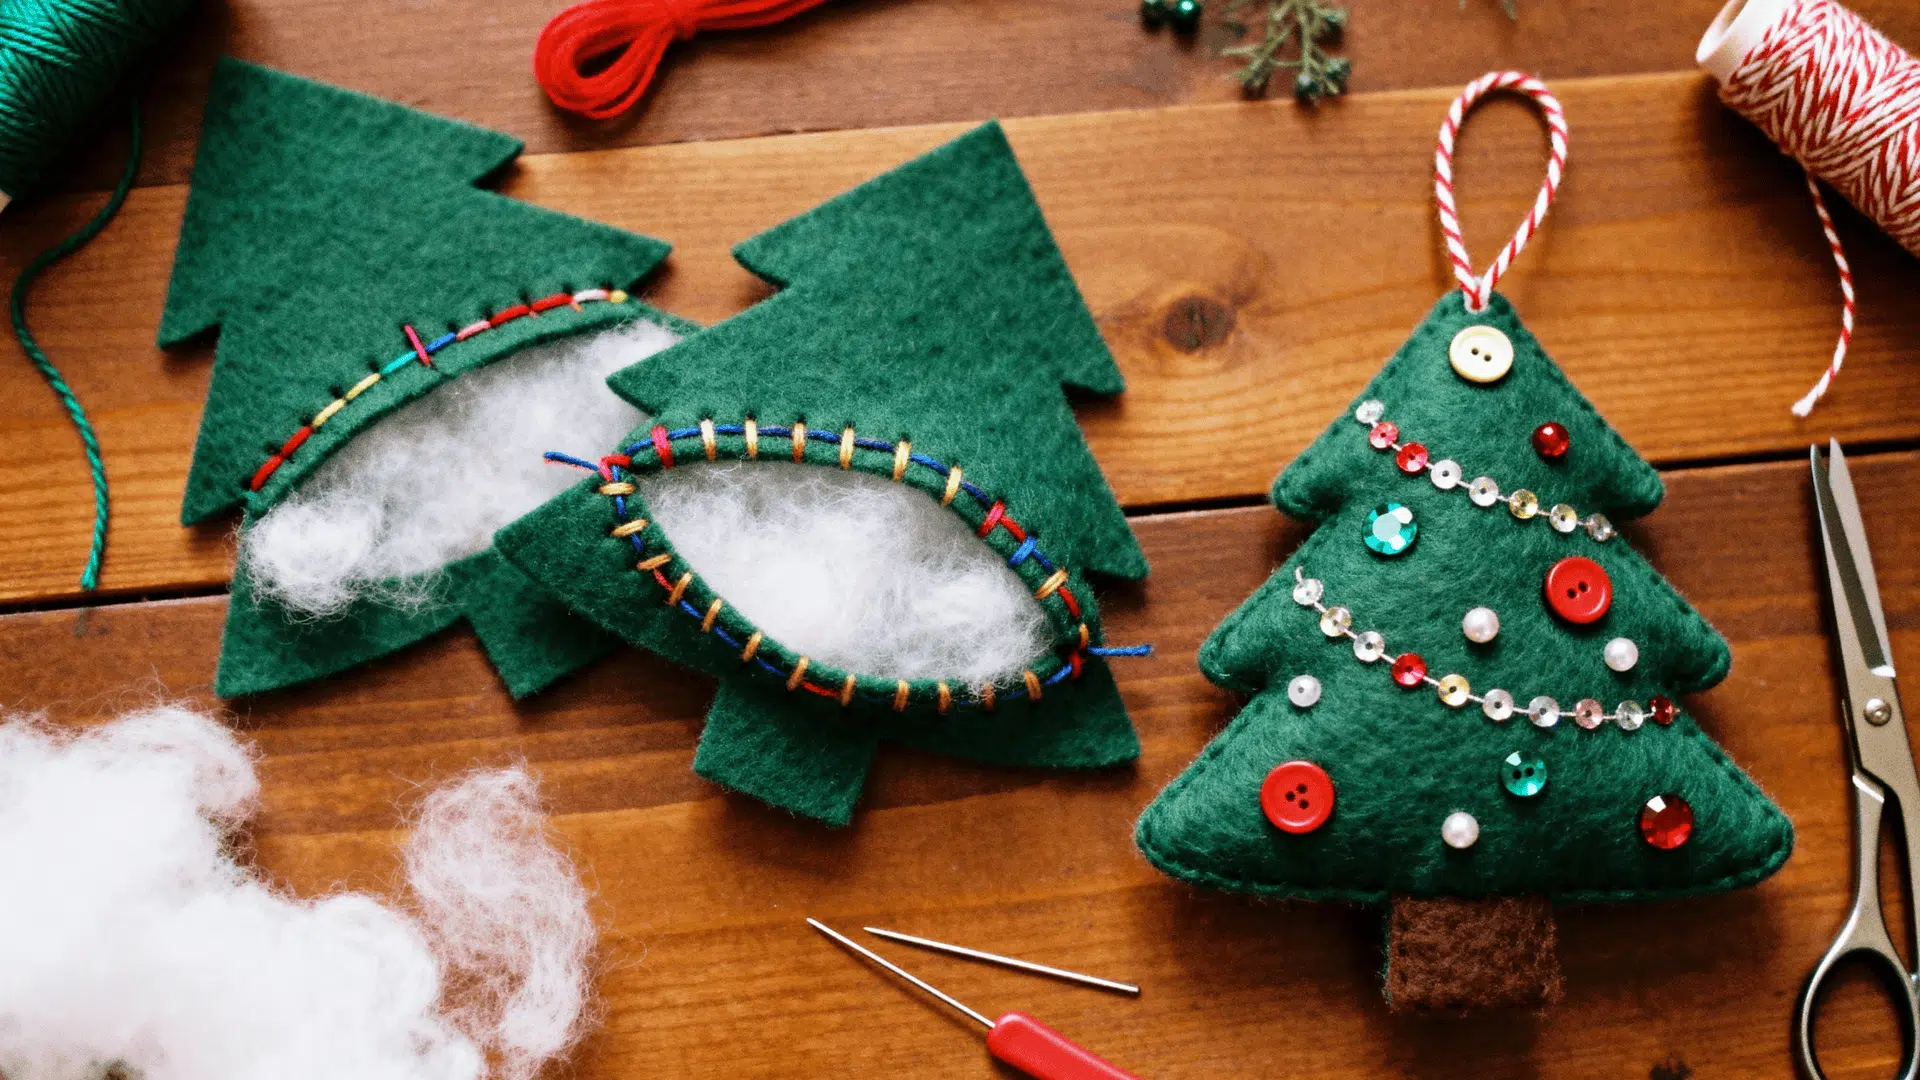
Cut two identical tree shapes from felt, then hand-stitch the edges together with colorful embroidery floss. Stuff with fiberfill before closing the final seam, and embellish with sequins, beads, or buttons for a soft, textured ornament.
- Age Group: 10+ with basic sewing skills, adult help for younger crafters
- Safety: Supervise needle use; secure loose beads and sequins for households with small children
- Time: 30-45 minutes per ornament
Pro Tip: Use pinking shears to cut your felt shapes for decorative edges that also prevent fraying.
9. Wood Slice Ornaments
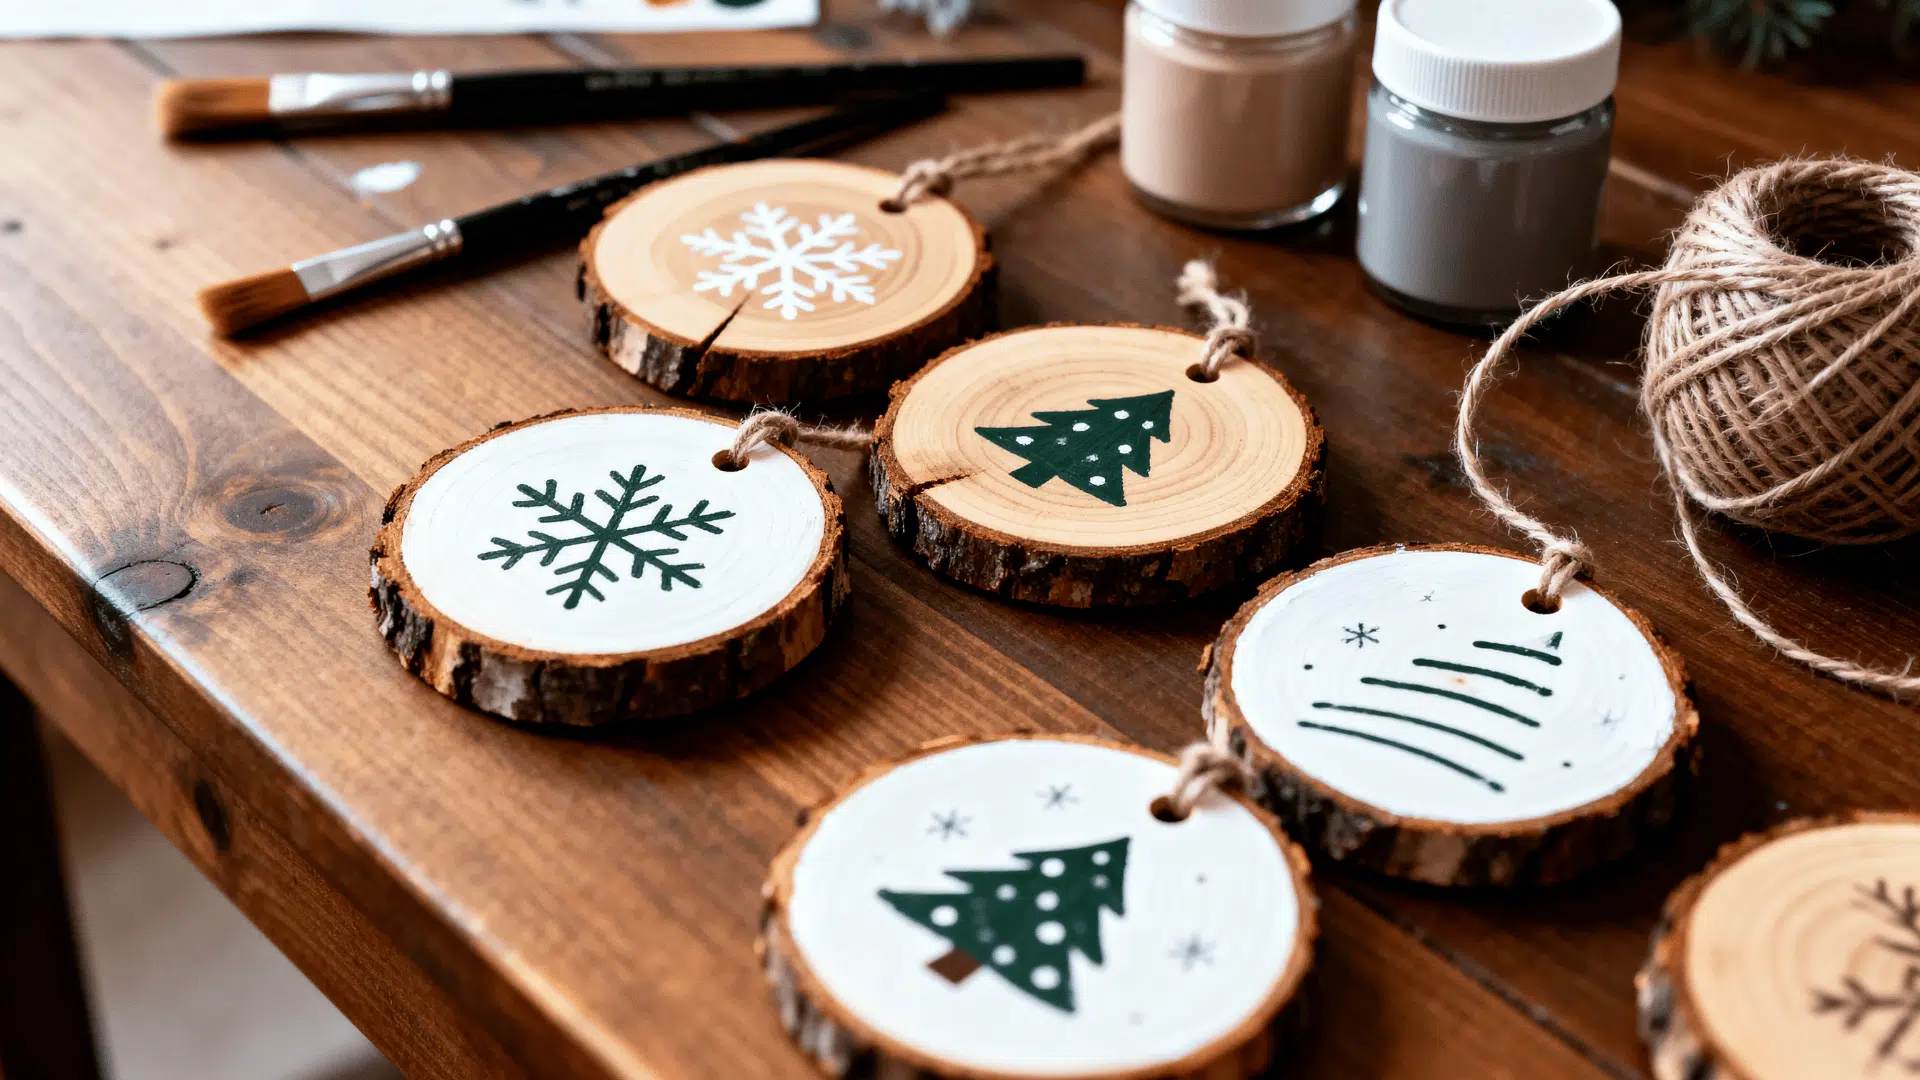
Paint festive designs like snowflakes, trees, or holiday messages on natural wood slices for rustic charm. Drill small holes near the top edge for twine hangers that showcase the wood’s natural grain and texture.
- Age Group: 12+ with supervision for drilling, adults handle power tools
- Safety: Adult supervision required for drilling; wear safety glasses and secure wood pieces
- Time: 20-30 minutes per ornament plus drying time
Pro Tip: Sand wood slices smooth and wipe with a damp cloth before painting for better paint adhesion and cleaner designs.
10. Glitter-Filled Clear Ornaments
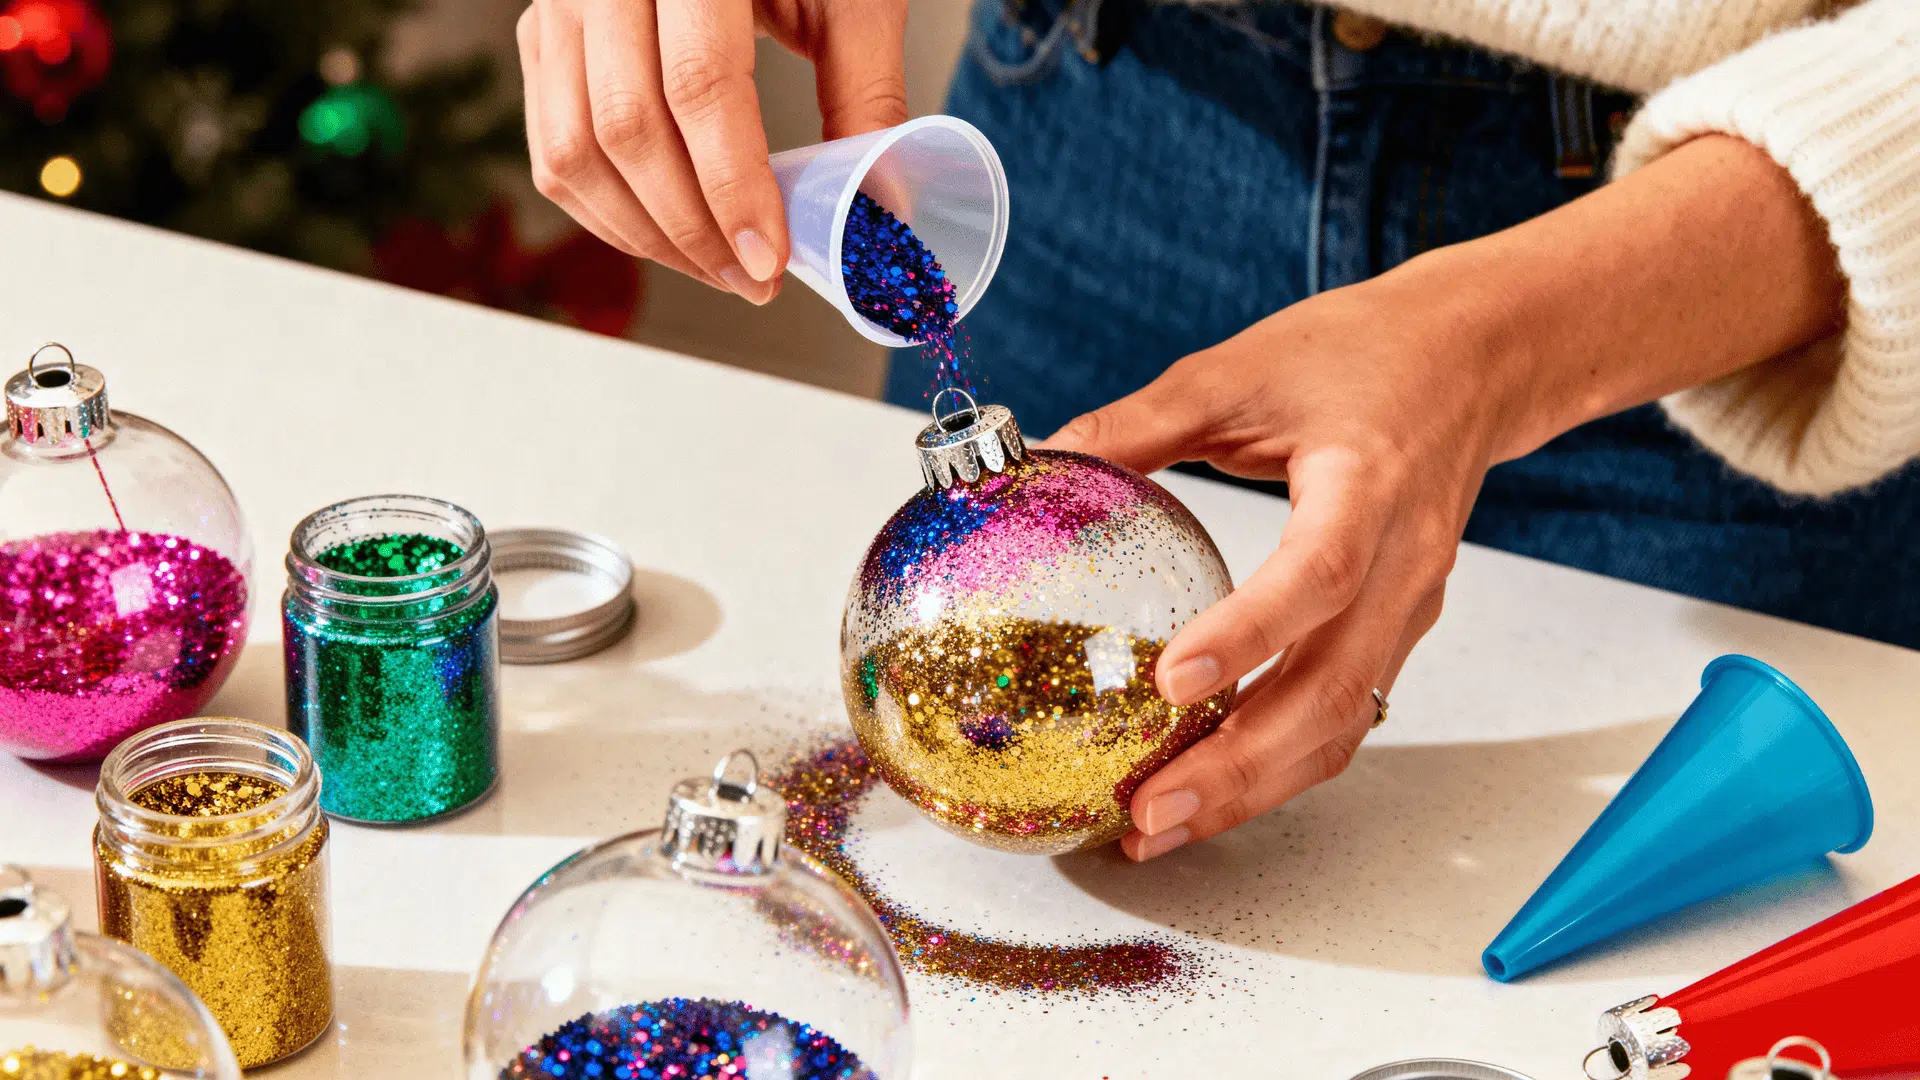
Remove the metal tops from clear plastic ornaments, pour glitter inside in your chosen colors, then replace the tops. Swirl the glitter around to coat the interior thoroughly for gorgeous sparkle without the messy cleanup.
- Age Group: 8+ with supervision, adults help with removing and securing tops
- Safety: Work over newspaper or tray to contain glitter spills; avoid inhaling glitter dust
- Time: 10-15 minutes per ornament
Pro Tip: Add a few drops of floor polish before the glitter to help it stick to the inside walls permanently.
11. Mini Grapevine Wreaths
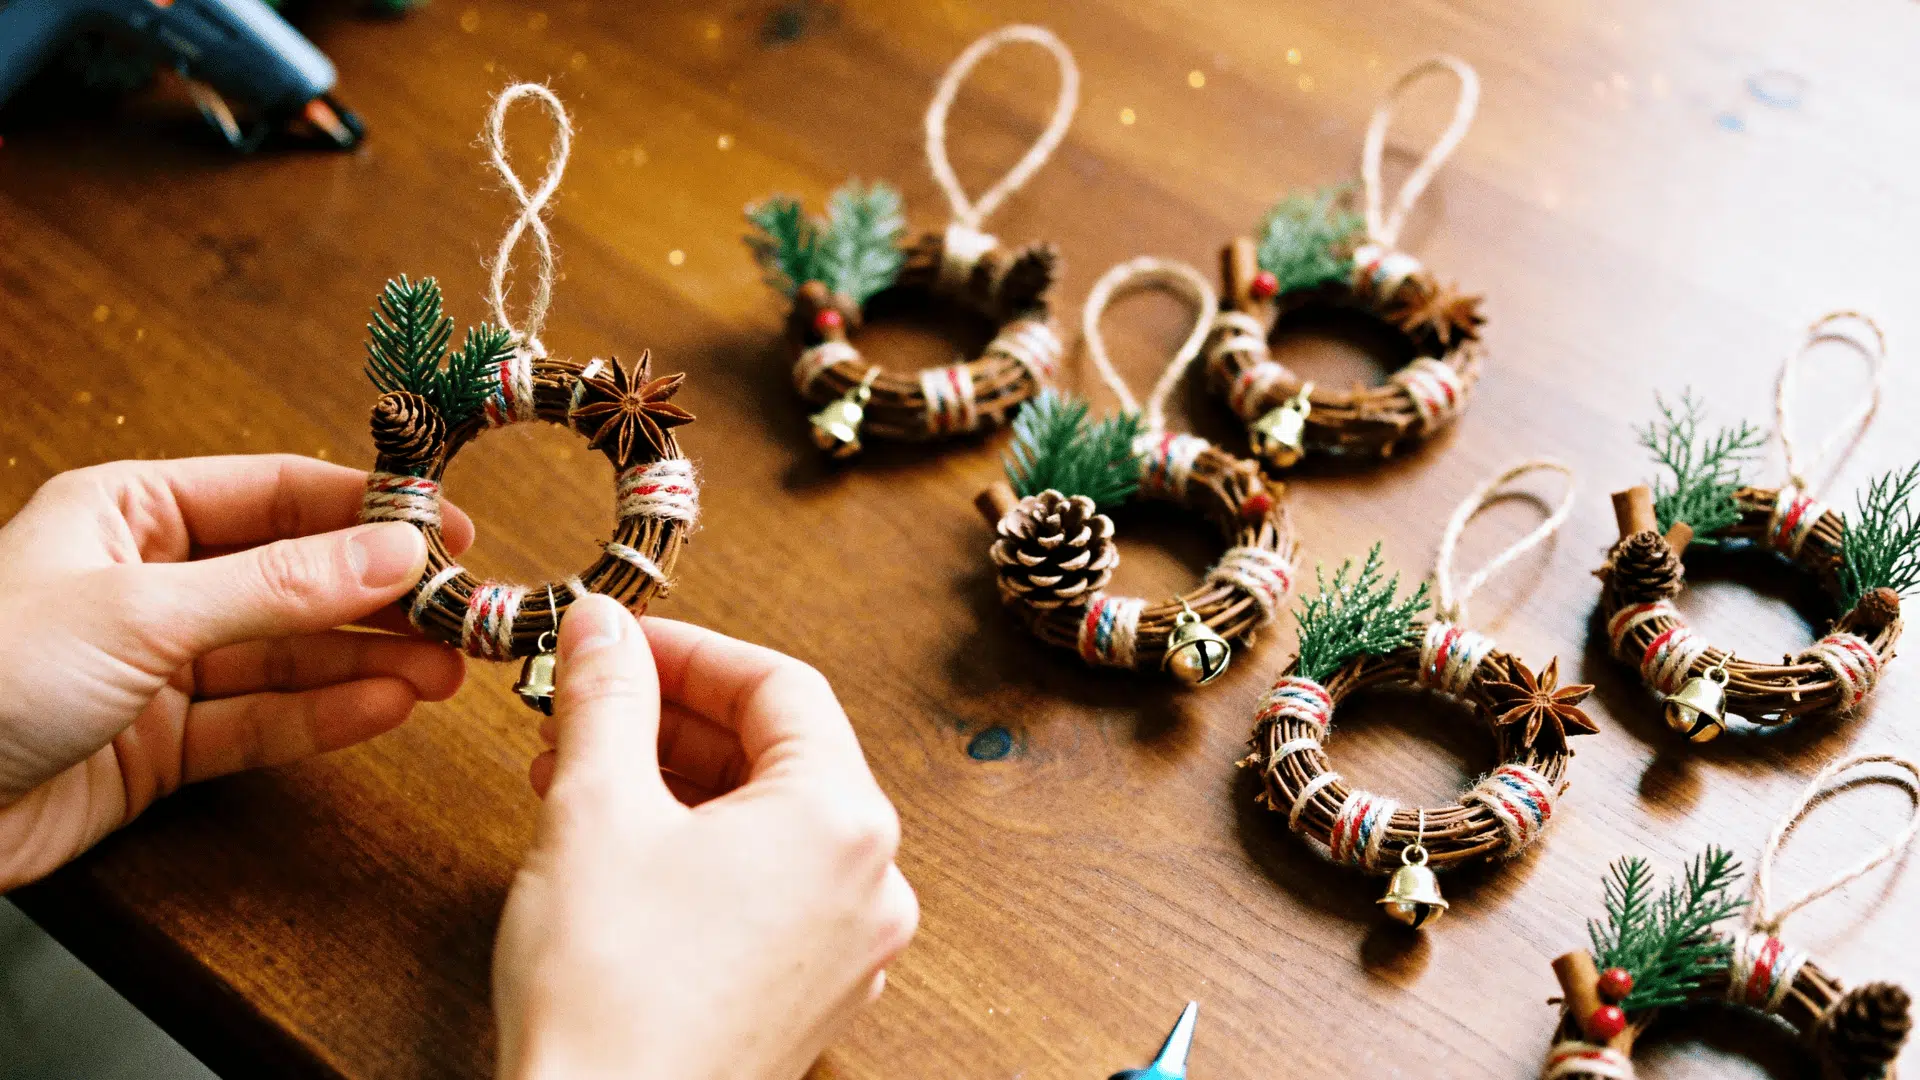
Wrap decorative twine around small 2-inch grapevine wreath forms for texture and color. Hot glue fresh or faux greenery sprigs, pine cones, star anise, or tiny bells for miniature wreaths bursting with holiday charm.
- Age Group: 10+ with supervision, adults handle hot glue gun
- Safety: Hot glue gun requires adult handling; ensure adequate ventilation if using fresh greenery
- Time: 20-30 minutes per wreath
Pro Tip: Mist fresh greenery with hairspray to help it last longer and maintain its color throughout the season.
12. 3D Geometric Paper Ornaments
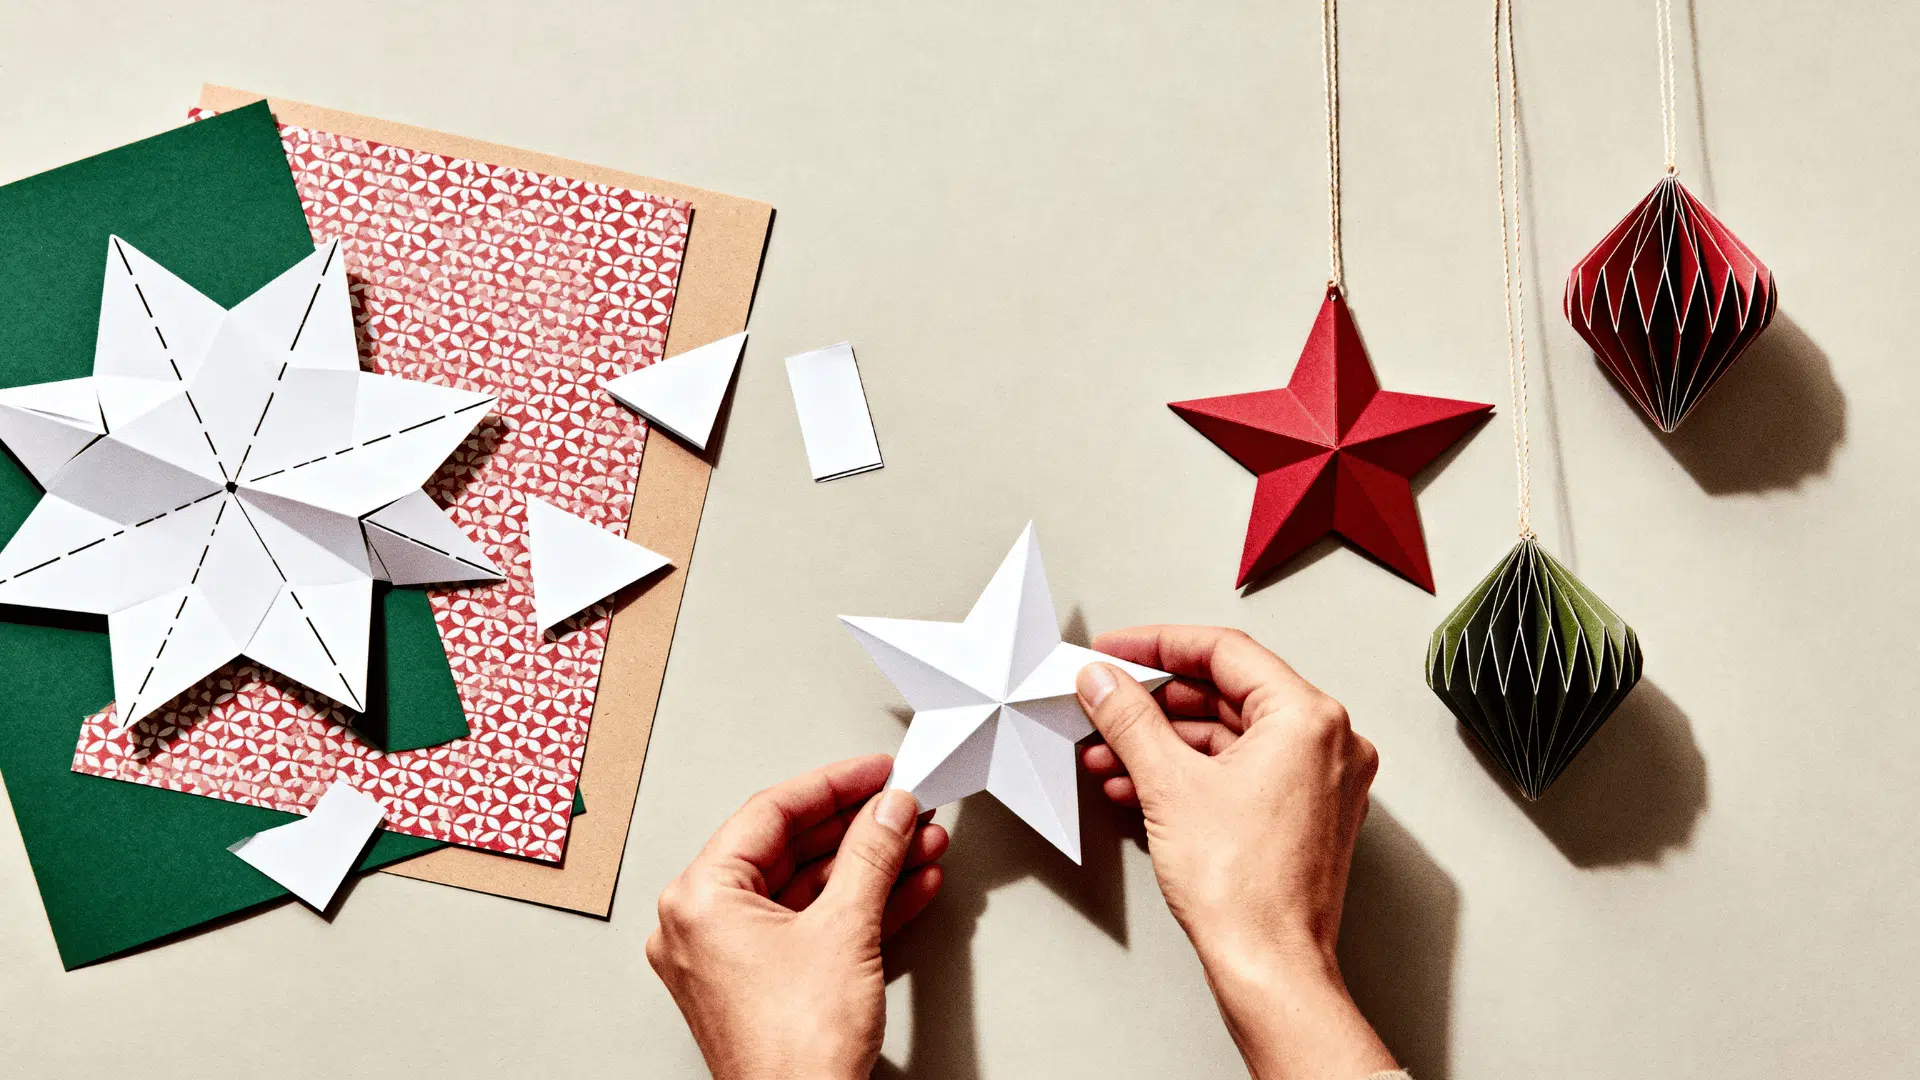
Follow downloadable templates to create impressive dimensional shapes from heavyweight cardstock or scrapbook paper. Carefully fold along score lines, glue tabs together, and assemble stunning modern geometric designs that look store-bought.
- Age Group: 12+ with patience for detailed folding and assembly
- Safety: Paper cuts possible; use paper-friendly glue to avoid burns from hot glue
- Time: 45-60 minutes per ornament, depending on complexity
Pro Tip: Use a bone folder or butter knife to score fold lines before folding for crisp, professional-looking edges.
13. Beaded Wire Candy Canes
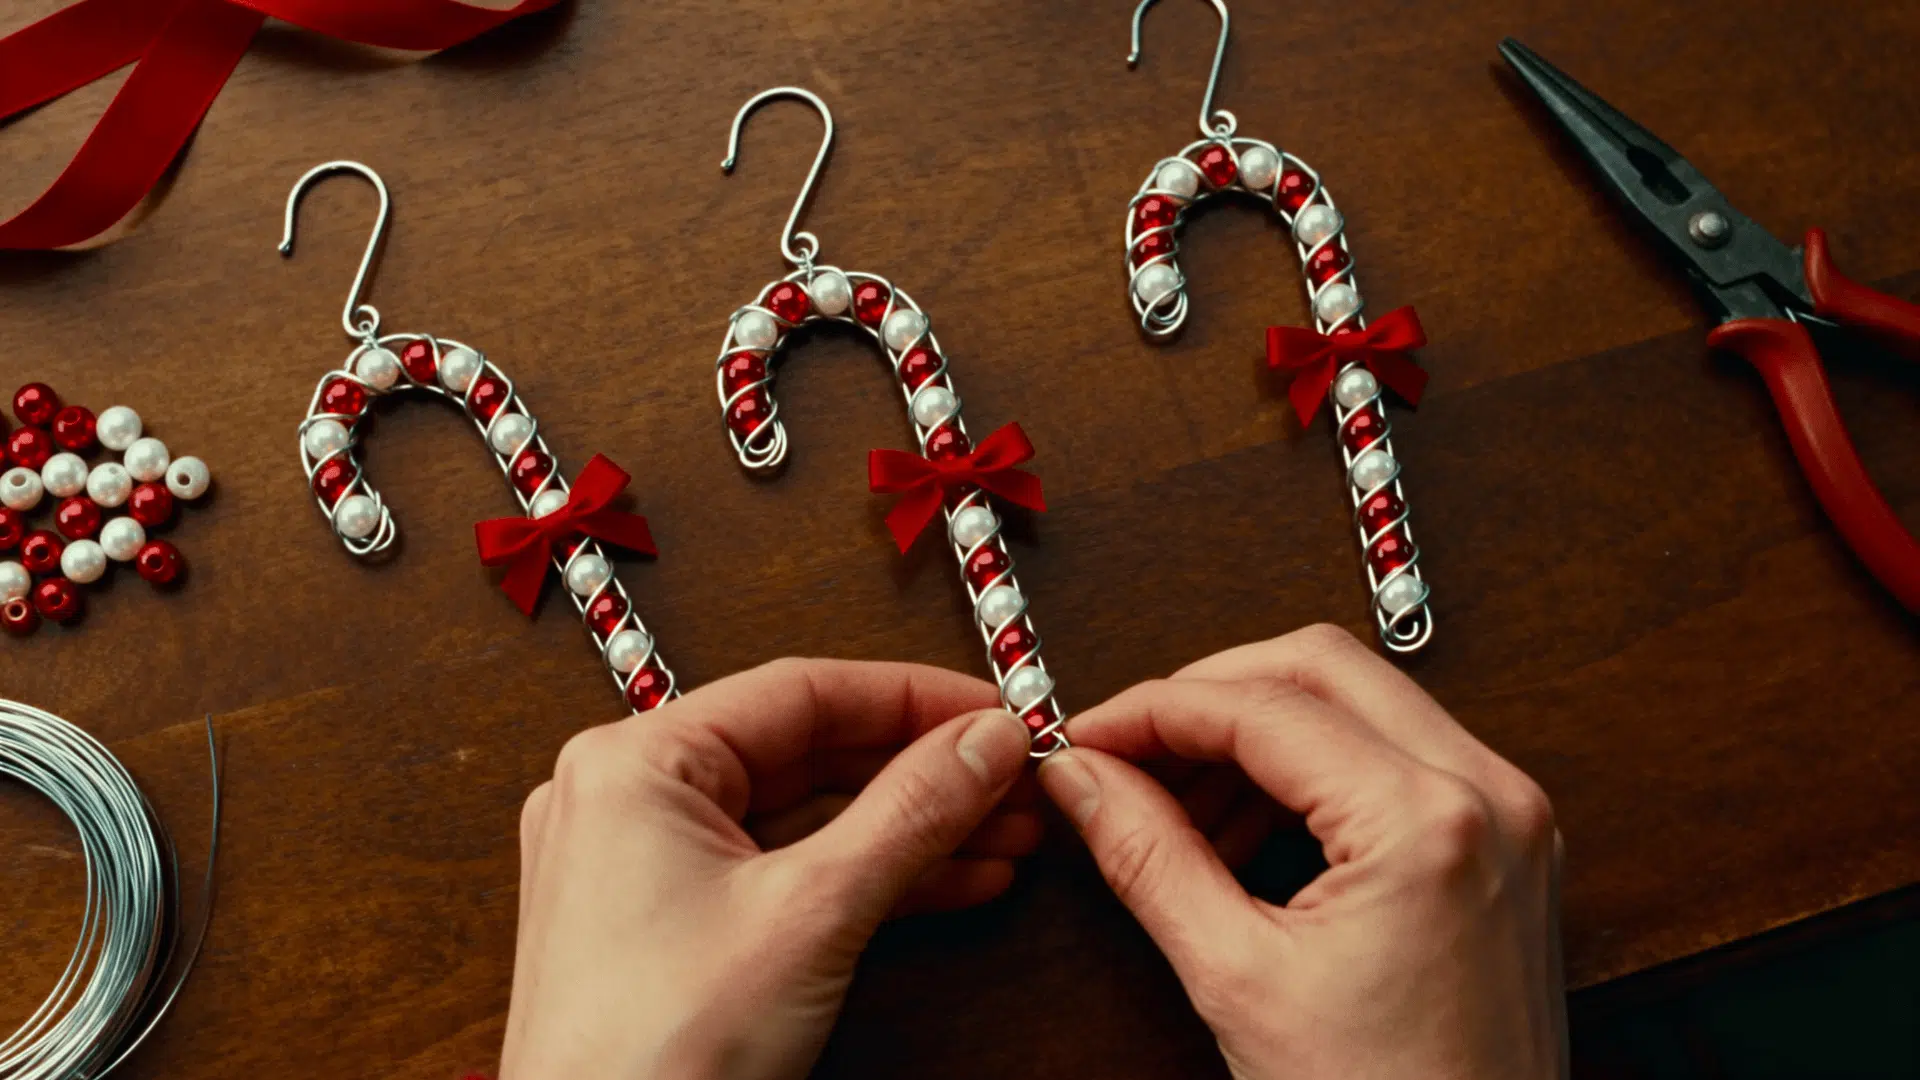
Thread alternating red and white beads onto flexible craft wire, carefully bend into classic candy cane shapes, then secure both ends. Add festive ribbon bows at the curved top for charming Victorian-style ornaments.
- Age Group: 10+ with fine motor skills for threading small beads
- Safety: Wire ends can be sharp; use needle-nose pliers to create smooth loops at both ends
- Time: 25-35 minutes per candy cane
Pro Tip: Use memory wire instead of regular craft wire so your candy canes hold their shape without unraveling.
14. Orange and Clove Pomanders
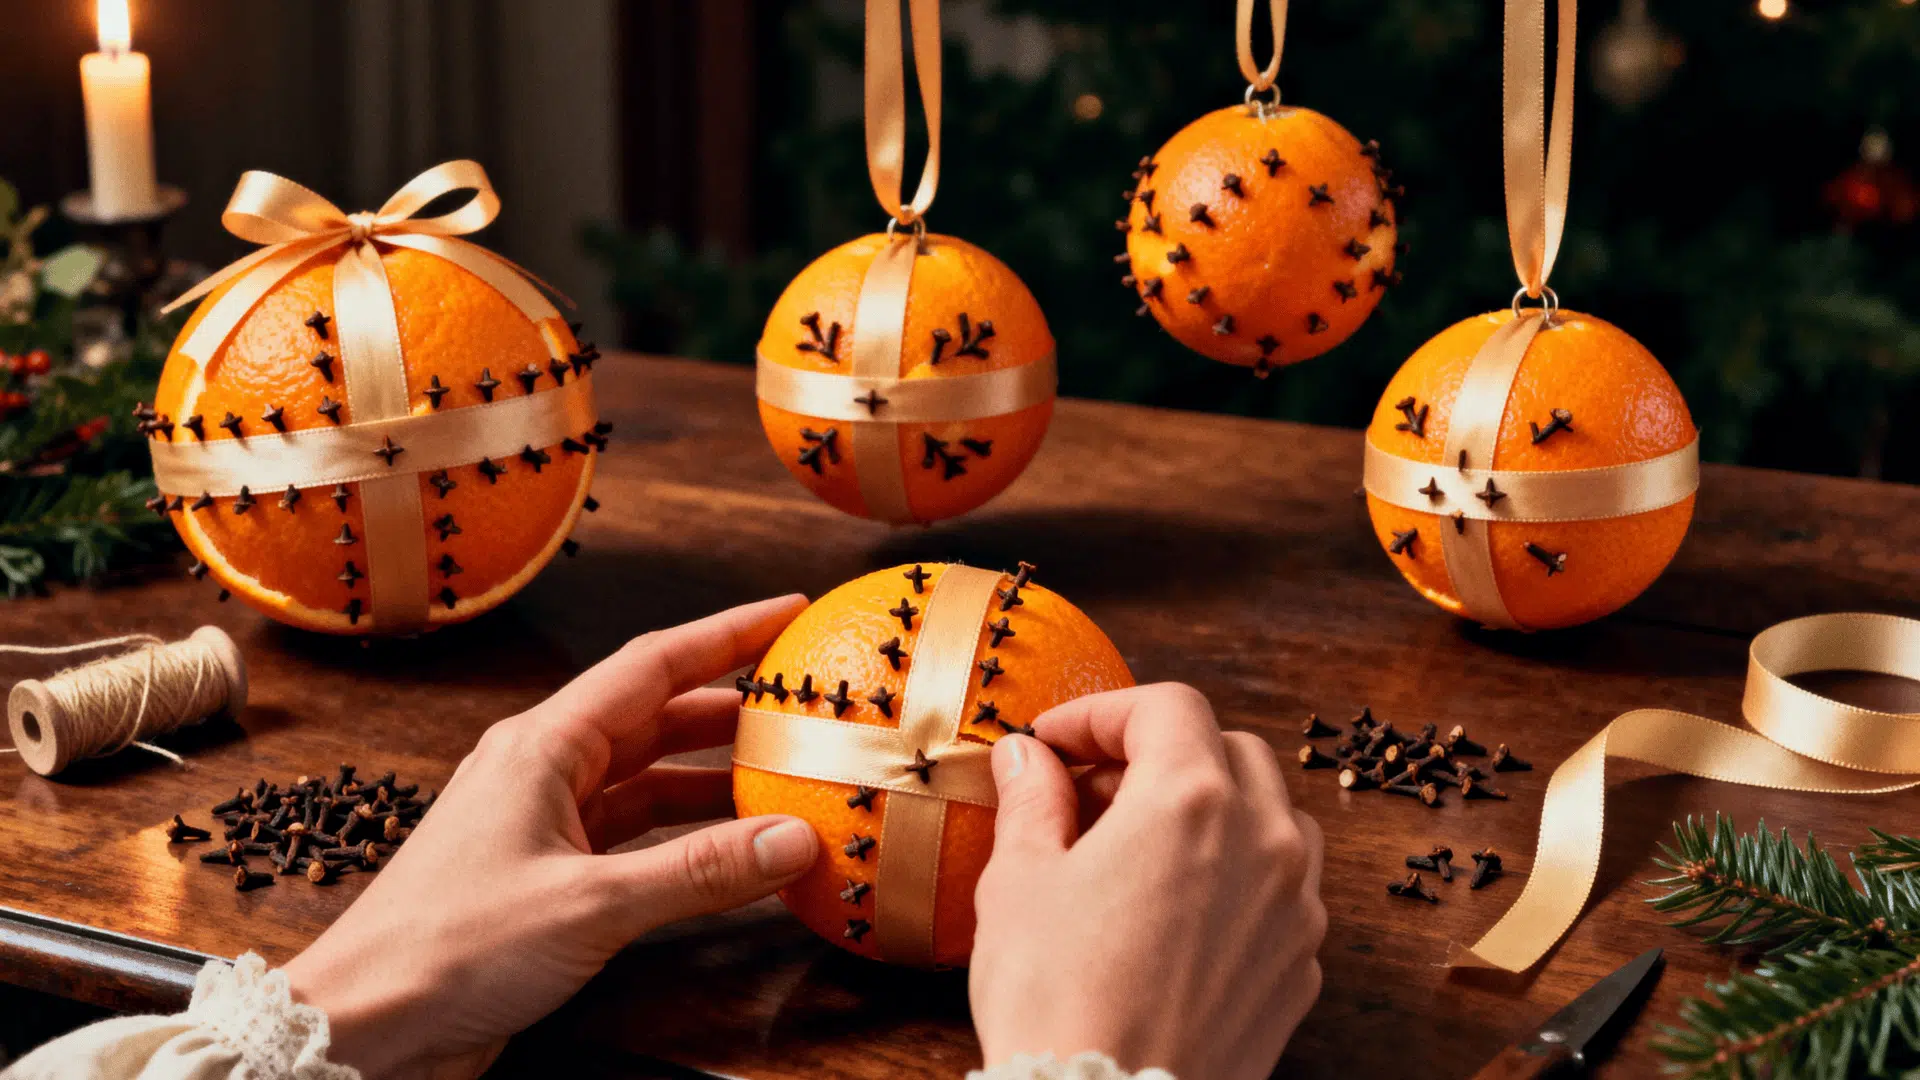
Wrap ribbon around fresh oranges in a cross pattern, securing with pins or tape. Push whole cloves into the exposed orange spaces between ribbons for this classic Victorian tradition that fills your home with natural spiced fragrance.
- Age Group: 8+ with supervision, all ages can help with clove insertion
- Safety: Monitor clove insertion to prevent finger soreness; wash hands after handling
- Time: 30-40 minutes per pomander
Pro Tip: Pre-poke holes with a toothpick or skewer to make inserting cloves easier and prevent sore fingers.
Advanced and Unique Ornaments
Challenge yourself with these refined projects that showcase advanced crafting techniques and artistic skills. These ornaments require patience, precision, and specific materials, but create heirloom-quality pieces that impress everyone who sees them.
15. Embroidered Mini Hoop Ornaments
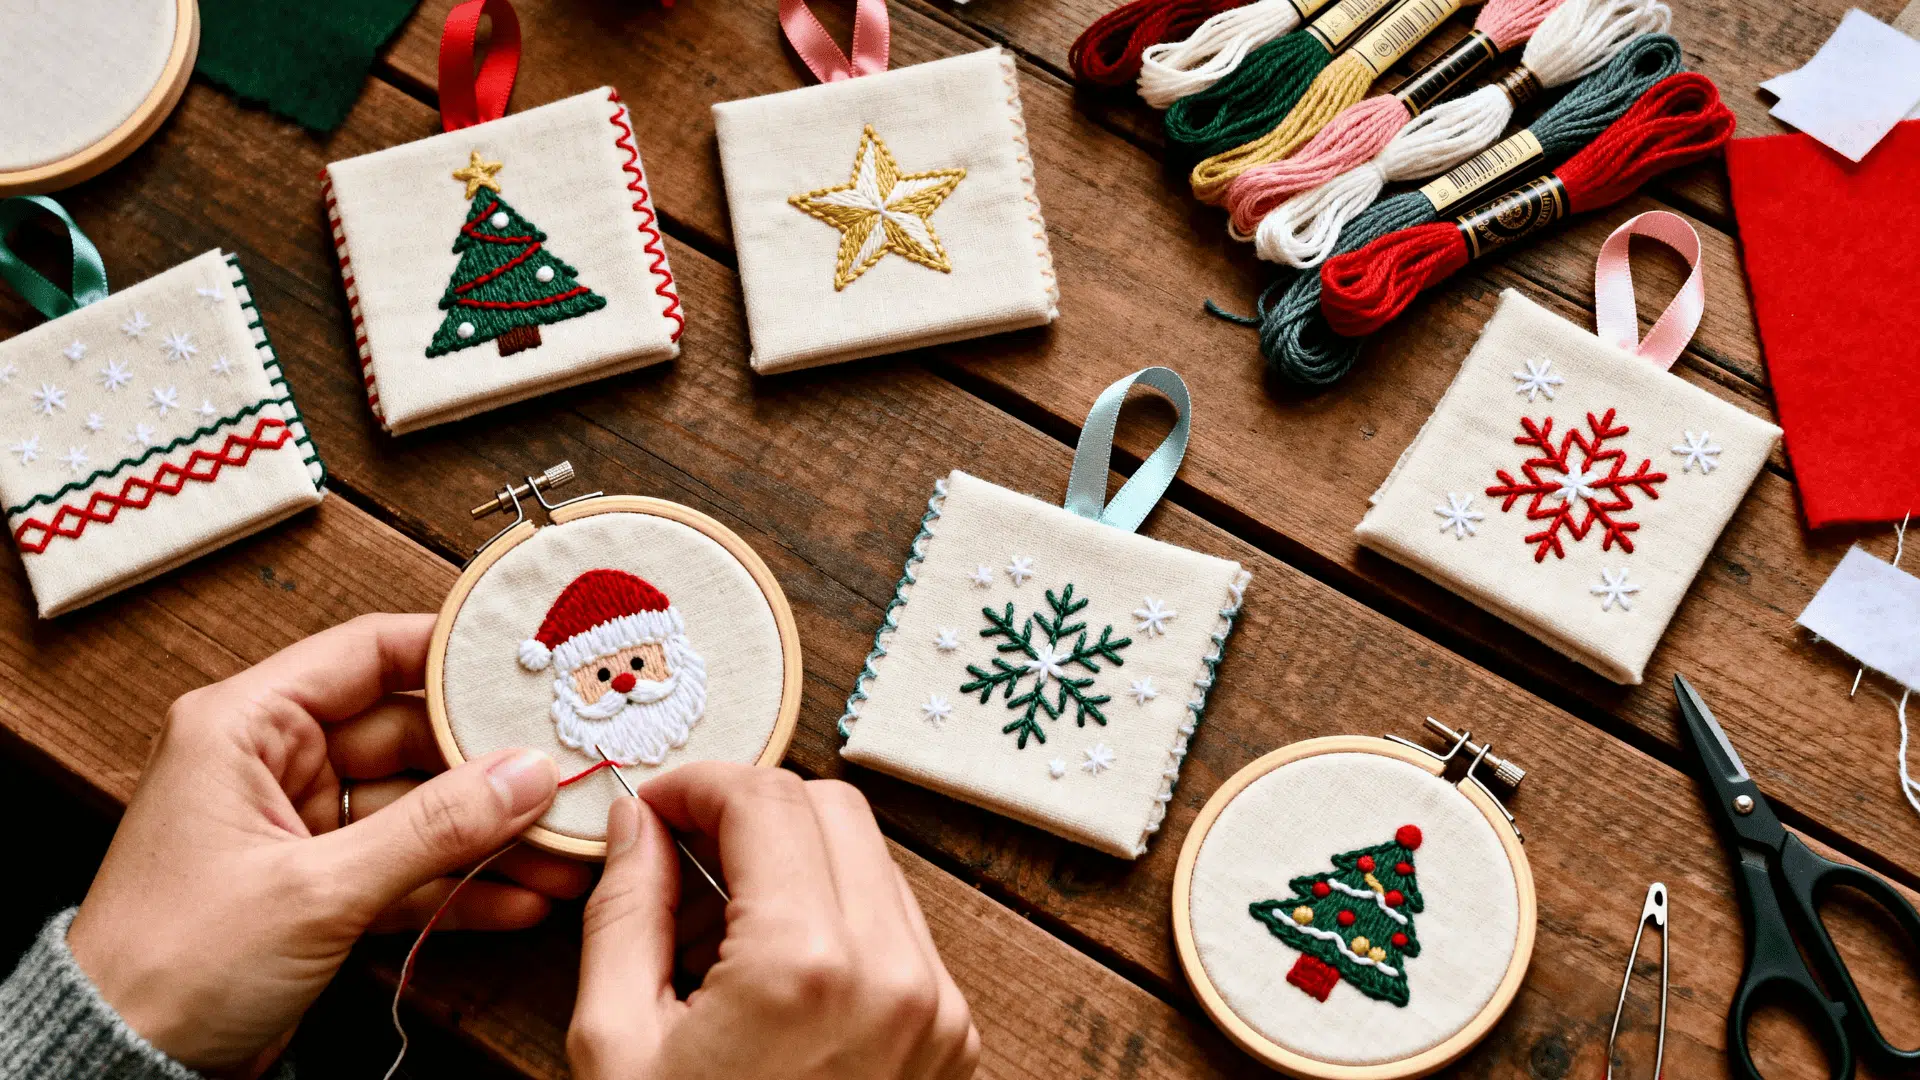
Stitch festive holiday designs onto fabric squares using embroidery floss and traditional stitching techniques. Secure the finished embroidery in 2-3 inch hoops, trim away excess fabric, and add ribbon hangers for charming handcrafted ornaments.
- Age Group: 12+ with basic embroidery skills, adults for complex patterns
- Safety: Supervise needle use; store sharp embroidery needles safely when not in use
- Time: 1-3 hours, depending on design complexity
Pro Tip: Transfer patterns onto fabric using water-soluble pens or iron-on transfers for perfectly centered designs every time.
16. Twig Star Bundles
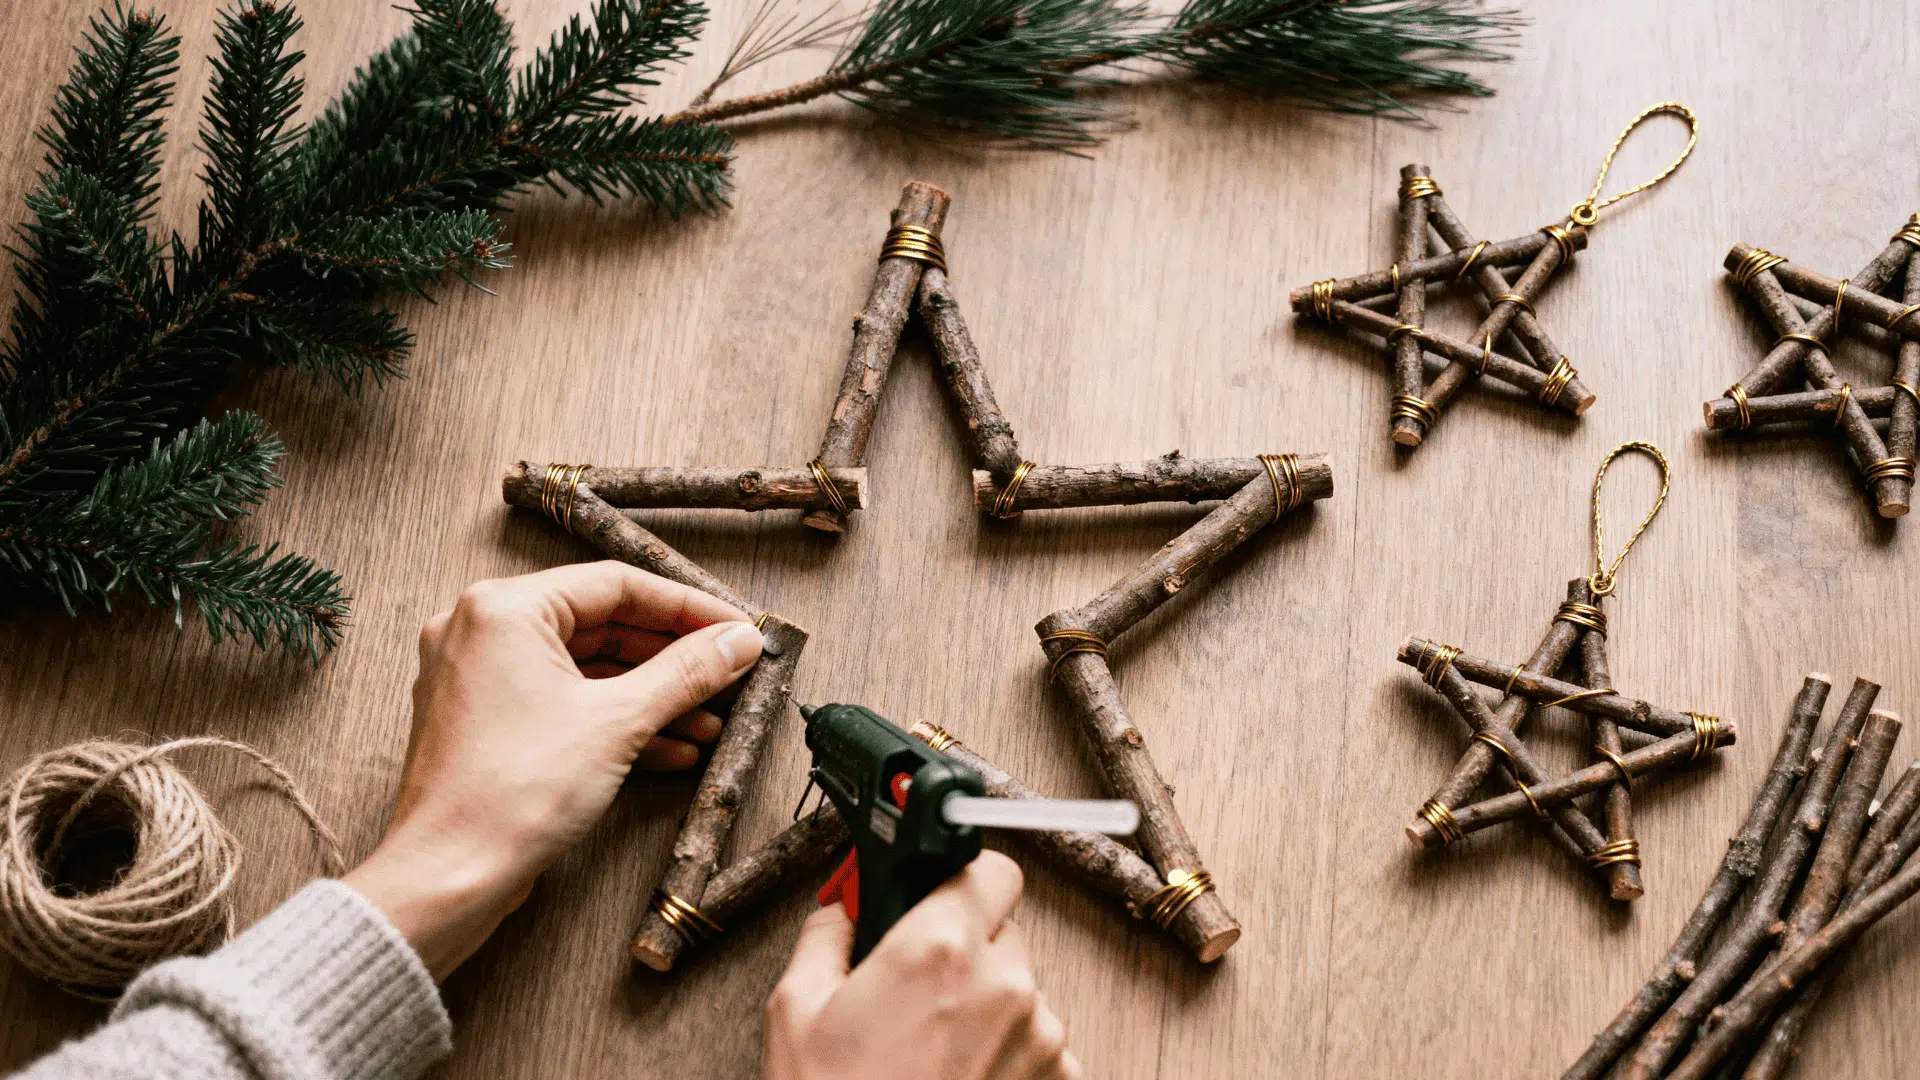
Collect five similar-sized twigs from your yard and arrange them in a five-pointed star shape. Secure all intersection points with hot glue, then wrap decoratively with gold wire or natural twine for rustic woodland ornaments.
- Age Group: 10+ with supervision, adults handle hot glue gun
- Safety: Inspect twigs for sharp ends or splinters; adult supervision required for hot glue
- Time: 15-25 minutes per star
Pro Tip: Choose dried twigs rather than fresh ones to prevent warping and cracking as they dry on your tree.
17. Lace-Covered Vintage Glass Balls
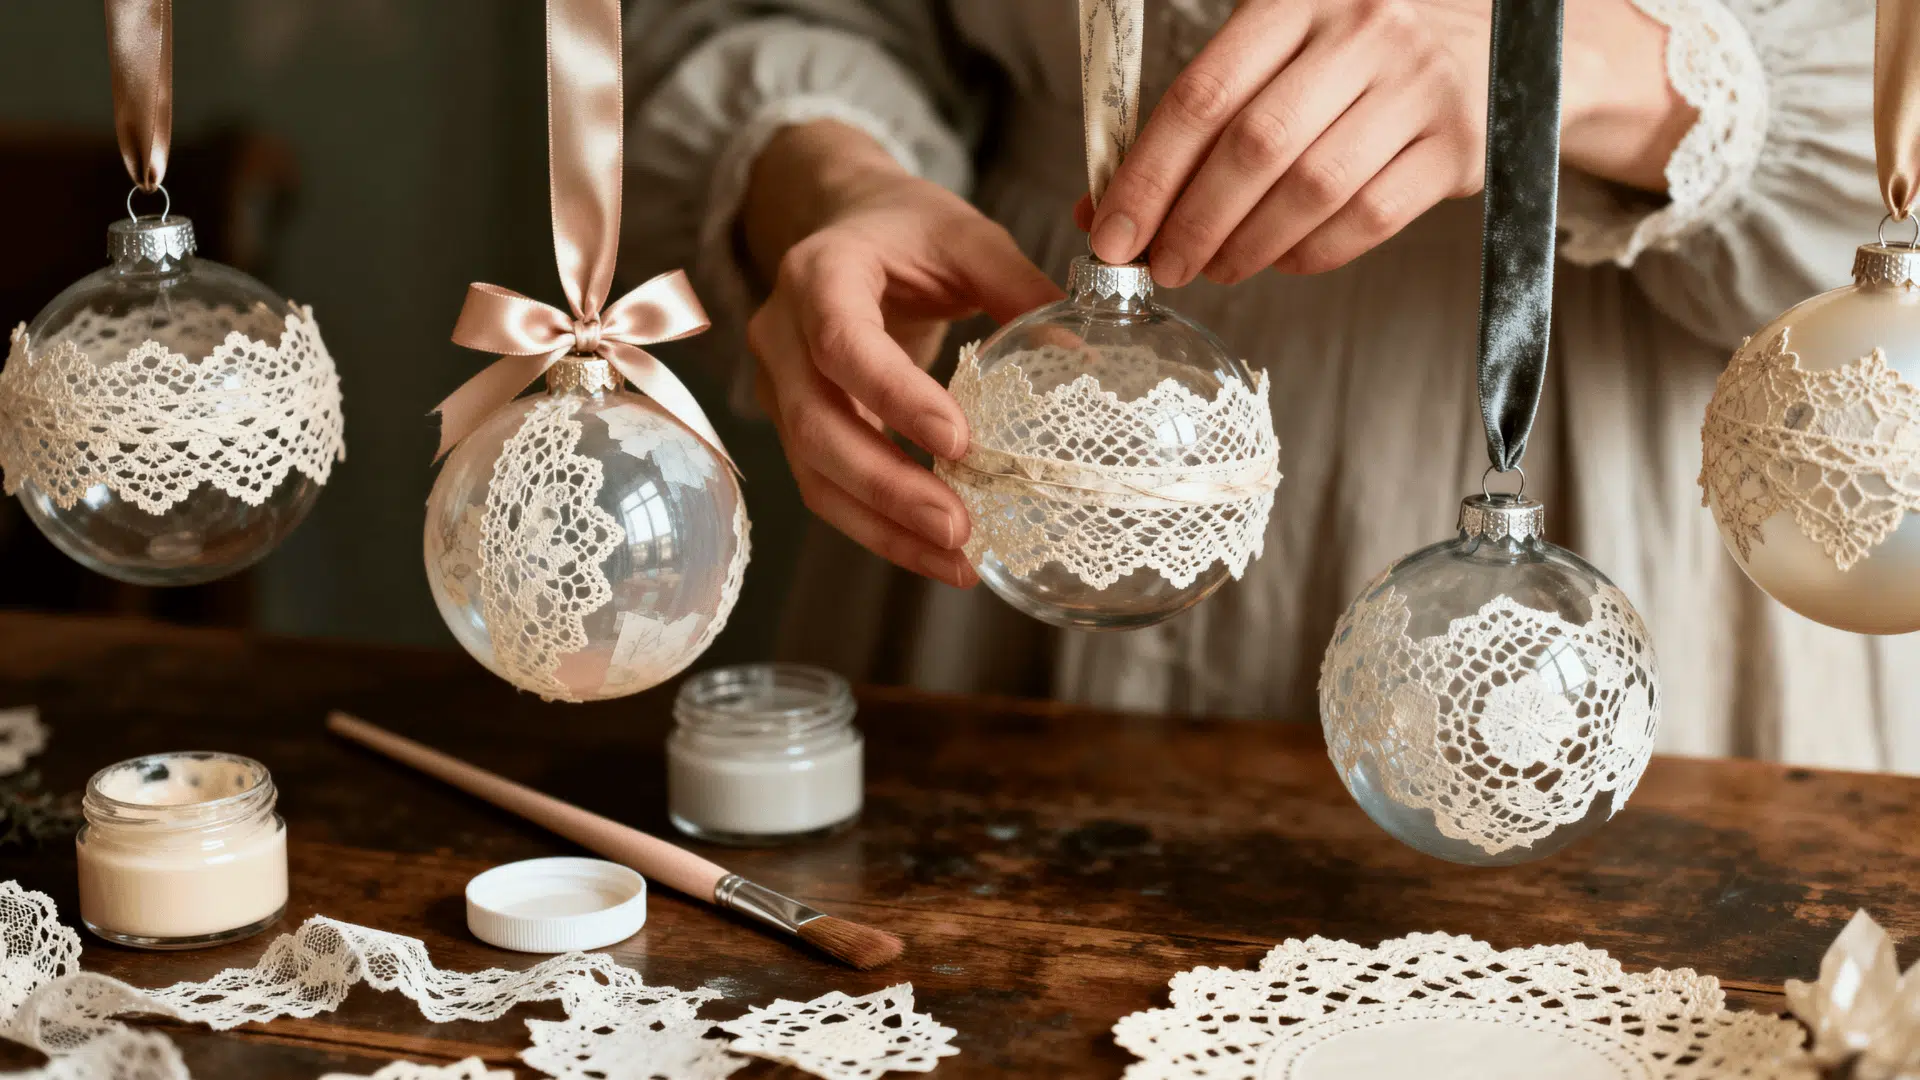
Adhere vintage lace pieces or delicate paper doilies to clear or solid-colored glass ornaments using decoupage medium; layer carefully for a graceful Victorian-inspired look that transforms plain ornaments into sophisticated keepsakes.
- Age Group: 14+ with steady hands for detailed work
- Safety: Handle glass ornaments carefully; work over a soft surface to prevent breakage
- Time: 45-60 minutes per ornament plus drying time
Pro Tip: Use a foam brush to apply decoupage medium smoothly without creating bubbles or wrinkles in the lace.
18. Polymer Clay Miniature Houses
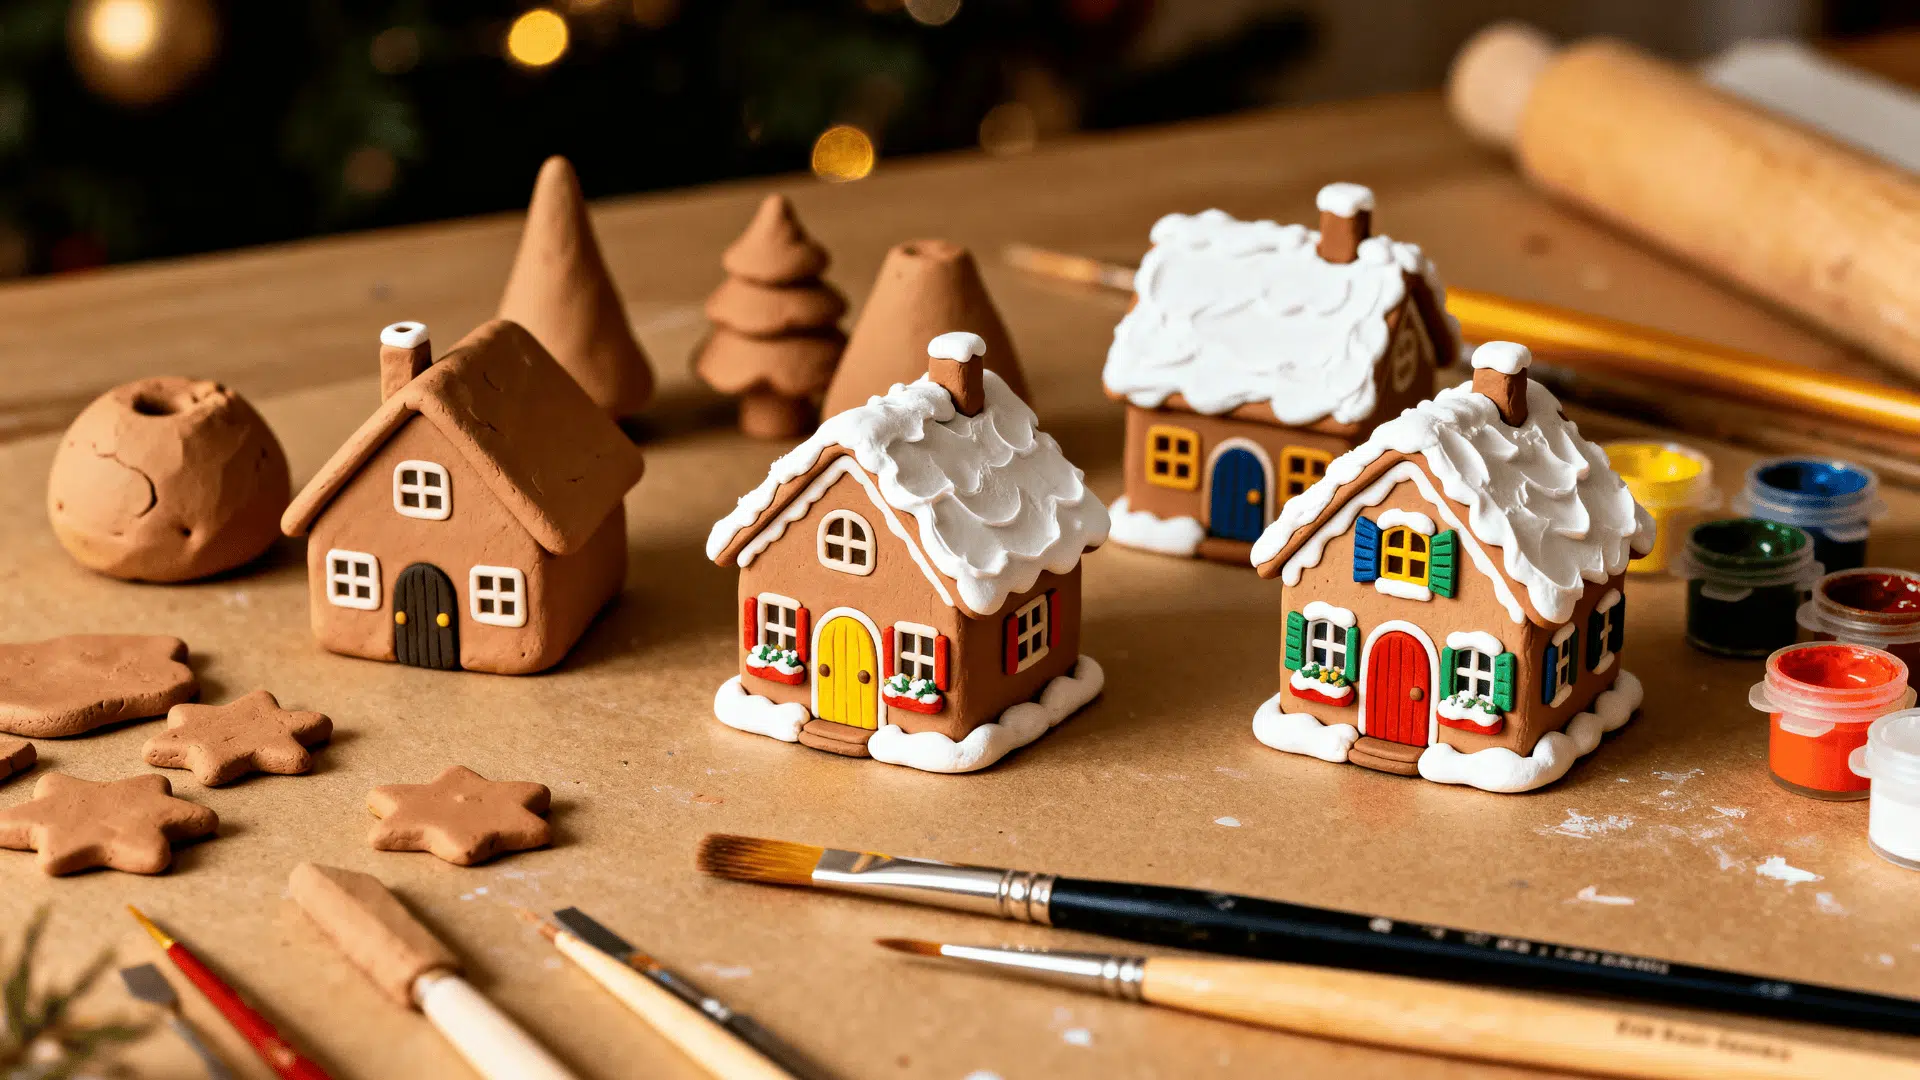
Mold polymer clay into tiny house shapes with roofs, doors, and windows, then bake according to package directions. Paint intricate details like colorful doors, shuttered windows, and add textured snow using thick white paint for whimsical village ornaments.
- Age Group: 12+ with clay sculpting experience, adult supervision for baking
- Safety: Adult supervision required for oven use; ensure adequate ventilation when baking polymer clay
- Time: 1-2 hours for sculpting and baking, plus painting time
Pro Tip: Bake clay pieces on parchment paper to prevent shiny spots and make them easier to remove from the baking sheet.
19. Macramé Mini Hangings
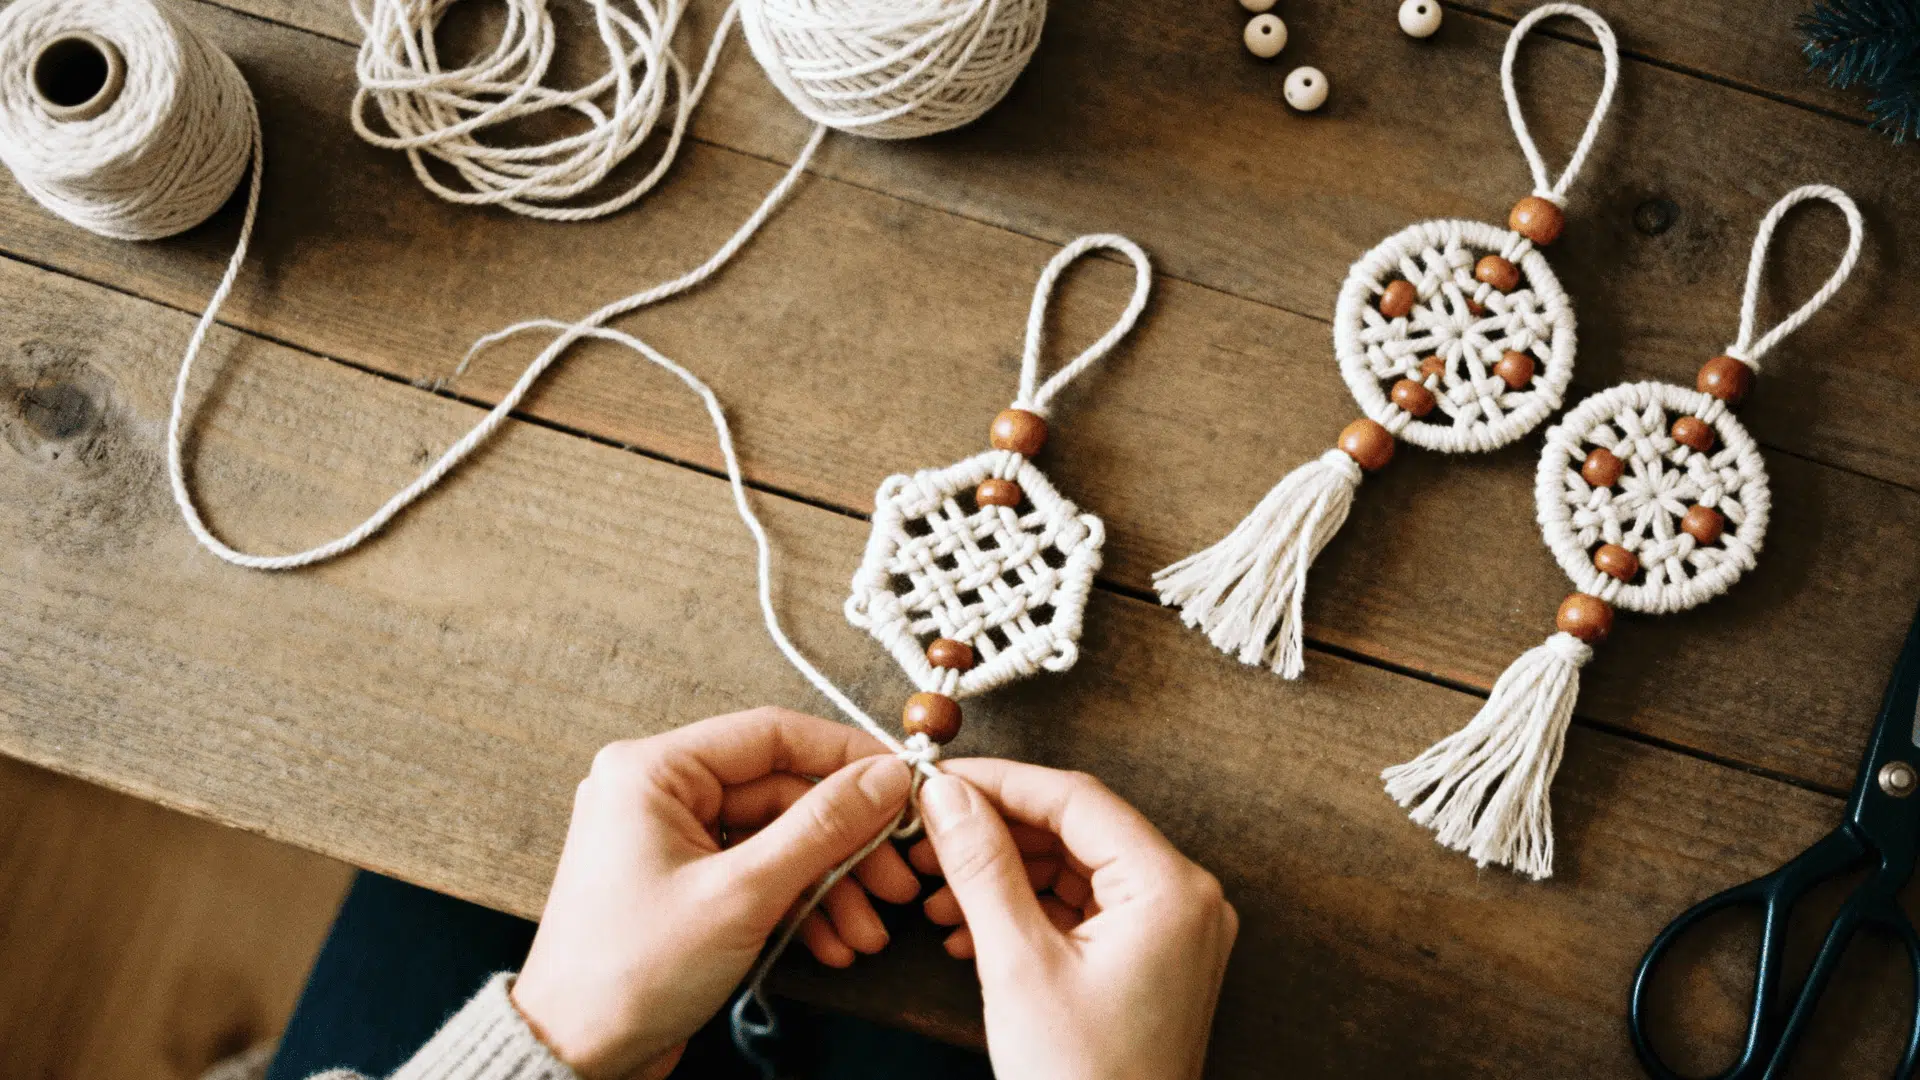
Create small macramé patterns using soft cotton cord and traditional knotting techniques like square knots and half hitches. Incorporate wooden beads throughout the design and finish with flowing tassel bottoms for bohemian-style tree decorations.
- Age Group: 14+ with patience for learning knotting techniques
- Safety: Keep cords organized to prevent tangling; supervise younger crafters with cord work
- Time: 1-2 hours, depending on pattern complexity
Pro Tip: Watch online macramé tutorials while working to master knot techniques and ensure consistent tension throughout your piece.
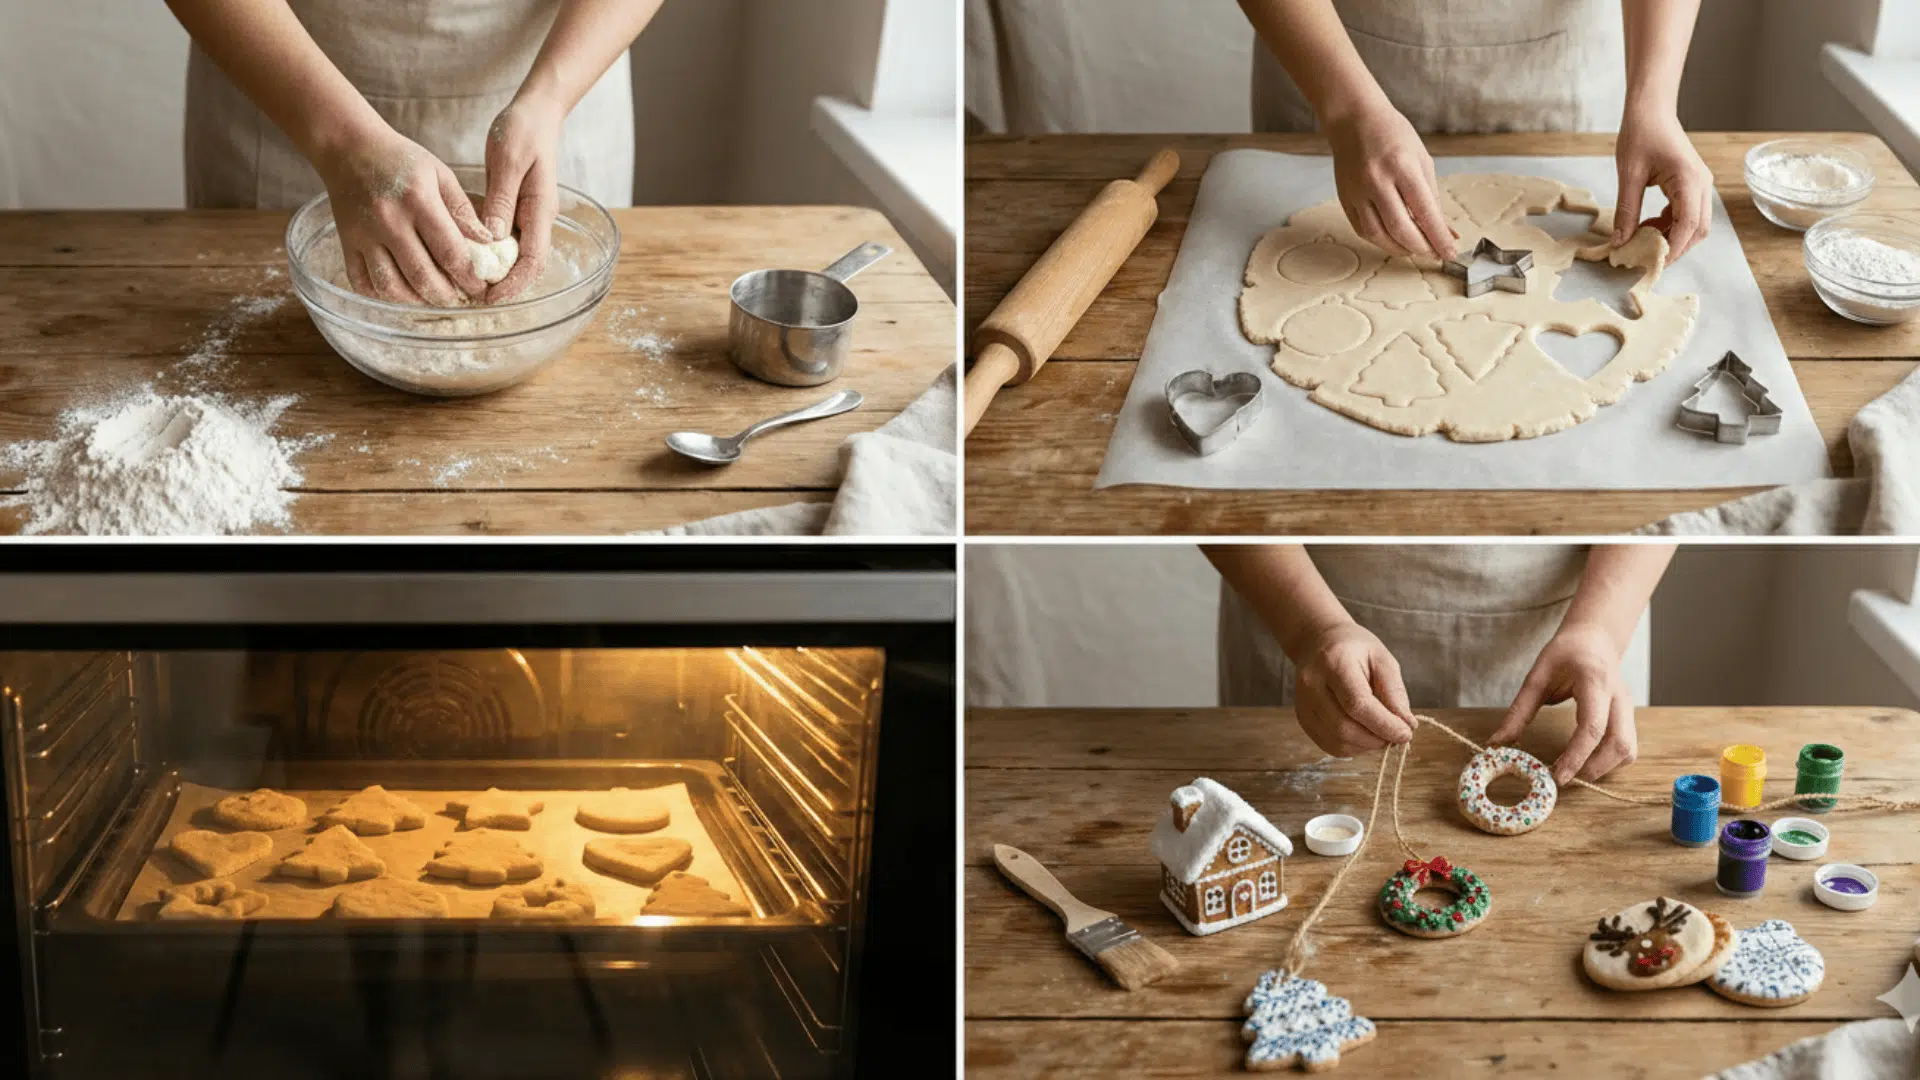
Step-by-Step Guide: How to Make Salt Dough Christmas Ornaments
Salt dough ornaments are the perfect beginner-friendly DIY project that requires only simple pantry ingredients. These charming keepsakes can be customized with paint and decorations, making them ideal for kids and adults alike.
Ingredients Needed:
Use these materials to make simple salt dough ornaments that can be shaped, baked, painted, and hung.
| MATERIAL | PURPOSE |
|---|---|
| All-purpose flour | Base of the dough |
| Salt | Strengthens the dough |
| Water | Binds ingredients |
| Cookie cutters | Shape designs |
| Straw or toothpick | Make hanging holes |
| Rolling pin | Flatten dough |
| Baking sheet + parchment | Bake safely |
| Acrylic paint & brushes | Decorate ornaments |
| Clear sealant spray | Protect finish |
| Ribbon | Hang ornaments |
Step-by-Step Guide
Follow this simple tutorial to create beautiful homemade ornaments that your family will treasure for years to come.
Step 1: Mix and Knead the Dough
Combine flour and salt in a large bowl, then slowly add water while stirring. Knead on a floured surface for 5-10 minutes until smooth and pliable. If the dough feels too sticky, add a tablespoon of flour at a time.
The dough should have a playdough-like consistency that doesn’t stick to your hands.
Step 2: Roll and Cut Shapes
Roll the dough to a 1/4-inch thickness using a rolling pin. Cut shapes with cookie cutters and use a straw to poke holes at the top.
Make sure holes are slightly larger than needed, as they’ll shrink during baking. Carefully transfer cut shapes to your prepared baking sheet using a spatula to prevent distortion.
Step 3: Bake the Ornaments
Place on parchment-lined baking sheet and bake at 250°F for 2-3 hours, flipping halfway. Let cool completely before decorating.
Ornaments should be completely hard and dry to the touch when done. If they still feel soft in the middle, bake for another 30 minutes and check again.
Step 4: Paint and Seal
Decorate with acrylic paints in desired colors and designs. Once dry, seal with clear spray and thread ribbon through holes for hanging.
Apply 2-3 light coats of sealant rather than one heavy coat for best protection. Let each coat dry for 15 minutes before adding the next layer.
Tips for Making Long-Lasting DIY Ornaments
Your handmade ornaments can last for decades with proper care and protection. Follow these simple tips to preserve your creations and enjoy them year after year.
- Seal your ornaments: Apply Mod Podge or clear acrylic spray to protect paper, fabric, and painted surfaces from moisture and fading.
- Store carefully: Wrap each ornament in tissue paper and pack in sturdy containers with dividers to prevent breakage during off-season storage.
- Reinforce hanging loops: Use strong wire, ribbon, or twine secured with hot glue to prevent ornaments from falling and breaking.
- Choose quality materials: Invest in durable supplies like wood, felt, and quality paints that won’t crack or deteriorate over time.
- Date your creations: Write the year on the back of each ornament to create a timeline of memories you’ll cherish as your collection grows.
Creative Ways to Display and Gift DIY Christmas Ornaments
Your handmade ornaments deserve to shine beyond the Christmas tree. Discover creative display ideas and thoughtful gifting options that showcase your beautiful creations all season long.
How to Display Homemade Christmas Ornaments
Change your DIY ornaments into stunning focal points throughout your home. These creative display ideas let you enjoy your handmade treasures in unexpected ways.
- Hang your best ornaments on prominent tree branches where guests will notice the handcrafted details.
- String ornaments together to create garlands for mantels, staircases, and doorways.
- Display ornaments in windows where sunlight creates beautiful shadow patterns and catches glitter.
- Attach multiple ornaments to a wreath form for a unique door decoration.
- Create an Advent calendar by hanging numbered ornaments that reveal daily surprises.
- Arrange ornaments in glass bowls or vases as festive table centerpieces.
DIY Christmas Ornament Gift Ideas
Handmade ornaments make meaningful gifts that recipients will treasure forever. Personalize your creations to mark special occasions and show loved ones you care.
- Create baby’s first Christmas ornaments with names, dates, and tiny handprints for new parents.
- Design wedding or anniversary ornaments featuring couples’ names and special dates.
- Craft housewarming ornaments shaped like their new home, with the address.
- Make teacher appreciation ornaments with their names and a heartfelt message.
- Build matching family ornament sets where each person gets a personalized design.
- Tie handmade ornaments onto gift packages as beautiful, reusable gift toppers.
Wrapping It Up
Creating DIY Christmas ornaments transforms your holiday season into something truly special. You’ve learned crafting techniques, preservation tips, and creative display ideas.
These handmade treasures bring families together while adding personal touches that store-bought decorations can’t match.
Your DIY ornaments create lasting traditions and family warmth. Start crafting memories that’ll shine on your tree for generations!


